
Operation Manual


9 t
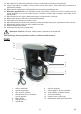
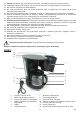
1. Slide the coffee pot with lid onto the hot plate. Make sure that the drip-stop (3) is pushed upwards during
this step.
2. Unwind the power cord (9) completely and connect the power plug to a suitable power outlet.
3. Make sure that the on/off switch I/0 (7) is in position I. The power indicator light goes on and the brewing
process begins.
4. While the coffee is brewing, you can temporarily remove the pot from the machine as the coffee machine
is equipped with a drip-stop system. Return the coffee pot after no longer than 30 seconds to prevent
the coffee in the lter from overowing.
5. Once all the water has run through the machine, set the on/off switch I/0 (7) to 0. The power indicator
light in the on/off switch I/0 (7) goes out and the machine switches itself off.
6. Pull the power plug out of the power outlet after each brewing process.
7. Wait about 1 minute and remove the coffee pot from the coffee maker to pour the coffee. Only touch the
coffee pot by the coffee pot handle (6).
TIPS FOR BETTER COFFEE
• Always clean the coffee machine according to the instructions in this manual.
• Always use fresh, cold water.
• Store coffee grounds in a cool, dry place. After opening a package, close it again and store it in the
refrigerator to preserve its aroma.
• For an optimal taste, buy coffee beans and ground them shortly before brewing.
• Do not reuse coffee grounds. Coffee should not be reheated as the aroma is at its best shortly after
brewing.
• Clean the coffee machine if you nd droplets of oil in the coffee. These oil droplets come from coffee.
• When you use heavily roasted coffee, then oil droplets will be found in the coffee more frequently.
CLEANING AND MAINTENANCE
Attention! Before cleaning, switch the device off and disconnect the power plug from the socket.
Attention! Do not use alcohol, acetone, benzene, scouring cleaning agents, etc., to clean the
synthetic parts of the device. Do not use hard brushes or metallic objects.
GENERAL
1. Make sure to follow the Safety Instructions carefully during cleaning.
2. Before each cleaning, unplug the device from the power outlet and let it cool down completely.
3. Swing the funnel (1) open. Remove the lter holder (13) from the pivotable funnel. Remove the paper
coffee lter from the lter holder and dispose of the coffee grounds environmentally friendly.
4. All removable parts can be cleaned under running warm water with a little dish soap.
5. Wipe off the coffee machine regularly with a slightly damp cloth. After that, dry off all parts thoroughly.
DECALCIFYING
1. The frequency of the decalcifying process depends on how often the coffee machine is used and with
which type of water (hard, soft). The harder the water is, the more often the coffee machine has to
be decalcied. Information regarding water hardness can usually be obtained from your local water
supplier.
2. As a rule, decalcify the coffee machine every 1 - 3 months, depending on the water hardness.
3. To do this, use the commercially available decalciers. Prepare the decalcier according to the
manufacturer’s instructions and let it run through the machine. This process may be repeated depending
on the hardness of the water. Never pour hot decalcier into the water tank!
4. Do not pour decalcier into an enamelled sink.
5. After decalcifying, let the brewing process run through 2-3 times with just clear water and without coffee.
Pour the processed water out each time.