
User Manual

_________________________________________________________________________
Document #7201-002, Rev C Page 9
After mounting the i-PORT, the antennas need to be installed and connected to the
appropriate antenna connectors.
Alignment of Antennas:
Align the antennas with the tags or the objects to be monitored. Linearly polarized
antennas must have the same polarization as the tags, either horizontal or vertical.
Circular polarized antennas are not dependent on the polarization of the tags.
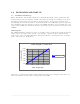
Based on the Orientation Diagram, an initial estimate of the read zone is possible. First set
the send range of the i-PORT. To do this, use the i-PORT’s blink mode (Note: Inhibit Time
must be set to “0”). With a test tag (with LED) in hand, walk off the read zone. As long as
the tag blinks, you are still within the zone. Reduce the i-Q Tx Power parameter as
required until the read zone has reached the desired size.
System Test:
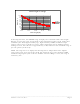
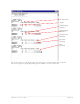
You can use the debug port to test the system and the range. Connect the i-PORT via
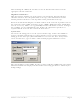
crossover network cable directly to a laptop computer. Create a Telnet connection by
dialing up on the debut port (Default IP-Address: 192.168.2.244, Port: 7090). Under
“Start” and “Execute”, type in “Telnet”. This terminal program will then be started.
Enter the IP-Address of the i-PORT, in order to connect with the i-PORT debug port. Debug
information will then be displayed on the monitor. The debug port must be activated (see
Debug Config).