Cable Shift Installation Instructions for: Ford Column to C-6 Transmission www.ididitinc.com ididit is... Your Steering Column Specialist For #’s 2802450010 ididit inc. 610 S. Maumee St.
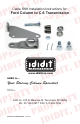
Your kit should contain the following parts: A.) Transmission Lever Bolt & Nut B.) Transmission Lever C.) Pan Bracket D.) Swivels E.) Cotter Pins F.) Spacers B. G.) Pan Bracket Bolts H.) Shift Cable I.) Two Piece Bracket J.) Horseshoe Bracket D. C. F. A. E. J. I. G. H. Before installation please read: You will need at least 2” of clearance between the firewall and lower shift lever for this product to function correctly. This transmission uses all Metric fasteners.
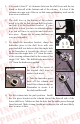
1. You need at least 2” of clearance between the shift lever and the toe board or firewall at the bottom end of the column. It is best if the column can come out of the car so that some preliminary work can be done on a workbench. 2. The shift lever at the bottom of the column needs to be flat so that you can drill two holes and bolt it to the horseshoe bracket. If your shift lever is bent, you have to either straighten it or you will have to cut it out and weld on a new piece.
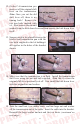
7. Reinstall the horseshoe bracket. It can either go on the top side of the column or below, it is your choice. Check for any brake pedal interference. 8. The cable is the next piece that you are looking for. Notice that both ends are the same. We did that so you could be right the first time. You will need to take the small nut and the rubber boots off so that you can get one large nut and washer off.
12. On the C-6 transmission you must cut off the original shift lever on the transmission. Note: Once you cut the old shift lever off, there is no turning back! Remove the two pan bolts marked with x’s. Also remove the nut and washer from the kick down lever and then remove the kick down lever itself. 13. Spacers need to be placed between the bracket and transmission pan with the two bolts supplied in the kit holding it all together in the holes of the bracket shown. 14.
15. (cont.) Rotate the shift lever clockwise to the Park position. Now you are going to put the swivel onto the threaded end of the cable and turn it until it lines up with the hole of the shift lever. Install the cotter pin. If it needs more travel, loosen the large nuts and washers and move the cable forward or backward to gain more travel. Then retighten the large nuts and washers. Install the small nut and tighten.
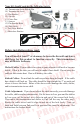
Think you may have forgotten something? Here’s what you may have missed: Add Ons: (Add Ons should be installed on the column prior to shipment) Cruise Control: Carbureted Engine or Fuel Injected Engine? Dimmer or Wiper: Dimmer/Wiper Kits will replace the original knobs and levers that come standard on an ididit column. This is a replacement lever with a push button at the end of the knob. The Dimmer/Wiper kit when pushed is either On or Off. Includes relay kit.
No part of this guide may be reprinted, reproduced or utilized in any form without the express written permission of ididit, inc. 2009 ididit, inc. All Rights Reserved Printed in the USA ididit, inc. 610 S. Maumee St., Tecumseh, MI 49286 (517) 424-0577 • (517) 424-7293 fax www.ididitinc.