
Manual


1. You need at least 2” of clearance between the shift lever and the toe
board or rewall at the bottom end of the column. It is best if the
column can come out of the car so that some preliminary work can be
done on a workbench.
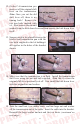
2. The shift lever at the bottom of the column
needs to be at so that you can drill two holes
and bolt it to the horseshoe bracket. If your
shift lever is bent, you have to either straighten
it or you will have to cut it out and weld on a
new piece. Please use the same thickness as
was used originally.
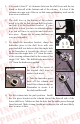
3. To install the horseshoe bracket, clamp the
horseshoe piece to the shift lever with vise
grips and drill two holes so that the single hole
in the horseshoe is towards the driver’s side.
Make sure the single hole is 2” from the center
of the steering column shaft to the center of the
single 5/16” hole. The drilled holes need to be
1/4” from the hardware supplied.
4. Trim off the excess of
the original shift lever to
make it look nicer.
5. Take the horseshoe piece
back off the column and
install the column in the car.
Remember to secure it at
the dash and rewall!
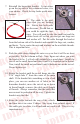
6. Put the column into the park position. Install
the two piece bracket on the column toward the rewall side of the
lower shift lever. Make sure that the hole that the cable passes through
faces forward. Make it snug, but do not tighten as you will most likely
have to move it later.
2