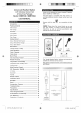
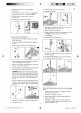
a Advanced Weather Station with Wireless Sensor Set & Mounting Package Model: WMR100 / WMR100A USER MANUAL Introduction .. Packing Contents Wind Rain Gauge Overview LCD Display Wind Sensor . RAIN GAUGE ooh eve Getting Started Set up Remote Wind Sensor Set up Remote Rain Gauge Set up Base Station Base Station Chang Display ! Melting Clock Reception Clock | Calendar Clock Alarm...
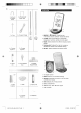
x Round U-Shaped Bolts Screws {Type A) 3 x Tension Strings 2 x Screws {Type B) 1x 1x Mid| Bottom Pole Pole 43% UM-3 Cone-Shaped £nd 1 x Plastic Support Base 1 x Air Collector 1 x Filter 2X UM-37 AA 4 x Strews 6 x Washers (Type C} 2 ® psa 1 2. “ees .
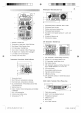
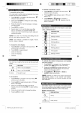
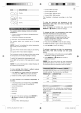
SHG [yeu Goriness Bh seediness, | Michigander eee IEEE HEEL BEAR 1. Weather Forecast Area Temperature / Heat Index { Wind Chill Area . Wind Speed / Wind Direction Area UVI/ Barometer / Rainfall Area . Clock / Alarm / Calendar / Moon Phase Area AC adapter icon displays wham unplugged . Low colliery icon for base station Humidity / Dew Point Area Nm A wom @ Temperature / Heat Index / Wind Chill Area HEAT WIND 5 El NEE . Temperature trend 2. Wind Chill level temperature is showing 3.
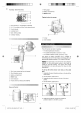
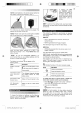
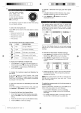
@ z Humidity / Dew Point Area 1 pm—1 BEN Both (INT TRE . Dew point level Temperature is showing . SILO humidity and Dew Point alarms are set . Comfort levels . Humidity trend WAX MIN humidity Humidity reading Dons wm . Wind vane measuring the wind speed . Wind direction sensor Battery compartment . RESET hole Nat indicator . Plastic sleeve protecting the batteries 8 ® oo» Base and funnel 4 @® be EEE 1. Rain gauges 2. Battery compartment 3. RESET button: Tipping bucket rain gauge 1. Funnel 2.
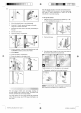
@ Slide the sleeve down to open the battery compartment Insert batteries (4 x UM-3/ AA} in the compartment, matching the polarity (+ / -) and press RESET. . Slide the protective sleeve up to close the compartment. . Rotate the sleeve to the right to luck. To set up the steel pole support: 10. Assemble the top pole to the mid-pole. 11. Use the screw to fix, 12. Assemble the wing sensor main body on top of the poi. Use the screw (Type A) to fix 13.
5 Mount the plastic base on an existing pole. 8. Using the 2 U-bolts, secures the base on the pole using the 4 washers and bolts, 7. Assemble the wind sensor main body horizontally to the plea. 8 Use the screw to fix. 9. Open the battery compartment. 10. Using a compass, rotate ihe wind direction part until the NORTH indicator points fo the "North". 11. Press RESET. 12. Close the battery compartment. 13.
NOTE" Install batteries in the remote sensor before the base station matching the polarities {+ and For continuous Use, please install the AC adapter. The batteries are for back-up use only. NOTE" Please make sure the casket-outiet is installed near tha equipment and is easily accessible. install the base station patisseries (4 x UM-3 / AA} matching the polarity + and -. Press RESET after each battery change. “NOTE Do not use rechargeable batteries.
To manually set the clock: {¥ou only need to set the clock and calendar if you have disabled the clock radio reception.) 1, Press SELECT fo navigate to the Clock Area. will show next to the Area. 2. Press and hold MODE to change the sock sating Tre setting will blink 3. Rotate the di the setting value. 4. Press MODE to confirm, §. Repeat steps 110 § to set the time zone offset hour {+ /-23 hours), 12 / 24 hour format, hour, minute, year, date / north format, month, date and weekday language.
a 36 Cloudy Rainy Snowy TEMPERATURE AND HUMIDITY The weather station displays indoor and outdoor readings for: 1. Current, minimum and maximum temperatures and relative humidity, 2. Cam fart level indicator and trend line. 5. Heat index, wind chill and dew point level. The weather station can connect up io 10 remote Assessors, NOTE! Channel 1 is dedicated for outdoor temperature and humidity in the wind sensor. Li shows which remote sensor's data you are viewing, t appears when indoor data is displayed.
Law & The base station provides wind speed and wind contraction information IN To read the wind direction i € find the compass point the pointing to, The timestamp records the date and time when storing the wind speed readings. To select the wind speed unit; Press UNIT {at the bottom of the base station) to switch doa.
The UV index levels are as follows: UV INDEX DANGER LEVEL CON LOW MED HI V.HI EX. Hi Very high | Extremely high 810 | 11 and above To change the high UV alarm: 1. in the UV / Barometer / Rainfall Area and UVI reading display. Press and hold ALARM to enter the high UV alarm setting. 2. Rotate the dial left or right to sel the desired values. 3. Crass ALARM to confirm the settings.
System requirements PROBLEM SYMPTOM REMEDY The minimum system requirements for use of the "Virtual Temp Shows “LLL or | Temperature is Heather Station” software is: “HHH” out-orange «Operating system: Microsoft Windows 98 or above Remote Carnot locate | 1. Check + Processor Pentium I 168Mhz or above sensor remote sensor | batteries + RAM: Min 84Mb : 2.
188 mm Dimensions 143 x 88x LxWxH) (5.6 inches) Weight 3004 (0.66 Iba) without battery mb/hPa, in Hg and mm Hg 700 105Cmb/rPa Barometer unit Measuring range mb/hPa Resolution mb (0.0 in Hg} Altitude setting Sea level User setting for compensation Sunny, Partly Cloudy, Cloudy, Rainy and Snowy Historical data and bar chart for last Zithers Weather display Mamore CIF 40°C to 50°C Temp. unit Displayed range, Operating ranges.
UT OREGON SCIENTIFIC Visit our website (www. oregonscisniific.conm) to meal more about Oregon Scientific products such as digital cameras, MP3 players: children’s electronic leaning products and games; projection clocks; health and the gear, weather stations; and digital and conference phones. The website also includes contact information for cur Customer Care department in case you need to reach us, as well as frequently asked questions and customer downloads.
| + Advanced Weather Station with Wireless Sensor Set & Mounting Package Model: WMR100 / WMR100A USER MANUAL 0) B15/08 4:26:34 PM