
Operating Instructions and Installation Instructions


9
Installation
The minimum distance between the supporting surface for the
cooking vessels on the hob and the lowest part of the range
hood must be not less than 60cm from electric cookers and
75cm from gas or mixed cookers.
If the instructions for installation for the gas hob specify a
greater distance, this must be adhered to.
Electrical connection
The mains power supply must correspond to the rating
indicated on the plate situated inside the hood. If provided with
a plug connect the hood to a socket in compliance with current
regulations and positioned in an accessible area. If it not fitted
with a plug (direct mains connection) or if the plug is not
located in an accessible area apply a bi-polar switch in
accordance with standards which assures the complete
disconnection of the mains under conditions relating to over-
current category III, in accordance with installation instructions.
Warning! Before re-connecting the hood circuit to the mains
supply and checking the efficient function, always check that
the mains cable is correctly assembled.
Warning! Power cable replacement must be undertaken by
the authorized service assistance centre or similar qualified
person.
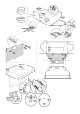
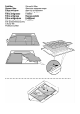
Mounting
The cooker hood may be installed on the wall or on the base
of a cabinet; if supplied, use the hole gauge H to drill the
correct distance, otherwise lean the cooker hood on the wall
or on the base of the cabinet and mark the holes with a pencil.
Wall mounting - Insert the wall screw anchors J in the drilled
holes and the two K screws in the upper drill holes, remove
the grill and hook the cooker hood to the 2 screws, finally from
the inside, insert the third screw L and lock them all in.
Cabinet fixing - Affix the cooker hood with the 4 M screws
from inside the cabinet.
Operation
The hood is fitted with a control panel with aspiration speed
selection control and a light switch to control cooking area
lights.
Use the high suction speed in cases of concentrated kitchen
vapours. It is recommended that the cooker hood suction is
switched on for 5 minutes prior to cooking and to leave in
operation during cooking and for another 15 minutes
approximately after terminating cooking.
Always open the vapour catcher N*.
If your product is provided with an electrically or mechanically
activated valve, the keys and/or the buttons and/or the
handles available are for controlling the lights and for opening
and closing the valve.
Maintenance
ATTENTION! Before performing any maintenance operation,
isolate the hood from the electrical supply by switching off at
the connector and removing the connector fuse.
Or if the appliance has been connected through a plug and
socket, then the plug must be removed from the socket.
Cleaning
The cooker hood should be cleaned regularly (at least with the
same frequency with which you carry out maintenance of the
fat filters) internally and externally. Clean using the cloth
dampened with neutral liquid detergent. Do not use abrasive
products. DO NOT USE ALCOHOL!
WARNING: Failure to carry out the basic cleaning
recommendations of the cooker hood and replacement of the
filters may cause fire risks.
Therefore, we recommend oserving these instructions.
The manufacturer declines all responsibility for any damage to
the motor or any fire damage linked to inappropriate
maintenance or failure to observe the above safety
recommendations.
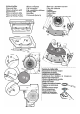
Grease filter
Traps cooking grease particles.
If situated inside the support grill, it may be one of the
following types:
Paper filter must be replaced once a month or if colouring
appears on upper side, in such cases the colouring is evident
through the grill openings.
Sponge filter should be washed with hot soapy water once a
month and replaced every 5 to 6 washes.
Metallic filter must be cleaned once a month, with non
abrasive detergents, by hand or in dishwasher on low
temperature and short cycle.
When washed in a dishwasher, the grease filter may discolour
slightly, but this does not affect its filtering capacity.
In order to remove the grease filter open the grill via the P
hooks and free the R1 or R2 stoppers.
The self-supporting metal filter does not include a support
grill, in order to remove the filter – pull the release springs P4
backwards and slide the filter downwards.