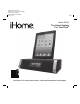
iDN45 IB_US version Size: 178 x 178 mm (13 pages) Printing color: Black Mat’l: 90gsm book paper Jan. 9, 13. P1 Model iDN45 The Home System For Your iPad® Questions? For latest instructions, visit www.ihomeaudio.
P2 Table of Contents Controls and Indicators / Display........................................................................................................................................1 Quick Start..........................................................................................................................................................................2 Using the unit ..........................................................................................................................
P3 Controls and Indicators Top Panel Flexible 30 pin connector for iPad/iPhone/iPod Rubberized device rest USB Play/Pause Button Nap Button Alarm 1 Button Alarm 2 Button Radio Preset Button Clock Button usb nap radio preset eq sleep Lower/Raise Volume Button mode Alarm Reset / Power Button dock Set –/+ Button, skip/search FWD/REV Sleep Button EQ Button Mode Button snooze/dimmer 30 pin Dock Play/Pause Button Snooze/Dimmer Button USB Charging and Playing Port Rear Panel DC Jack Aux line-in J
P4 quick start 1: Power 2: docking your iPad/iPhone/iPod in the 30-pin connector RESET RESET TEST T EST DC 12V, 2.7A iPod/iPhone line-in Gently dock your iPad, iPhone or iPod onto the 30-pin dock on top of the unit. The iPad, iPhone or iPod will charge while docked. Press the Dock Button on the unit to play your iPad, iPhone or iPod. The 30-pin connector is not compatible with iPhone 5 and new iPad models.
P5 Using the Unit Connecting the Unit to Power Source Connect the AC adaptor cable plug into the DC jack on the back of the system, then plug the AC adaptor into the wall outlet. Adaptor must be plugged in to operate unit. The unit does not operate on battery (a battery back up system maintains clock settings during power failures). Updating your iDN45 firmware For best performance, make sure to update the iDN45 firmware. To do so, download the free iHome Set app from the App Store.
P6 Using the Alarms This unit has a dual alarm system so you can set two separate alarms to different alarm times, wake-to sources and schedules (daily, weekdays or weekend).Tip: Download the free iHome Set app for advanced alarm, snooze and sleep functions. Setting the Alarms Note: Alarm 1 and Alarm 2 are set the same way; Alarm Button below means the button ( or ) for whichever alarm you are setting. 1. Press and hold the or Button until the alarm time flashes on the lower part of the display.
P7 Sure Alarm The unit has a sure alarm feature so the buzzer alarm still sound in the event of a power failure, if the backup battery is installed (see page 7). If your iPad/iPhone/iPod has no sound for 35 seconds or is not present, the unit will switch to buzzer alarm automatically.
P8 Using the Unit in Other Countries Different regions of the world use different FM radio frequency steps and ranges. You will need to select the one that matches the standards in your region (USA, EUROPE, JAPAN, AUSTRALIA, or CHINA). The default setting is USA; if you live in the US, you may skip this section. 1. Make sure the unit is OFF (not playing in any mode). Press and hold the Mode Button for about 5 seconds until “Radio xxx” appears in the lower part of display.
P9 Dimmer Operation During normal operation, press and release the Snooze/Dimmer Button to control the brightness of the LCD display. Replacing Clock Backup Battery The unit comes with 1 CR2450 back-up battery installed to provide continuous alarm operation and clock settings in the event of a power failure. Remove the battery pull tab before use. When the Battery Low Icon located on the lower right of the display is flashing, it is time to replace the back-up battery.
P10 A Consumer Guide to Product Safety IMPORTANT SAFETY INSTRUCTIONS When used in the directed manner, this unit has been designed and manufactured to ensure your personal safety. However, improper use can result in potential electrical shock or fire hazards. Please read all safety and operating instructions carefully before installation and use, and keep these instructions handy for future reference. Take special note of all warnings listed in these instructions and on the unit. 1.
P11 Troubleshooting Symptom Possible Problem Solution Unit does not turn on AC adaptor isn't plugged into a working wall socket or not plugged into the power supply jack on back of the unit Plug the AC adaptor into a working wall socket and plug the connector into the supply jack on the unit Unit doesn’t respond Unit requires a reset If unit is plugged in and doesn't respond, try resetting the unit by following these steps: a) remove iPad/iPhone/iPod from dock b) unplug unit from power source c) re
P12 Troubleshooting Symptom Sound is distorted Possible Problem Solution Volume level is set too high Decrease the volume Sound source is distorted If the iPad/iPhone/iPod original sound source (MP3) is old or of poor quality, distortion and noise are easily noticed with high-power speakers. Try a different file from a trusted source such as iTunes. If you are using an external sound source like older generation of iPod or iPod Shuffle, try reducing the output volume on the device itself.
P13 Limited 1 Year Warranty Information iHome Products, a division of SDI Technologies Inc. (hereafter referred to as SDI), warrants this product to be free from defects in workmanship and materials, under normal use and conditions, for a period of one (1) year from the date of original purchase. Should this product fail to function in a satisfactory manner, it is best to first return it to the store where it was originally purchased.