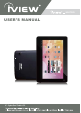
900TPCII USER’S MANUAL USB iVIEW-900TPCII DC-5V 2A CA RD REA DER RESET 9" CyberPad Tablet PC
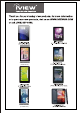
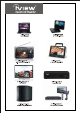
iVIEW-900TPCII (9 Tablet PC) iVIEW-754TPC (7 Tablet PC)
iVIEW's new 9'' CyberPad 900TPCII Tablet PC is the next generation of mobile internet device, providing access to the web, customization through Android Apps, and viewing of multimedia content.
Content 1.Appearance and button................................................................... 2 2.Start-up and shut-down................................................................... 4 3.Desktop...........................................................................................5 4.Buttons........................................................................................... .6 5.Main menu operation...................................................................... 7 system settings..
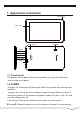
Preparation 1. Appearance and button Front camera Touch panel Back camera Speaker Power Earphone jack iVIEW-900TPCII 2A CA RD REA DER Reset DC-5V Card reader USB USB DC-5V RESET 1.1 Touch panel 9”Capacitive touch panel: During the operation, you can click and drag items on the touch panel. 1.2 POWER To power on: Press and hold the power button, the system will enter the main interface.
1.3 ESC Short Press ESC button will return to the last interface, long Press ESC button will return to the main interface. 1.4 Volume +, VolumeThe buttons Volume +/Volume located on the side of the tablet which allow to adjust volume. 1.5 Earphone jack 3.5 mm standard earphone jack. 1.6 Card Reader Video output interface. 1.7 Micro SD Card Card Reader Slot: External micro SD card. 1.
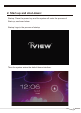
2. Start-up and shut-down: Preparation Startup: Press the power key and the system will enter the process of Start-up, as shown below: Startup Logo,in the process of startup Then the system enters the default home interface.
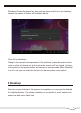
Shutdown:Press the power key then pop-up options will be on the desktop, choose the option of Power off as shown below. Click OK to shutdown Sleep:In the normal state operation of the machine, press the power button, enter a state of dormancy, at this time,the screen will be closed. Another short press on the power button will resume to normal mode.When CyberPad is not in use you can start this function to reduce power consumption. 3.
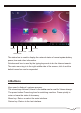
Return volumeView Records Content volume+ Home Screen The status bar is used to display the network status of current system,battery power,time and other information. Quick search box is used by the typing keywords to do the Internet search. The main menu tag is in the right middle side of the screen, click it and the default menu bar can be expanded. 4.Buttons Keys used in Android systems process: The volume keys:Volume+,Volume- in the taskbar can be used for Volume change.
5.
Select the relevant items to do corresponding operation,for example: * Wireless&network * Sound&Display * Date&Time * The equipment and so on Time/Date setting: In the interface of the setting, select "the time and date settings" to enter the date and time settings interface: You can choose the automatic mode by using the network time .
Select"done". if the input number is legitimate, then the operation is successful,and the system will use the new settings. Brightness: In the setting of the interface to select "display settings" into the display settings interface,roll drop-down lists to select "Brightness" as appeared in the following dialogue.
Screen standby: Screen standby: You can set the time for the screen standby function to occur. After it starts it will lock the screen the screen saver appears. In the setting of the interface to select "display settings" into the display settings interface, roll drop-down lists to select"screen standby: as appeared in the following interface. Note: During video playback,the screen standby function is automatically inhibited.
In the WIFI" interface(Pictured above),by click on the WIFI column you can open and close the WIFI function. Click "network notification" to list the wireless router that is searched by Cyberpad .Click the searched wireless router and setup window will pop-up. follow the prompts to complete the WIFI network links.
After you connected WI-FI as shown above, the following image will appear: Install, unload,run the application *Android installation: There are a variety of ways to install applications, for example, you can click on the Apk file directly and it will automatically be installed. in case that it is the third party programs installation the system may identify it as unsafe and will need the following procedures for installation with the assistance of the Appinstaller.
4.Press"Unknown sources" and then "OK" the following image will appear.
Storage Remove TF card, view of the available storage space.
【Remark】: pls touch option”delete SD card”, so that can safety to romeve SD card. Language & keyboard Setting: (Language), text input and automatic error correction options; Select Language: 54 kind of national languages are available. Remark: Android system can support 54 kind of language, now manu interface just suport 14 language.
The first time to enter the program installation, the system defaults NAND Flash as the search directory . If your APK setup application is on Micro SD card. The system will automatically search the directory from Micro SD Card .
Install the searched application The user can do on-line installation through"market", or download and install by the computer,or through a built-in browser download and install online. *Uninstall the application: You can use the third party software management tools or use the built-in Android application management software. Select"Settings"/"application"/"management application", and select the corresponding installed applications to check the program.
6.Network Webpage browsing: When the network is connected ,open the webpage browser and enter the URL, you can browse.
Online video: Users can use the "market"or other ways to download online video player software,online TV player software,online music software, and then install in the machine. To open the installed software,you can watch online video or online TV,and listen to online radio. 7.Music playback Click on the "music"icon in the main menu,and then enter the music player interface.
8.Video playback: Click on the "Video player" in the main menu,to enter the "Super-HD player" main interface. It lists all video files and image files as shown below: Select the video file and enter the video playing interface,as shown below. Select "play","stop","fast forward","rewind","progress" and other control keys to control the payback schedule.
9. Photo browse Click on the main menu"Super-HD player"to enter the"Super-HD player" interface.It lists all the picture files and video files as shown below: Select a picture file; enter the picture play interface, as shown below. Select"zoom","narrow" "set" and"delete" operation.
10. Wallpaper The system supports static wallpaper, and 3D wallpaper. In the desktop interface, press down the Menu key for pop-up menu options, select "wallpaper"and" choose the wallpaper source" selection box: There are the following options: Select " wallpaper" to customize wallpaper.
Select the "dynamic wallpaper"to use the system-supplied 3D wallpaper. Select the"Gallery"to choose a picture supplied by the system as the static wallpaper. Or press on the screen and dialog box for the following to pop: Into the above dialog box, click on the "wallpaper"set; The following options will display: Select"wallpaper"to customize wallpaper. Select the "dynamic wallpaper"to use the system-supplied 3D wallpaper.
Select the "recording" button to record and after recording is completed press"stop" button . At this time you can select the "play" button to play the recorded sound. Select"Use this recording"button to save the recording, so that you can find the corresponding audio files in "NAND"; if you do not need to save ,you can select the "give up" button. 12.
Click on shutter in the camera 13. E-mail Click on the “e-mail” icon in the main menu to enter email client . Allocation of account information will be required the first time. As shown below: Email requires network support. Make sure that network link is normal. Here we take whhpwjh@126.
In the email address bar,enter your valid email address:whhpwjh@126.com In the email address bar,enter your valid password:******** Then you can choose the “next”, account type selection interface will appear as shown below: Choose POP3 account .
The POP3 server:Default is “126.com”,and should be modified as “pop.126.com” The port number is “110” Then select the “next”, you will enter the “inspection acceptance server settings”, if set up correctly ,there will be a “foreign server settings” interface as follows: In the column”name”,input the name you want to display in the outgoing message, and then click “finish”button,you can enter the mail interface. It will load the mail automatically; Select one of the column to be viewed in the message.
14. External device USB connection Enter “setting”>”Developer options”>”Choose USB work pattern: OTG/HOST/SLAVE…….. Using USB to connect the Cyberpad and PC, the default connection mode is a synchronous mode. You can drag the status bar to drop, appeared as the following interface: Click into the USB connection hints. “USB connected”: It means that the external memory(SD) loading is completed , and you can see the corresponding letter in the PC terminal.
OTG use CyberPad supports FAT32 format mobile devices such as U disk and mobile hard disk. The plug-and-play connection method: Use the OTG wire to connect the Tablet PC USB OTG and the external equipment . Keyboard and mouse CyberPad supports plug and play USB mouse and keyboard device. Features * Screen:9`` Capacitive Touch Screen * Processor: 1.2Ghz * GPU:Mali 400MP * OS: Android 4.0 Ice Cream Sandwich * RAM:512MB DDR3 * Memory:8GB * Support 3G Module USB Dongle * Support Camera Front 0.3MP,Rear 2.
6.