USER MANUAL Thank you very much for choosing the iiyama LCD monitor. We recommend that you take a few minutes to read carefully through this brief but comprehensive manual before installing and switching on the monitor. Please keep this manual in a safe place for your future reference.
FCC DECLARATION OF CONFORMITY Model Number: PLL400W Trade Name: Responsible party: iiyama IIYAMA North America, Inc. Address: Telephone number: 65 West Street Road, Suite 101B, Warminster, PA18974 U.S.A. 215-682-9050 This device complies with Part 15 of the FCC Rules. Operation is subject to the following two conditions: (1) This device may not cause harmful interference, and (2) this device must accept any interference received, including interference that may cause undesired operation.
FOR YOUR SAFETY SAFETY PRECAUTIONS WARNING STOP OPERATING THE MONITOR WHEN YOU SENSE TROUBLE If you notice any abnormal phenomena such as smoke, strange sounds or fumes, unplug the monitor and contact your dealer or iiyama service center immediately. Further use may be dangerous and can cause fire or electric shock. NEVER REMOVE THE CABINET High voltage circuits are inside the monitor. Removing the cabinet may expose you to the danger of fire or electric shock.
SPECIAL NOTES ON LCD MONITORS The following symptoms are normal with LCD monitors and do not indicate a problem. NOTE n When you first turn on the LCD monitor, the picture may not fit in the display area because of the type of computer that is used. In this case, adjust the picture position to its correct position. n Due to the nature of the backlight, the screen may flicker during initial use. Turn off the Power Switch and then turn it on again to make sure the flicker disappears.
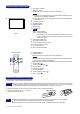
BEFORE YOU OPERATE THE MONITOR FEATURES K 40" Wide TFT Color LCD Monitor K Supports Resolutions up to 1280 × 1024 (down scale) K Super Wide Viewing Angle and High Contrast K Digital Character Smoothing K Automatic Set-up K Plug & Play VESA DDC2B Compliant, Windows® 95/98/2000/Me/XP Compliant K Power Management (ENERGY STAR® and VESA DPMS Compliant) K Digital Input for Clear Display CHECKING THE CONTENTS OF THE PACKAGE The following accessories are included in your package.
CONTROLS AND CONNECTORS A Power Switch (POWER) B Auto Button (AUTO) Adjusts Clock, Phase, H-Position and V-Position automatically. C D E F G H NOTE n For best results, use the Auto Set-up in conjunction with the test pattern Test.bmp. (See page 12 for SCREEN ADJUSTMENTS.) n The screen becomes dark for approximately five seconds during the adjustment.
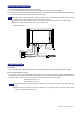
CONNECTING YOUR MONITOR A Ensure that both the computer and the monitor are switched off. B Connect the computer to the monitor with the signal cable. (See page 16 for CONNECTOR PIN ASSIGNMENT.) C Connect the RS-232C cable to the computer while using the RS-232C control feature. (See page 16 for CONNECTOR PIN ASSIGNMENT.) D Connect the Power Cable to the monitor first and then to the power supply. NOTE n The signal cables used for connecting the computer and monitor may vary with the type of computer used.
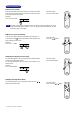
BASIC OPERATION n Turn on the monitor Press the Main Power Switch on the monitor. The monitor is turned ON when you press the Power Switch on the monitor or the Remote Control. Press again to turn OFF the monitor. [ Remote Control ] Press the Power Switch. [ Monitor ] Press the Power Switch. NOTE Even when using the power management mode, the monitor consumes electricity. Turn off the Power Switch whenever the monitor is not in use, during the night and weekends, to avoid unnecessary power consumption.
V-Position – + 50
Menu : 2 (Analog) Menu:2 AUTO 1280 × 768 H: 44 KHz V: 56 Hz Adjustment Item Auto Set-up* 2 Direct Color Temp. Problem / Option NO Return to Menu. YES Adjust Clock, Phase, H-Position and V-Position automatically. Color1 Approx. 9300K Color2 Approx. 7500K Red User Sharpness Button to Press 1 2 3 4 5 Adjust the picture quality at resolutions of less than 1280 × 768 when selecting “1” or “2 at “Full Screen” on Menu:3. You can change the picture quality from 1 to 5 (sharp to soft).
Menu : 3 (Analog) Menu:3 OSD - + 1280 × 768 H: 44 KHz V: 56 Hz Adjustment Item Signal Select Direct OSD Position Problem / Option Input 1 Input 2 Video 1*1 Video 2*1 Button to Press Select the INPUT 1. Select the INPUT 2. Select the VIDEO input. Select the S VIDEO input. 1 2 3 4 5 *1 Optional input only, see APPENDIX B.
Digital Input Menu : 1 (Digital) Menu:1 1280 × 768 H: 44 KHz V: 56 Hz Adjustment Item Problem / Option Button to Press Brightness *1 Direct Too dark Too bright or Contrast Direct Too dull Too intense or Color Temp. Color1 Approx. 9300K Color2 Approx. 7500K Red Too dull Green Too intense Blue User Sharpness 1 2 3 4 5 Direct or or Adjust the picture quality at resolutions of less than 1280 × 768 when selecting “1” or “2 at “Full Screen” on Menu:2.
Menu : 2 (Digital) Menu:2 OSD - + 1280 × 768 H: 44 KHz V: 56 Hz Adjustment Item Signal Select Direct OSD Position Problem / Option Input 1 Input 2 Video 1*1 Video 2*1 Button to Press Select the INPUT 1. Select the INPUT 2. Select the VIDEO input. Select the S VIDEO input. 1 2 3 4 5 *1 Optional input only, see APPENDIX B.
SCREEN ADJUSTMENTS Adjust the image by following the procedure below to get the desired picture when selecting Analog input. n The screen adjustments described in this manual are designed to set image position and minimize flicker or blur for the particular computer in use. n The monitor is designed to provide the best performance at resolution of 1280 × 768, but can not provide the best at resolutions of less than 1280 × 768 because the picture is automatically stretched to fit the full screen.
2) Stretch the right side of the picture frame to the right edge of the display area by adjusting the Clock. or NOTE n When the left side of the picture frame moves apart from the left edge of the display area during the Clock adjustment, adjust steps 1) and 2). n Another way to make the Clock adjustment is to correct the vertical wavy lines in the zebra pattern. n The picture may flicker during the Clock, H-Position and V-Position adjustment.
TROUBLE SHOOTING If the monitor fails to operate correctly, please follow the steps below for a possible solution. 1. Perform the adjustments described in OPERATING THE MONITOR, depending on the problem you have. If the monitor does not get a picture, skip to 2. 2. Consult the following items if you cannot find an appropriate adjustment item in OPERATING THE MONITOR or if the problem persists. 3.
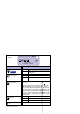
APPENDIX A SPECIFICATIONS LCD Panel Driving system a-Si TFT Active Matrix Size Diagonal: 102cm / 40" Pixel pitch 0.681mm H × 0.681mm V Brightness 450cd/m2 (Typical) Contrast ratio Viewable angle 600 : 1 (Typical) Response time 23ms (Black, white, black) Right / Left / Up / Down: 85 degrees each Display Colors 16,777,216 maximum Sync Frequency Horizontal: 31.47-60.24kHz, Vertical: 56-75Hz Dot Clock 102.
COMPLIANT TIMING Horizontal Frequency 31.469kHz 37.861kHz 37.500kHz 37.879kHz 48.077kHz 46.875kHz 48.363kHz 56.476kHz 60.023kHz 44.409kHz 47.701kHz 60.150kHz 31.469kHz 35.000kHz 49.725kHz 60.150kHz Video Mode VGA 640 × 480 SVGA 800 × 600 VESA XGA 1024 × 768 WXGA 1280 × 768 VGA TEXT 720 × 400 640 × 480 Macintosh 832 × 624 1024 × 768 Vertical Frequency 59.940Hz 72.809Hz 75.000Hz 60.317Hz 72.188Hz 75.000Hz 60.004Hz 70.069Hz 75.029Hz 56.000Hz 60.000Hz 75.000Hz 70.087Hz 66.667Hz 74.500Hz 74.
RS-232C INTERFACE n Baud Rate 9600bps n Data Format Start: Data: Parity: Stop: n Command 1-bit 8-bit 0 (no Parity) 1-bit Command Name Function POF Turn off power PON Turn on power NOTE Transmit POF and PON commands one by one. Allow an interval of 20 or more seconds between commands.
APPENDIX B Optional Video Input This OSD Menu is available only when the optional video adapter is installed in the monitor. Video input is not selected automatically from Analog or Digital input. Switch to video input by “Signal Select” on OSD Menu or the Input Button. Under the power management mode, “Signal Select” page is displayed directly by pressing the Menu Button when the Menu is not displayed.
Menu : 2 (Video) Menu:2 OSD - + H: 16 KHz V: 60 Hz NTSC Adjustment Item Signal Select Direct OSD Position Full Screen NOTE Problem / Option Input 1 Input 2 Video 1 Video 2 Button to Press Select the INPUT 1. Select the INPUT 2. Select the VIDEO input. Select the S VIDEO input.
Menu : 3 (Video) Menu:3 H: 16 KHz V: 60 Hz NTSC Problem / Option Adjustment Item Input Source NOTE DVD Select this in normal use. VCR Correct the picture distortion and shaking. The picture may be shaking or distorted because of the type of video equipment. In this case, select VTR. The picture may not display normally when inputting the signal of television or damaged videotape. Auto Switch the broadcast system automatically. Select this in normal use.
IIYAMA CORPORATION 710-1 Kitaowaribe, Nagano-shi 381-0014 Japan This manual is printed on recycled paper. Part No.