ENGLISH USER MANUAL DEUTSCH FRANCAIS POLSKI PLP1704S_1904S-e-COVER-RevD .P65 1 NEDERLANDS Thank you very much for choosing the iiyama LCD monitor. We recommend that you take a few minutes to read carefully through this brief but comprehensive manual before installing and switching on the monitor. Please keep this manual in a safe place for your future reference.
ENGLISH Congratulations! The display you have just purchased carries the TCO’03 Displays label. This means that your display is designed, manufactured and tested according to some of the strictest quality and environmental requirements in the world. This makes for a high performance product, designed with the user in focus that also minimizes the impact on our natural environment.
CE MARKING DECLARATION OF CONFORMITY This LCD monitor complies with the requirements of the EC Directive 89/336/EEC “EMC Directive” and 73/23/ The electro-magnetic susceptibility has been chosen at a level that gives correct operation in residential areas, business and light industrial premises and small-scale enterprises, inside as well as outside of the buildings. All places of operation are characterised by their connection to the public low voltage power supply system.
ENGLISH FOR YOUR SAFETY SAFETY PRECAUTIONS WARNING STOP OPERATING THE MONITOR WHEN YOU SENSE TROUBLE If you notice any abnormal phenomena such as smoke, strange sounds or fumes, unplug the monitor and contact your dealer or iiyama service center immediately. Further use may be dangerous and can cause fire or electric shock. NEVER REMOVE THE CABINET High voltage circuits are inside the monitor. Removing the cabinet may expose you to the danger of fire or electric shock.
CAUTION INSTALLATION LOCATION DO NOT PLACE THE MONITOR IN A HAZARDOUS POSITION The monitor may topple and cause injury if not suitably located. Please also ensure that you do not place any heavy objects on the monitor, and that all cables are routed such that children may not pull the cables and possibly cause injury. MAINTAIN GOOD VENTILATION Ventilation slots are provided to keep the monitor from overheating. Covering the slots may cause fire.
SPECIAL NOTES ON LCD MONITORS ENGLISH The following symptoms are normal with LCD monitors and do not indicate a problem. NOTE When you first turn on the LCD monitor, the picture may not fit in the display area because of the type of computer that is used. In this case, adjust the picture position to the correct position. Due to the nature of the backlight, the screen may flicker during initial use. Turn off the Power Switch and then turn it on again to make sure the flicker disappears.
TABLE OF CONTENTS BEFORE YOU OPERATE THE MONITOR.......................................................................2 English CHEKING THE CONTENTS OF THE PACKAGE ............................................................1 CONNECTING..................................................................................................................2 STARTUP .........................................................................................................................4 BASIC SETUP............
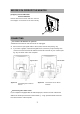
BEFORE YOU OPERATE THE MONITOR [Stopper] ProLite PB1704S ProLite PB1904S Please stand the monitor and then remove the stopper on the back of the sand slowly. CONNECTING ・ To connect the monitor to your PC 1. Make sure that the PC and the monitor is unplugged. 2. Connect the 15-pin signal cable to the monitor and The PC (see fig. 2a) 3. If you have a graphic card with a digital DVI-D connector (24-pin socket), then connect one end of the DVI-D cable to the DVI-D connector of your monitor (see fig.
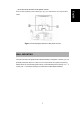
・ To connect the monitor to the power source outlet. English Connect the separate power cable (② in fig. 3) to the Monitor and a grounded Deutsch Français Figure 3.Connecting the monitor to the power source Polski WALL MOUNTING The iiyama monitor is shipped with the standard desktop configuration. However, you can optionally mount the device on a wall or on a monitor swivel arm (optional accessory). inches (100 × 100 mm)according to the international VESA FDMI standard).
STARTUP 1. First start your PC and then turn on your monitor using the power switch (① in fig. 4). The status indicator (① in fig. 4) should light up green. 2. Adjust the image to meet your requirements (see the following sections “Basic Setup” and “Image settings using the OSD menu”). 3. If there is no image displayed on the monitor, consult the section “Troubleshooting”.
The OSD menu is a window on your screen that allows you to view and change display settings. To change an OSD setting: English IMAGE SETTINGS USING THE OSD MENU Deutsch Français Figure 4.Monitor features Press the MENU button (② in fig. 4) to display the OSD menu on the screen. 2. Press the button MENU (② in fig. 4) to activate the selected function or associated submenu. 3. If you selected submenu, now select the sub-function you want using the buttons(④ and ⑤ in fig. 4). 4.
OSD MENU FUNCTIONS Brightness/Contrast Adjustment Item Problem/Option Button to Press BRIGHTNESS Too dark Press Too bright Press Too dark Press Too bright Press Adjustment Item Problem/Option Button to Press AUTO ADJUSTMENT Adjust H./V. Position, Pixel Clock and Phase CONTRAST ▶ ◀ ▶ ◀ IMAGE CONTROL automatically. H.POSITION V.
COLOR Button to Press 9300k 6500k CUSTOM COLOR Red Too week Press Green Too strong Press ▶ ◀ Deutsch Blue sRGB OSD CONTORL Problem/Option Button to Press H OSD POSITION OSD is too left Press OSD is too right Press OSD TIMEOUT OSD is too low Press OSD is too high Press you can set the OSD Press ▶ ◀ ▶ ◀ ◀ or ▶ Français Adjustment Item V OSD POSITION English Problem/Option display duration time.
TROUBLESHOOTING Blank Screen Power indicator is off z z Make sure the power cable and the power adapter are connected properly (see section “Connecting”). Make sure that the monitor was turned on using the power switch (see section “Startup”). Power indicator lights orange z A screen saver may have activated automatically after a certain period of inactivity. Press any key on your keyboard or move the mouse.
P L P 17 04 S LCD pa ne l P L P 19 04 S P L P B1 9 04 S Da ia go n a l: 19 . 0 ” P ixe l P ixe l P it c h : 0. 2 64 (W )x0 .2 6 4 (H) P it c h : 0. 2 94 (W )x0 .
RECYCLING INFORMATION All recycling information is placed in the iiyama international’s website. http://www.iiyama.