Studio reference monitor USER MANUAL
Contents Table of Contents Contents 2 English 4 iLoud Micro Monitor 4 Register your iLoud Micro Monitor 4 iLoud Micro Monitor overview 5 Installation and setup 6 Control panel 10 Audio inputs 10 Speaker’s connection ports 10 Bluetooth pairing 11 Volume 11 Power switch and DC input 11 Acoustic setup 12 Desktop filter 12 High frequency filter 13 Low frequency filter 13 LED 13 Drivers 13 Woofer 13 Tweeter 13 Bass port 14 Speakers placement 14 Desktop positioning 14 Listening position 15 Room acoustics 15 Micro
Contents Interruptor de alimentação e entrada DC 27 Configuração Acústica 28 Filtro Desktop (Mesa) 28 Filtro de agudos 29 Filtro de graves 29 LED 29 Drivers 29 Woofer 29 Tweeter 29 Porta de graves 30 Posicionamento dos monitores 30 Posicionamento de mesa (Desktop) 30 Posição de audição 31 Acústica da sala 31 Montagem em estante de microfone 32 Diagrama de blocos 32 Resolução de problemas 33 Especificações 33 Gráficos 34 Garantia 35 Suporte e mais informações 35 中文 36 iLoud Micro Monitor 36 注册你的iLoud Micro
Contents 麦克风支架安装 47 故障排除 47 规格参数 48 保修政策 48 支持及更多信息 48 4
English iLoud Micro Monitor Thank you for purchasing iLoud Micro Monitor. Your package contains • iLoud Micro Monitor speakers • Power supply unit • Speakers connection cable • RCA cable • Quick start guide • Registration card iLoud Micro Monitor is a full-featured ultra-compact stereo monitoring system. It’s a pair of portable studio monitors with a professional-quality bi-amplified design that provides an honest and accurate sound with a true linear frequency response.
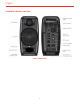
English iLoud Micro Monitor overview Active speaker (left) 6
English Installation and setup We recommend using high-quality audio cables to guarantee optimal performance. It is important to ensure the speakers stand firmly on a solid ground. Please note that the loudspeakers will need a few days to achieve optimum sonic performance. 1. Make sure that the volume control of iLoud Micro Monitor is set to minimum. Make sure that the ON/OFF switch on the rear panel is set to OFF. 2. Connect the speakers with the included connection cable.
English 3. Connect the included PSU to the DC socket on the left speaker. 4. Connect your sound source to the left speaker. You can use both the 1/8” jack input or the unbalanced RCA stereo inputs.
English 5. Switch ON the main ON/OFF switch on the rear panel of the left speaker. 6. It is also possible to stream audio wirelessly by pairing a Bluetooth® device with iLoud Micro Monitor.
English 7. Play audio from your audio source and slowly raise the volume of the iLoud Micro Monitor to a comfortable listening level. 8. If needed, adjust the speakers response with the dedicated controls on the rear panel of the left speaker. 9. If needed adjust the speakers inclination with the tilting pads. Note: Before plugging in and turning on, remember the “last on, first off” rule of powered speakers.
English Control panel Audio inputs RCA unbalanced line input These RCA jacks allows for the connection of line sources (i.e., mixer/audio interface bal/unbal line out) both for the Left and Right channel. 1/8” AUX unbalanced input This unbalanced line input allows for the connection of stereo unbalanced audio sources (i.e., computer stereo output, music player stereo output, smartphone/tablet stereo output).
English Bluetooth pairing The iLoud Micro Monitor uses Bluetooth® to stream high quality audio from your Bluetooth® enabled device without the need to connect any audio cable. In order for your device to work with the iLoud Micro Monitor it must first be paired. To pairing your device: • Turn the back panel volume control counter-clockwise to the -INF position.
English Acoustic setup These three switches on the back panel will help you to fit perfectly iLoud Micro Monitor in every acoustic environment. Desktop filter This switch sets a notch filter to compensate the typical acoustic effect of a console or a desktop. Such placement usually results in a peak in the lower midrange. The Desktop switch activates a bell shaped notch filter, with a +3.5dB between 1kHz and 10kHz and -1dB below 400Hz.
English High frequency filter This switch controls the high frequency level using a shelf-type EQ. The level can be set to 0dB or +2dB (above 4kHz). Low frequency filter This switch controls the low frequency level using a shelf-type EQ. The level can be set to 0dB or -3dB (below 250Hz). This filter is used to adjust the proximity effect of side walls and ceiling. Use this filter whenever the acoustics of your room cause problems in the low frequency range.
English Bass port The hole in the front panel is a bass reflex port. It is designed to discharge the low frequency signals and enhance the overall bass response. Speakers placement Please make sure that no obstacles are presents in the way from the monitors to your ears. You should be able to see the speakers completely. iLoud Micro Monitor has been designed for a vertical set up. The speakers must be positioned on a firm ground or a stand.
English Listening position When you use iLoud Micro Monitor for stereo applications, the optimum listening position should be located in the middle of an imaginary triangle. This means that your listening point (sweet point) will be located at the top of an equilateral triangle and the two loudspeakers should be placed at the other two points of this triangle. Furthermore, a symmetrical positioning is also important: this applies to the distance between speakers as well as to the walls, ceiling and floor.
English Microphone stand mounting Thanks to the thread adapter on the bottom of the speakers, iLoud Micro Monitor can be mounted on any standard 3/8” microphone stand. This allows you to place the speakers at the perfect height and, most important, helps to reduce the typical reflections of the desktop (or shell) and, consequently, improves the frequency response/linearity of the speaker. Block diagram EQ CONTROLS CROSS-OVER TIME ALIGNMENT SYSTEM OPTIMIZATION DYNAMIC CONTROL .....
English Troubleshooting I have connected my device to iLoud Micro Monitor, but no sound comes out. Make sure to set up the volume with the volume potentiometer on iLoud Micro Monitor and/or with your device’s volume control. Sound is distorted. When a noticeable distortion occurs, please turn down the level of the speakers, or of the connected audio source.
English Graphics ILOUD MICRO MONITOR FREQUENCY RESPONSE (normalized at 0dB) 20 Magnitude (dB) 10 0 -10 -20 1K 100 10K Frequency (Hz) Measured at 1 meter distance, in anechoic chamber, on tweeter axis. All calibration switches set to “FLAT”. ILOUD MICRO MONITOR MAXIMUM SPL 110 Magnitude (dBSPL) 100 90 80 70 60 100 1K Frequency (Hz) Measured at 50 cm distance, with two speakers playing, for 10% THD.
English Warranty Please visit: www.ikmultimedia.com/warranty for the complete warranty policy. Support and more info www.ikmultimedia.com/support www.iloudmm.
Português iLoud Micro Monitor Obrigado por adquirir o iLoud Micro Monitor. Sua embalagem contém: - Par de monitores iLoud Micro Monitor - Fonte de energia - Cabo de conexão entre os falantes - Cabo RCA - Guia de início rápido - Cartão de registro: iLoud Micro Monitor é um sistema de monitoração estéreo ultracompacto com recursos completos. É um par de monitores de estúdio portáteis com desenho profissional biamplificado que oferece som acurado e honesto com resposta de frequência linear de verdade.
Português Visão Geral do iLoud Micro Monitor Falante ativo (esquerdo) 22
Português Instalação e configuração Recomendamos usar cabos de áudio de alta qualidade para garantir a melhor performance. É importante garantir que os monitores estejam firmes em superfíce sólida. Por favor perceba que os alto-falantes precisam de alguns dias para alcançar performance sonora ótima. 1. Verifique que o controle de volume do iLoud Micro Monitor esteja no mínimo. Verifique que a chave ON/OFF (liga/desliga) na parte de trás do painel esteja na posição OFF (desligado). 2.
Português 3. Conecte a fonte de alimentação PSU ao soquete DC no monitor esquerdo. 4. Conecte sua fonte sonora ao monitor esquerdo. Você pode usar o jack de entrada de 1/8” ou a entrada desbalanceada estéreo RCA.
Português 5. Ligue a chave principal ON/OFF (liga/desliga) no painel traseiro do monitor esquerdo. 6. Também é possível enviar áudio sem fio emparelhando um dispositivo Bluetooth® com o iLoud Micro Monitor.
Português 7. Toque áudio a partir da sua fonte de áudio e vagarosamente aumente o volume do iLoud Micro Monitor para um nível de audição confortável. 8. Se necessário, ajuste a resposta dos monitores com os controles dedicados no painel traseiro do monitor esquerdo. 9. Se necessário ajuste a inclinação dos monitores com os suportes de inclinação. Observação: Antes de conectar e ligar, lembre-se da regra “último a ligar, primeiro a desligar” dos falantes ativos.
Português Painel de controle Entradas de áudio Entrada de linha desbalanceada RCA Os jacks de entrada RCA permitem a conexão de fontes de linha (por exemplo mixers/interfaces de áudio com saída de linha balanceada/desbalanceada) tanto para o canal direito quando o esquerdo.
Português funcione com o iLoud Micro Monitor é necessário que primeiro seja emparelhado. Para emparelhar seu dispositivo: • Gire o controle de volume no painel traseiro em sentido anti-horário para a posição -INF. • Com seu iLoud Micro Monitor e seu dispositivo Bluetooth® ligados: pressione o botão PAIRING (emparelhar) no painel traseiro do monitor esquerdo para tornar o monitor visível. A luz frontal indicadora irá piscar vagarosamente em azul.
Português Configuração Acústica Estas três chaves no painel traseiro vão lhe ajudar a acomodar o iLoud Micro Monitor com perfeição em qualquer ambiente acústico. Filtro Desktop (Mesa) Esta chave aciona um filtro tipo notch para compensar o efeito acústico típico de um console ou mesa. Tal posicionamento normalmente resulta em um pico nos médio-graves. A chave desktop ativa um filtro notch formato bell, com mais +3.5dB entre 1kHz e 10kHz e -1dB abaixo de 400Hz.
Português Filtro de agudos Esta chave controla o nível de frequências altas usando um equalizador tipo shelf. O volume pode ser ajustado para 0dB ou +2dB (acima de 4kHz). Filtro de graves Esta chave controla o nível de graves usando um equalizador tipo shelf. O volume pode ser ajustado para 0dB ou -3dB (abaixo de 250Hz). Este filtro é usado para ajustar o efeito de proximidade das paredes próximas e do teto. Use este filtro sempre que a acústica do seu quarto causar problemas nas baixas frequências.
Português Porta de graves A abertura no painel frontal é uma porta bass reflex. Ela é desenhada para descarregar os sinais de frequências graves e aprimorar a resposta geral de graves. Posicionamento dos monitores Assegure-se de que não há obstáculos presentes no caminho dos monitores até seus ouvidos. Você deve ser capaz de ver os monitores por completo. iLoud Micro Monitor foi desenhado para posição vertical. Os monitores devem estar posicionados em superfície firme ou em uma estante.
Português Posição de audição Quando você usa o iLoud Micro Monitor para aplicações estéreo, a posição ótima de áudição deve estar localizada no centro do triângulo imaginário. Isto significa que o seu ponto de audição (sweet point) estará localizado no topo de um triângulo equilátero e os dois monitores devem ser posicionados nas outras duas pontas do triângulo. Além disso, uma posição simétrica também é importante: isto se aplica à distância entre os monitores e também às paredes, teto e piso.
Português Montagem em estante de microfone Graças à rosca adaptadora na parte de baixo dos monitores, iLoud Micro Monitor pode ser montado em qualquer estante de microfone padrão 3/8”. Isto lhe permite posicionar seus monitores na altura perfeita e, mais importante, ajuda a reduzir as reflexões típicas da sua mesa e, consequentemente, melhora a resposta de frequências e a linearidade dos falantes. Diagrama de blocos EQ CONTROLS CROSS-OVER TIME ALIGNMENT SYSTEM OPTIMIZATION DYNAMIC CONTROL .....
Português Resolução de problemas Eu conectei meu dispositivo ao iLoud Micro Monitor, mas não sai som nenhum. Verifique o ajuste de volume no potenciômetro de volume do iLoud Micro Monitor e/ou o controle de volume do seu dispositivo. O som está distorcido. Quando uma distorção perceptível ocorrer, por favor abaixe o volume dos monitores ou da fonte de áudio conectada.
Português Gráficos ILOUD MICRO MONITOR FREQUENCY RESPONSE (normalized at 0dB) 20 Magnitude (dB) 10 0 -10 -20 1K 100 10K Frequency (Hz) Measured at 1 meter distance, in anechoic chamber, on tweeter axis. All calibration switches set to “FLAT”. ILOUD MICRO MONITOR MAXIMUM SPL 110 Magnitude (dBSPL) 100 90 80 70 60 100 1K Frequency (Hz) Measured at 50 cm distance, with two speakers playing, for 10% THD.
Português Garantia Por favor visite: www.ikmultimedia.com/warranty para a política completa de garantia. Suporte e mais informações www.ikmultimedia.com/support www.iloudmm.
中文 iLoud Micro Monitor 感谢您购买iLoud Micro Monitor。 盒子内包含 • iLoud Micro Monitor音箱 • 电源适配器 • 音箱连接线 • RCA线材 • 快速启动指南 • 注册卡 iLoud Micro Monitor是一个全功能超小型立体声监听系统。 这是一对便携式录音棚监听音箱,带有专业品质的双功放设计,其真实的线性频率响应提供诚实而精确的声音。 iLoud Micro Monitor由四个放大器输送一个组合50 W RMS的功率驱动。通过两个3/4”高音单元和两个3” 低音单元,每个音箱都提供清晰、卓越的低音响应。 这些功能因板载的56位DSP处理器而得以增强。它让你完全控制音箱的性能,带来非常精确和详细的声音,这 在考量的尺寸和价格内是难以实现的。 它能够调整以配合不同的播放情况,这得益于其扬声器的两个可定位的倾向角度和三个专用的EQ开关:低频、 高频和“自由场”/“桌面”补偿开关。这些开关让你优化它的声音,配合你的听音环境。 它还配备了一个全方位的音源选项,包括蓝牙流以及RCA和1/8”输入。 iLoud Micro Monitor可完美用于
中文 安装和设置 我们建议使用高品质音频线以保证最佳的性能。一定要确保音箱稳定的放置在坚实的平面上。请注意,音箱需要 几天才能达到最佳的声音性能。 1. 确保iLoud Micro Monitor的音量控制设置为最低。确保后面板上的ON/OFF开关是OFF状态。 2.
中文 3. 连接配备的电源适配器到左音箱的DC接口 4. 将音源连接到左音箱。可以使用3.
中文 5. 打开左音箱上背面的ON/OFF开关 6.
中文 7. 从您的音源播放音频并缓慢转动iLoud Micro Monitor 的音量旋钮调整到舒适的音量大小。 8. 如果需要,可以通过左音箱背面的专用控制调节音箱的响应。 9.
中文 控制面板 音频输入 RCA 非平衡线性输入 这组RCA接口让你可以连接任何线性音源(例如:混音台/音频接口平衡/非平衡线性输出)到左右声道。 3.
中文 蓝牙配对 iLoud Micro Monitor 使用蓝牙来从设备无线传输高品质音频信号,在使用iLoud Micro Monitor 播放之前需 要先进行配对,来匹配连接您的设备: • 将背部面板的音量控制旋钮调节到 -INF的位置 • 打开您的iLoud Micro Monitor电源并开启需要连接蓝牙的设备:点击左音箱背部的PAIRING 按钮来将设备 变为可发现状态,设备前面板的指示灯将缓慢闪烁蓝灯。 • 在您的蓝牙设备设置中,允许其“扫描”可用设备。 • 在蓝牙可用设备列表中,选择“iLoud Micro Monitor”设备。 • 当iLoud Micro Monitor 的指示灯回到白色的固定状态表示配对已经完成,现在你可以使用iLoud Micro Monitor来播放音源:当有音源输入后LED指示灯变为蓝色。 • 当您的蓝牙音量开启后,播放一些音乐并缓慢的加大iLoud Micro Monitor的音量直到它达到您想要的效 果。 音量 这个指示开关让你可以调整输入音源的音量 电源开关的DC输入 电源开关:这个拨动式开关让你可以开启和关闭iLoud Micro Monitor电
中文 声学设置 这三个位于背部面板的开关可以帮助您将iLoud Micro Monitor在不同的声学环境中调整到最佳状态。 桌面滤波器 此开关设置陷波滤波器以补偿控制台或桌面的典型声学效果,在较低的中频中改变了峰值的结果,Desktop 开 关激活了钟形陷波滤波器,在1kHz到10kHz以及-1dB低于400Hz的区间+3.
中文 高频滤波器 这个开关通过使用搁架式EQ来控制高频等级,等级可以设置为0bB或+2dB(高于4kHz) 低频滤波器 这个开关通过使用搁架式EQ来控制低频等级,等级可以设置为0db或-3dB(250Hz以下)。该滤波器用于调整 侧壁和天花板的邻近效应。当您的房间因为声学问题对音频造成影响时可以使用这个滤波器。 LED 位于左音箱正面的LED用于显示iLoud Micro Monitor的重要状态信息:持续白色:iLoud Micro Monitor 电 源已开启 持续红色:限幅 蓝色闪烁:iLoud Micro Monitor 正在和蓝牙设备配对 持续蓝色:以连接的蓝牙设备正在输入音频信号到音箱 驱动 低音单元 低音单元采用了一个定制3”纸锥来提供平衡的中频和低频响应。 高音单元 通过使用特别开发的3/4”丝球搭配钕磁铁,高音单元在高频范围内可以带来及其自然的响应。 45
中文 低频倒相口 位于前面板的这个洞口为倒相口,它的设计是用来释放低频信号并加强整体的低频响应。 音箱放置 请确保没有任何障碍物放置在音箱和您的耳朵之间,您应当确保可以完整的看到音箱。iLoud Micro Monitor 的设计采用了垂直的模式,音箱必须放置在坚固的平面或支架上。 请注意音箱附近的物品震动将会影响音色。 桌面定位 位于高音单元和低音单元的中点应当摆放在和耳朵大约一致的高度,如果您需要将音箱放置在特别矮或特别高的 位置,音箱的角度需要相应的调整。如果音箱的放置位置低于耳朵,您可以使用音箱底部的支架调整,同时也改 善了扬声器和桌面的声学耦合。 46
中文 听音位置 当您使用iLoud Micro Monitor 搭配立体声软件使用,最佳的听音位置应该位于等边三角形上。这意味着您的 听音点(sweet point)将落在等边三角形的顶点上,2个音箱应该分别位于等边三角形的另外两个顶点。此 外,一个对称的位置同样重要:应用于两个音箱的间距以及和墙面、天花板、地板的间距。为了得到一个对称的 立体声图像,对称的反射同样重要:我们建议和墙面至少保持20 cm(8英寸)的距离,来避免低频堆积。 房间声学设置 房间的声学在监听系统的表现中起到关键的作用,建议您至少对您的环境做最基本的声学处理。搭配正确的监听 音箱位置摆放,可以提高听音的线性和精确度。 47
中文 麦克风支架安装 因为有了音箱底部的麦克风支架接口,iLoud Micro Monitor 可以连接到任何标准3/8”麦克风支架上。这让你 可以将音箱摆放在完美的高度,更重要的是,减少了桌面(或外壳)的反射,提升音箱的频率响应/线性。 故障排除 我已经连接了我的设备到iLoud Micro Monitor,但是没有声音。 确保您调整过iLoud Micro Monitor的音量控制按钮或调整设备的音量控制。 声音失真 当可辨认的失真发生时,请调低音箱的音量或调低音源的音量。 48
中文 规格参数 类型:2路供电,双功放,录音棚监听音箱 频率响应(-3dB):55Hz - 20kHz 频率响应(-10dB):45 Hz - 22 kHz 交叉频率:3kHz 高音单元:3/4”丝膜球顶和钕磁体 低音单元:3” 纸锥 最大SPL @ 50cm(使用双音箱播放,从100Hz到10kHz平均正弦波):107dB 功放数量:4 功放类型:D类 总输出功率(双音箱):70W(峰值)- 50W RMS 低音单元输出功率(单音箱):18W RMS 高音单元输出功率(单音箱):7W RMS 声学设置:high shelf (0dB or +2dB from 4kHz up); low shelf (0dB or -3dB from 250Hz down); desktop (+3.5dB between 1kHz and 10kHz and -1dB below 400Hz) 高性能低音倒相口 使用A2DP协议的蓝牙 56-bit DSP 内部分辨率 系统总延迟(模拟输入):1.02 ms 系统总延迟(蓝牙输入):155 ms (取决于播放主机,使用iPhone 6S/iOS 10.0.
CANADA IC ID: 11298A-072900001 EUROPE IC statement/warning This device complies with Industry Canada licence-exempt RSS standard(s). Operation is subject to the following two conditions: 1. This device may not cause interference, and 2. This device must accept any interference, including interference that may cause undesired operation of the device.