High resolution compact studio monitors with Midwoofer-Tweeter-Midwoofer design USER MANUAL English 日本語 中文
High resolution compact studio monitors with Midwoofer-Tweeter-Midwoofer design USER MANUAL
Contents Table of Contents Contents 2 English 3 iLoud MTM 3 Register your iLoud MTM 3 Safety Instructions 4 iLoud MTM overview 6 Installation and setup 7 Control panel 11 Audio inputs 11 ARC Mic input 11 Volume 11 USB port 11 Power 11 Rear controls 12 LF extension 12 HF filter 12 LF filter 12 CAL/Preset 12 Custom Calibration 13 Front LED 16 MTM design 17 Desktop positioning 18 Listening position 19 Room acoustics 19 Microphone stand mounting 20 DFU mode 20 Troubleshooting 21 Specifications 21 Graphics 22 Wa
English iLoud MTM Thank you for purchasing iLoud MTM.
English Safety Instructions • Read these instructions. • Keep these instructions. • Heed all warnings. • Follow all instructions. • Do not use this apparatus near water. • Clean only with dry cloth. • Do not block any ventilation openings. Install in accordance with the manufacturer’s instructions. • Do not install near any heat sources such as radiators, heat registers, stoves, or other apparatus (including amplifiers) that produce heat.
English • The lightning flash with arrowhead symbol within an equilateral triangle is intended to alert the user to the presence of uninsulated “dangerous voltage” within the product’ s enclosure that may be of sufficient magnitude to constitute a risk of electrical shock to persons. • The exclamation point, within an equilateral triangle, is intended to alert the user to the presence of important operating and maintenance (servicing) instructions in the literature accompanying the product.
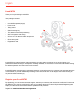
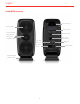
English iLoud MTM overview Bass reflex port 2x3,5” woofers Rear controls 1” back-chamber Volume control loaded tweeter Multi-color indication LED 1/8” ARC Mic input AC power input Integrated tilting isolation stand 6 1/4” / XLR combo input USB port Power switch
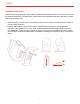
English Installation and setup We recommend using high quality audio cables to guarantee optimal performance. It is important to ensure that the speakers stand firmly on a solid surface. Please note that the loudspeakers will need a few days to achieve optimum sonic performance. 1. Make sure that the volume control of iLoud MTM is set to minimum. Make sure that the ON/OFF switch on the rear panel is set to OFF. 2. Install the adjustable foot on the bottom of the iLoud MTM with the locking key.
English 3. Adjust the vertical alignment of the speaker. This step is crucial to fully benefit from the MTM design (for more information refer to the dedicated paragraph in this manual). 4. Connect the power cord.
English 5. Connect the audio input source to the input connector of iLoud MTM. 6. Switch ON the ON/OFF switch on the rear panel. The front LED will illuminate steady white after a short delay.
English 7. Turn your audio playback system on (Mixing console, Audio interface, etc.). Make sure you have set the proper input sensitivity using the SENS button, then set the volume control to MAX (full clockwise). This is the reference position for the SPL calibrated values in the specs. Adjust the volume control to a lower position only if needed or only in case you require different levels between the speakers. 8. If needed, adjust the speaker response with the dedicated controls on the rear panel. 9.
English Control panel Audio inputs Combo XLR-1/4” balanced line input This combo connector allows for the connection of an analog audio source (i.e., mixer/audio interface bal/unbal line out). Connect professional equipment with balanced outputs to the XLR or 1⁄4” TRS input of the speaker using balanced signal cables. Sensitivity +4dBu/-10dBV The +4dBu / -10dBV input sensitivity button allows connection of the speakers to high-output professional equipment without risk of input overload.
English Rear controls The pushbuttons on the back panel will help you to perfectly match iLoud MTM to every acoustic environment. LF extension The LF extension button is a high-pass filter that can be set to filter out frequencies below 60Hz, 50Hz (default) or 40Hz. HF filter This pushbutton controls the high frequency level using a shelf-type EQ. The level can be set to 0dB (FLAT), +2dB or -2dB, from 8kHz up. LF filter This pushbutton controls the low frequency level using a shelf-type EQ.
English To perform a custom Calibration refer to the next paragraph. IMPORTANT: units shipped from our factory have no custom calibration loaded, so the CAL position won’t be available until a custom calibration has been performed by the user. Custom Calibration Thanks to the ARC technology, iLoud MTM can be tailored to perfectly fit your listening space. For this reason iLoud MTM is supplied with an ARC measurement microphone and its connecting cable.
English • place the microphone at the listening point, making sure the mic capsule aperture points towards the ceiling, and that the microphone is placed exactly in the center spot between the two speakers, at the listening position; • keep the CAL/PRESET button pressed for more than 2 seconds; • the CAL LED will start to blink blue and the front LED will start to blink white.
English • at this point the calibration test signals production will start. During this time, the front LED will stay steady ON blue. IMPORTANT: during the measurement process make sure that the environment is a silent as possible, do not touch the speaker or the microphone, and make sure that the overall room setup is as similar as possible to the one that will be used during normal iLoud MTM usage.
English NOTE: the measurement signal level is independent from the volume control. The audio Sweep’s level is fixed and optimised for best performance. Factory reset: to perform a factory reset keep pressed both the CAL/PRESET and SENS buttons for more than 2 seconds. After this time all of the controls will be returned to the factory status and the, possibly saved, custom Calibration will be erased. Front LED The front LED will show important information about iLoud MTM’s status.
English MTM design The MTM (Midwoofer-Tweeter-Midwoofer) design has a very uniform and smooth horizontal dispersion, and a more controlled, narrower vertical one. This means that: - ceiling and floor reflections are minimised, especially at mid and high frequencies, basically augmenting the focus the speakers can provide. - in the same way, reflections from a desk are less problematic (causing less comb-filtering) than with a regular 2-way TM speaker.
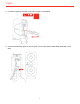
English Desktop positioning The center of the tweeter should be positioned approximately at the height of your ears. In case you need to position the speakers in a significant lower or higher position, the monitors should be angled accordingly. If the speakers are placed lower than the ear line, you can tilt them using the adjustable foot that, also, improves the acoustic decoupling of the speakers from the surface.
English Listening position When you use iLoud MTM for stereo applications, the optimum listening position should be located in the middle of an imaginary triangle. This means that your listening point (sweet spot) will be located at the top of an equilateral triangle and the two loudspeakers should be placed at the other two corners of this triangle. Furthermore, a symmetrical positioning is also important: this applies to the distance between speakers as well as to the walls, ceiling and floor.
English Microphone stand mounting Thanks to the thread adapter on the bottom of the speaker, iLoud MTM can be mounted on any standard 3/8” microphone stand. This allows you to place the speakers at the perfect height and, most important, helps to reduce the typical reflections of the desktop (or shell) and, consequently, improves the frequency response/ linearity of the speaker. DFU mode To update the firmware of your iLoud MTM you need to enter in DFU mode.
English Troubleshooting I have connected my device to iLoud MTM but no sound comes out. Make sure to set up the volume with the volume control on iLoud MTM and/or with your device’s volume control. Sound is distorted. When noticeable distortion occurs, please turn down the level of the speakers, or of the connected audio source.
English - Connectors: 1x combo XLR-1/4” TRS balanced input; 1/8” TS ARC microphone input, 1 x USB type-B (service use only), AC POWER socket - Power requirement: 90 to 240 V AC, auto-ranging, 50 or 60Hz, 120W max power consumption - Dimensions (inches): 264mm/(10.39”) x 160mm/(6.3”) x 130mm/(5.12”) - Weight : 2.
English - Phase - IR graph 23
English Warranty Please visit: www.ikmultimedia.com/warranty for the complete warranty policy. Support and more info www.ikmultimedia.com/support www.iloudmtm.
Regulatory iLoud® MTM is a trademark or registered trademark property of IK Multimedia Production Srl. All other product names and images, trademarks and artists names are the property of their respective owners, which are in no way associated or affiliated with IK Multimedia.
High resolution compact studio monitors with Midwoofer-Tweeter-Midwoofer design USER MANUAL 日本語版
目次 目次 目次 2 日本語 iLoud MTM iLoud MTMの登録 安全上のご注意 iLoud MTM 概要 設置方法 オーディオ入力 ARCマイク入力 音量 USB端子 電源 リア・コントロール LF エクステンション HFフィルター LFフィルター CAL/PRESET カスタム・キャリブレーション フロントのLED MTMのデザイン 卓上の設置 リスニング・ポジション 部屋の音響 マイクロフォン・スタンドへの取り付け DFUモード トラブルシューティング 仕様 グラフィック 保証 サポートおよびその他の情報 3 3 3 4 6 7 11 11 11 11 11 12 12 12 12 13 13 16 17 18 19 19 20 20 21 21 22 24 24 2
日本語 iLoud MTM この度は、 iLoud MTMをお求めいただき、 誠にありがとうございます。 パッケージ同梱物をご確認ください: • iLoud MTMスピーカー本体(1台) • 角度調整スタンド • 電源コード* • スタンドの固定器具 • ARCマイクロフォンとクリップ • • • 横向きの為のTPU製ベース ARCマイクロフォン専用のXLR – 1/8” TSケーブル レジストレーション・カード iLoud MTMは革新的な機能とスマートなデザインであなたのモニタリング作業を向上させます。 明瞭なサウンドを求めているプ ロスタジオをお持ちの方から、 自宅や小型スタジオを使っているミュージシャンまで、 iLoud MTMはどのセットアップにも適してい ます。 iLoud MTMの2倍の価格がする製品同様、 フラットな周波数特性とフェーズレスポンスを持ち、 長時間聴いていても疲れない、 信じ られないほど忠実度の高い音質を提供します。 iLoud MTMの登録 登録をすることで、 テクニカルサポートへのアクセス、 保証の有効および無料のJamPoints™をお客
日本語 安全上のご注意 • 本書をよく読んでください。 • 注意事項のすべてに従ってください。 • • • • 本書を安全なところに保管してください。 本製品を水の近くで使用しないでください。 汚れをとる際は乾いた布のみを使用します。 換気用の穴に障害物を置かない。 メーカーの基準に従って設置してください。 • ストーブなど、 熱を出すものの近くに設置しないでください。 • 電源コードを踏んだり、 特にプラグ、 コンセント、 および 機器から出てくる箇所で電源コードがねじれたりしないようにしてくだ さい。 • • • • • • • アース付き、 または有極プラグの安全機能を無効にしないでください。 有極プラグは二つの刃を持ち、 1つの幅はもう一つより 広くなっています。 アース付きのプラグは刃を二つと、 アースを一つがあります。 幅が広くなっている刃、 またはもう一つの刃は 安全のために装置されています。 コンセントに差し込めない場合は電気工にコンセントの交換を依頼してください。 製造元または製品販売者によって推奨される付属品以外は使用しないでください。 製造元または製品
日本語 • • 警告:本機を分解しないでください。 感電の恐れがあります。 この機器の電圧は生命に危険です。 お客様自身での修理は行わ ないでください。 修理は有資格のサービス担当者に依頼してください。 本機をコンセントの近くに設置し、 電源ブレイカー・ス イッチが手の届きやすいことを確認してください。 警告:本機はリアパネル、 または同梱の電源供給に記載されているAC電圧のみでの動作を意図としています。 記載以外の電 圧での動作を行うと修理不可能な損害を起こすおそれがあり、 本機の保証が無効になります。 想定されていない電圧を供給 するため、 本機とAC変換アダプターの使用は注意が必要です。 取り外し可能の電源コードは、 同梱の電源ケーブルおよび製 品販売者によって推奨される電源コードを使用してください。 動作にあたり、 正しい電圧が不明な場合は製造元または製品 販売者に連絡してください。 5
日本語 iLoud MTM 概要 バス・リフレックス 開口部 3.
日本語 設置方法 最適な動作を確保するため、 高品質なケーブルの使用をお勧めします。 しっかりとした固い面に設置してください。 スピーカーは 最適なパフォーマンスに達するまで数日かかります。 リアパネルのオン/オフスイッチがオフになっているか確認します。 1. iLoud MTMの音量が最小になっているか確認します。 角度調整スタンドを設置します。 角度を0度から20度まで調整できます。 お好みの角度に設定できましたら、 2.
日本語 MTMデザインを最大化に活用できるための大切なステップです。 詳しくは別章を参照して下さい。 3. 配置の高さを調整します。 4.
日本語 5. iLoud MTMの入力端子にオーディオ機器を接続します。 表面のLEDはまもなく白く点灯します。 6.
日本語 オーディオインタフェイスなど) の電源がONになっていることを確認してくださ 7. オーディオ再生機器(ミキシングコンソール、 い。 再生機器の出力にあわせて、 iLoud MTMの入力感度をSENSボタンで調節します。 次はVOLUMEを最大(時計周りを最後 まで)にしてください。 キャリブレーションされた音圧レベルの数値を持つ基準位置です。 音量を下げる必要がある場合、 何ら かの理由で左右の音量差が必要な場合のみ、 VOLUMEを絞って下さい。 リアパネルの専用ボタンを使用し、 スピーカーの周波数を調整します。 8. 必要に応じて、 音響環境に合わせることができます。 詳しくは本書に記載されています。 9. スピーカーキャリブレーションで、 縦の方がよりいいパフォーマンスを期待できるため、 10.
日本語 コントロールパネル オーディオ入力 コンボ仕様のINPUTジャック (XLR・1/4”、 バランス) このコンボジャックはアナログのオーディオソース (例:ミキサー、 オーディオインタフェイス、 バランスまたアンバランスのラインア ウト) を接続できます。 バランスシグナルを送信できるケーブルでバランス出力を搭載した機材をスピーカーのXLRまたは1/4” TRS 入力に接続してください。 SENS +4dBu/-10dBV +4dBu/-10dBVのSENSボタンは入力過負荷のリスクをなくし、 高出力機器の接続を可能にします。 +4dBuと-10dBvの切り替えは SENSボタンを2秒以上押し続けます。 出荷時は+4dBuに設定されており、 プロオーディオでの使用に適しています。 コンポ、 スマホ、 タブレット、 ノートパソコンなどのコンシューマー向け機器との使用時は-10dBVに設定します。 適切な出力レベル を決めるために、 接続する機器の書類を参照してください。 ARCマイク入力 この1/8” TSジャックは同梱のARCマイクロフォンの接続用で、 音響環境に合わせてスピーカーのキャリ
日本語 リア・コントロール リアパネルのボタンの使用でiLoud MTMは音響環境に合わせて調整可能です。 LF エクステンション LF Extensionは60Hz、 50Hz(既定)、 または40Hz以下の周波数をカットするハイパス・フィルタです。 HFフィルター HFフィルターはシェルフ・タイプのEQで高域周波数のレベルを制御します。 8kHz以上の周波数が変わり、 0dB(フラット)、 +2dB、 -2dBの3つのレベルから選択できます。 LFフィルター LFフィルターはシェルフ・タイプのEQで低域周波数のレベルを制御します。 100Hz以下の周波数が変わり、 0dB(フラット)、 +2dB、 -3dBの3つのレベルから選択できます。 壁と天井を影響する近接効果を調節するためのフィルターです。 壁や天井の近接効果を調整するために使用します。 部屋の音響 特性により低域に問題が発生している場合には、 このフィルターを使用してください。 12
日本語 CAL/PRESET CAL/PRESETボタンを押すと、 デスクトップ・フィルター、 FLAT(デフォルト)、 カスタム・ユーザー・キャリブレーションを切り替えるこ とができます。 デスクトップ・フィルターは、 コンソールやデスクとの反響による問題を補正するための減衰フィルターです。 デスク トップ設置時は、 通常、 中低域がブーストされます。 DESKを選択すると、 160Hzを中心に-4dBカット、 1.
日本語 • マイクロフォンは通常の視聴位置にて耳の高さで水平に設置します。 2台のスピーカーの真ん中の間に置き、 マイクロフォン のカプセルの穴が天井に向かっていることを確認します。 • CAL/PRESETのボタンを2秒以上押し続けます。 • CALのLEDは青く点滅し、 フロントのLEDは白く点滅し始めます。 5秒後に測定が始まります。 人が間に入ってしまうと測定に影響しますので、 スピーカーとマイクロフォンの間に入らないでください。 14
日本語 • キャリブレーションのテストトーンが発生します。 発生している間、 フロントのLEDは青に点灯します。 重要:測定するときは環 境をできるだけ静かにしてください。 スピーカーまたはマイクロフォンに触れず、 通常の視聴環境に近いセットアップを保って ください。 • オーディオ・スイープの実地が完了したところ、 フロントのLEDは青に点滅し始めます。 • キャリブレーションが正常に完了しましたら、 フロントのLEDは4秒の間に緑に点滅し、 リアパネルのCALのLEDはONに点灯し ます。 キャリブレーションが失敗した場合、 フロントのLEDは4秒の間に赤に点滅し、 リアパネルのCALのLEDは点灯しません。 その場合はもう一度キャリブレーションを試してください。 備考:測定の信号レベルはボリューム・コントロールの影響を受けません。 オーディオ・スイープの最適なパフォーマンスのため、 音 量が固定されています。 出荷時ディフォルト:出荷時ディフォルト設定を復元するには、 CAL/PRESETとSENSのボタンを2秒以上、 同時に押してください。 これですべてのコントロールは出荷時ディフォルト
日本語 フロントのLED フロントのLEDはiLoud MTMの状態を示します。 動作状態 白に点灯:iLoud MTMはオンになっています。 電源をつけた際、 数秒間白く点滅した後オーディオ信号を出せる状態になります。 赤に点滅:クリッピングしています。 一貫性を保った、 リファレンスとなるオーディオ再生を実現するには、 スピーカーに過大な負荷 をかけてはいけません。 フロントのLEDが赤に変わった場合は下記の手順を試してください: - iLoud MTMに接続されたコンソール、 オーディオ・インターフェースの再生音量(コントロール・ルーム/モニタリング・アウト等) を 下げます。 もしくは - 低音のオーバーロードを避けるため、 LFエクステンション・コントロールを40Hzから50/60Hzに引き上げます。 白に点滅:キャリブレーションのカウントダウン。 青に点灯:キャリブレーションのスイープを実施中。 青に点滅:キャリブレーションを計算中。 障害状態 赤に点灯:アンプの修復不可能な障害。 オーディオは再生されません。 本機の電源をすぐに落としてください。 オレンジに点滅:熱の警告。 ゲ
日本語 MTMのデザイン MTM(ミッドウーファー・ツイーター・ミッドウーファー) の水平方向の分散が滑らかで一定でありながら、 垂直方向の分散は細く制 御されています。 このため: - 特に中域と高域の周波数にて天井と床の反響を減少し、 スピーカーのフォーカスを増強します。 - 上記図の通り、 机の反響(コーム・フィルタリングを減少)は他の2ウェイTMスピーカーより少ないです。 視聴者の耳の垂直アラインメントは非常に重要です。 垂直アラインメントが悪いと中域と高域の周波数は大幅に下がることがあ ります。 その理由で、 iLoud MTMの設置場所に気を付けなければなりません。 モニターと耳の間に障害物がないか確認してください。 スピーカーのすべてが見えるようになっているべきです。 スピーカーを固く 平坦なところに置くか、 スタンドの上に設置してください。 近くのものの振動で音に影響を及ぼすことがありますので、 ご注意ください。 17
日本語 卓上の設置 ツイーターは視聴者の耳の高さになっているのが正しい位置です。 スピーカーの角度が大幅にずれている場合は調整を行ってく ださい。 耳より低くなっていたら、 傾斜スタンドの使用で角度を調整できます。 表面から引き離すことで、 振動による共振や干渉を 防げます。 18
日本語 リスニング・ポジション iLoud MTMをステレオ目的で使用する場合、 最適な聴取位置は三角の真ん中になります。 つまり、 聴取位置、 いわゆる 「スイートス ポット」 は正三角形の頂点になり、 スピーカーは残りの二つの隅に設置します。 なお、 対称的な設置も大事です。 壁や天井、 床とス ピーカーの間にも当てはまります。 対称的なステレオ・イメージを作るには、 対称的な反響を作ることも大切です。 最低20センチ 壁から離すことを推奨します。 そうすることで低域の強調を回避できます。 部屋の音響 モニター・システムには、 部屋の音響は大きいな役割を果たしています。 最低限の吸音処理を行うことも勧めします。 正しい設置の 位置に加え、 これらのことを守ると安定した聴取経験を味わえます。 19
日本語 マイクロフォン・スタンドへの取り付け スピーカーの下にあるネジ穴の使用で、 iLoud MTMは標準の3/8”のマイクスタンドに取り付けられます。 高さの調整に役に立ち、 机(または本体) の反響を少なくし、 周波数応答と安定性を改善します。 DFUモード DFUモードに入りますとiLoud MTMのファームウェアを更新できます。 更新方法はこちら: • • • • • USBケーブルを使用し、 iLoud MTMをパソコンにつなぎます。 DFUモードに入ります:電源を入れるときSENSボタンを押し続けます。 DFUモードに入っている間、 フロントLEDは白に点滅し ます。 ファームウェア更新プログラムを開き (www.ikmultimedia.
日本語 トラブルシューティング iLoud MTMにデバイスを接続しましたが音がでません。 iLoud MTMの音量が適切になっているかを確認してください。 または、 デバイスの出力音量を確認してください。 音が歪んでいる。 著しく歪みがある場合、 スピーカーの音量を下げるか、 接続オーディオソースの音量を下げてください。 キャリブレーションが正常に完了しませんでした (フロントLEDは赤に点滅) キャリブレーションが正常に完了しないでフロントLEDが赤に点滅した場合、 XLRケーブルがマイクロフォンと1/8” ARCマイク入力 の両端に正しく接続できているのを確認してください。 仕様 - スピーカータイプ : 2ウェイ/3スピーカー、 バイアンプ仕様のデジタルコントロールスタジオモニター - LFドライバー : 2×3.
日本語 - キャリブレーション : フルオートのデジタルキャリブレーションを内蔵(測定用マイク付属) - 測定用マイク : 無指向性、 MEMS 仕様の詳細測定用マイク - DSPによるフルコントロール - 接続端子 : バランスコンボ入力(XLR/TRS標準フォーン)、 ARCマイク用TSミニフォーン入力、 USB type-B(サービス用)、 AC電源 インレット - 電源 : 90V ~ 240V AC、 オートレンジ、 50/60 Hz、 消費電力120W(最大) - 寸法:264 mm x 160 mm x 130 mm - 重量:2.
日本語 - 位相特性 - IR応答 23
日本語 保証 保証規約に関しては、 下記のリンクに記載しています: www.ikmultimedia.com/warranty サポートおよびその他の情報 www.ikmultimedia.com/support www.iloudmtm.
Regulatory iLoud® MTM is a trademark or registered trademark property of IK Multimedia Production Srl. All other product names and images, trademarks and artists names are the property of their respective owners, which are in no way associated or affiliated with IK Multimedia.
高分辨率紧凑型录音棚监听音箱 中低频-高频-中低频设计 用户手册
内容 目录 内容 2 中文 3 iLoud MTM 3 注册iLoud MTM 3 安全说明 4 iLoud MTM 简介 5 安装和设置 6 控制面板 9 音频输入 9 ARC麦克风输入 9 音量 9 USB端口 9 电源 9 后置控件 10 LF扩展 10 HF滤波器 10 LF滤波器 10 CAL/预设 10 自定义校准 11 正面 LED 13 MTM 设计 14 桌面摆放 15 听音位置 16 房间声学 16 麦克风支架安装 17 DFU 模式 17 故障排除 17 规格参数 18 图表 19 质保 21 技术支持和更多信息 21 2
中文 iLoud MTM 感谢您购买iLoud MTM。 包装内含有 • iLoud MTM音箱(单只) • 电源线 • 倾斜支架 • 支架锁定键 • TPU底座,用于水平定位 • ARC麦克风和夹子 • 用于ARC麦克风的XLR转3.5mm TS线 • 快速入门指南 • 注册卡 iLoud MTM的创新功能和智能设计为任何类型的设置带来了全新的录音棚监听,从寻找透明、监听近场的专业 录音棚,到从大型监听寻找绝对精确度的家庭和小型工作室音乐人。 iLoud MTM提供平坦的频率和相位响应,是此前从未在监听上出现过的,甚至是iLoud MTM两倍价格的监听, 提供令人难以置信的显示逼真的声音,不会产生耳朵疲劳,这使得聆听任何类型的音频材料都很轻松。 注册iLoud MTM 通过注册,您可以访问技术支持,激活保修并获得将添加到您帐户的免费JamPointsTM。JamPointsTM让您 获得未来购买IK产品的折扣!注册还可以让您了解所有最新的软件更新和IK产品。 注册地址:www.ikmultimedia.
中文 安全说明 • 阅读这些说明 • 保留这些说明 • 留意所有警告 • 遵循所有说明 • 请勿在靠近水的地方使用本设备 • 仅使用干布清洁 • 不要堵塞任何通风口。按照制造商的说明进行安装。 • 请勿安装在任何热源附近,如散热器,热记录器,火炉或其他产生热量的设备(包括放大器)。 • 不要破坏极化插头或接地插头的安全性。极化插头有两个叶片,一个比另一个宽。接地型插头有两个叶片和 一个第三接地插脚。为了您的安全,提供了更宽的叶片或第三个插脚。如果提供的插头不适合您的插座,请 咨询电工更换过时的插座。 • 保护电源线不被踩踏或夹在插头、便利插座和设备出口处。 • 仅使用制造商指定的附件/配件。 • 仅可使用制造商指定的或与设备一起销售的推车,支架,三脚架,托架或桌子。使用推车时,请小心移动推 车/设备组合,以免翻倒造成伤害。 • 在雷雨天气或长时间不使用时,请拔下本设备的电源插头。 • 将所有维修工作交给合格的维修人员。当设备以任何方式损坏时都需要进行维修,例如电源线或插头损坏, 液体溅出或物体掉入设备,设备暴露在雨中或潮湿环境中,无法正常运行,或掉落。 • 为降低火灾或触电风险,请勿将本设备暴露在雨中或潮湿
中文 iLoud MTM 简介 低音反射端口 2x3.5”低音扬 声器 后置控件 1”后室加载高音 扬声器 音量控件 多彩LED指示灯 1/4” /XLR组合 输入 3.
中文 安装和设置 我们建议使用高品质音频线以确保最佳性能。确保音箱牢固地固定在坚固的表面上非常重要。请注意,扬声器需 要几天才能达到最佳声音性能。 1. 确保iLoud MTM的音量控制设置为最小。确保后面板上的ON/OFF开关设置为OFF。 2. 使用锁定键将可调支脚安装在iLoud MTM的底部。您可以调整音箱的倾斜范围是从0°到20°。一旦达到 所需的倾斜角度,拧紧锁定键。重要提示:确保拧紧iLoud MTM底部正确螺纹插件上的锁定键。第二个螺 纹插件用于将iLoud MTM安装在麦克风支架顶部。 3.
中文 4. 连接电源线。 5.
中文 6. 打开后面板上的主ON/OFF开关。短暂延迟后,前面的LED指示灯将亮起稳定的白色。 7. 打开音频播放系统(混音控制台,音频接口等),然后打开iLoud MTM。确保使用SENS按钮设置了正确的 输入灵敏度,然后将音量控制设置为MAX。这是SPL校准值在规格上的参考位置。仅在需要时或仅在音箱之 间需要不同电平时将音量控件调节到较低位置。 8. 如果需要,请使用后面板上的专用控件调整扬声器响应。 9. 您可以执行音箱校准,使您的iLoud MTM完全适合您的声学环境(有关更多信息,请参阅本手册中的专用 段落)。 10.
中文 注意:在插入和打开之前,请记住有源扬声器的“最后开启,先关闭”规则。打开系统电源时,请确保已连接所 有线,打开调音台/接口和任何其他外置设备,然后再打开iLoud MTM。关闭电源时,首先关闭iLoud MTM, 然后关闭调音台/接口和外置设备。 控制面板 音频输入 组合XLR-1/4”平衡线性输入 该组合连接器允许连接模拟音频源(即,调音台/音频接口/平衡 - 不平衡线路输出)。使用平衡信号线将带有平 衡输出的专业设备连接到音箱的XLR或1/4” TRS输入端。 灵敏度+4dBu/-10dBV + 4dBu / -10dBV输入灵敏度按钮可将扬声器连接到高输出专业设备,而不会出现输入过载的危险。通过按住 SENS按钮超过2秒,可以在+ 4dBu和-10dBV之间循环。从我们工厂发货时,电平设定为+ 4dBu。此设置最 适合大多数专业应用程序。 将iLoud MTM连接到消费类设备(例如Hi-Fi组件、智能手机、平板电脑、笔记本电脑等)时,请将电平设置 为-10dBV设置。要确定所连接设备的额定输出电平,请参阅所连接设备随附的说明。 ARC麦克风输入 使用此3.
中文 后置控件 后面板上的按钮将帮助您在各种声学环境中完美贴合iLoud MTM。 LF扩展 LF扩展按钮是一个高通滤波器,可以设置为滤除低于60Hz,50Hz(默认)或40Hz的频率。 HF滤波器 该按钮使用架式均衡器控制高频电平。从8kHz开始,电平可以设置为0dB(FLAT),+ 2dB或-2dB。 LF滤波器 该按钮使用架式均衡器控制低频电平。 电平可以设置为0dB(FLAT),+ 2dB或-3dB,从100Hz下降。 该滤波器用于调整侧面墙壁和天花板的邻近效应。只要房间的声学在低频范围内出现问题,请使用此滤波器。 CAL/预设 此按钮允许您在桌面文件管理器,FLAT(默认)和自定义用户校准之间循环。桌面滤波器设置衰减滤波器以 补偿控制台或桌面的典型声学效果。 这种放置通常会导致较低中频的增强。桌面开关激活钟形陷波滤波器,以 160Hz为中心-4dB,1.
中文 要执行自定义校准,请参阅下一段。 重要提示:我们工厂发货的设备没有加载自定义校准,因此在用户执行自定义校准之前,CAL位置不可用。 自定义校准 借助ARC技术,iLoud MTM可以量身定制,完美适合您的听音空间。因此,iLoud MTM配有ARC测量麦克风 及其连接线。要开始自定义校准: • 使用(随附的)XLR线将ARC麦克风连接到iLoud MTM背面的ARC麦克风输入,并确保麦克风上的绿色 LED亮起; • 将麦克风放在收听点上,确保麦克风外壳的光圈指向天花板,麦克风正好放在两个音箱之间的中心位置,在 听音位置; 11
中文 • 按住CAL/预设按钮2秒以上; • CAL LED将开始呈蓝色闪烁,前面的LED将开始呈白色闪烁。现在你有5秒钟的时间让自己远离音箱,这样 你就不会受到音箱和麦克风之间的影响; • 此时校准测试信号的再现将开始。在此期间,前面的LED将保持稳定亮蓝色。重要提示:在测量过程中,请 确保环境尽可能安静,不要触摸音箱或麦克风,并确保整个房间设置尽可能与正常iLoud MTM使用期间存 在的设置相似。 • 扫描后,在计算过程中,前面的LED开始闪烁蓝色。 12
中文 • 当过程结束时,如果校准成功结束,正面的LED将闪烁4秒绿色,背面的CAL LED将稳定亮起;如果由于某 些原因,校准结束不成功,正面的LED将闪烁4秒红色,而背面的校准LED不会打开。在这种情况下,尝试 执行另一次校准。 注意:测量信号电平与音量控件无关。扫描水平是固定的,并针对最佳性能进行了优化。 恢复出厂设置:执行恢复出厂设置,按住CAL/预设和SENS按钮2秒以上。在此时间之后,所有控件将返回出厂 状态,最终保存的自定义校准将被删除。 正面 LED 正面LED将显示有关iLoud MTM状态的重要信息。 运行状况 稳定白色:iLoud MTM开启。在通电时,正面LED将闪烁白色几秒钟,然后音箱开启,它将准备再现音频信 号。 闪烁红色:剪裁。音箱不应过载,以确保一致和参考音频再现。如果您看到正面的LED转为红色,您应该: - 通过调低控制台或音频接口上的控制室/监听级别来调节收听音量。 或者 - 将LF扩展控制从40增加到50或60Hz,以避免系统被低音过载。 闪烁白色:校准倒计时 稳定蓝色:校准扫描正在进行中。 闪烁蓝色:校准计算。 13
中文 故障报告 稳定红色:不可恢复的放大器故障。不会再现任何音频。立即关闭设备。 闪烁橙色:热警告,增益将降低6dB。 稳定橙色:热故障。不会再现任何音频。 稳定黄色:功率放大器故障。不会再现任何音频。 闪烁紫色:内部电源问题。立即联系技术支持。 MTM 设计 MTM(Midwoofer-Tweeter-Midwoofer)设计具有非常均匀和平滑的水平色散,以及更加可控、更窄的垂直 色散。 这意味着: - 最小化天花板和地板反射,特别是在中频和高频时,基本上增加了音箱可以提供的焦点。 - 同样地,与常规2路TM音箱相比,来自桌面的反射问题更少(导致更少的梳状滤波)。 这也意味着音箱与听者耳朵的垂直对准是至关重要的:不良的垂直对准可能导致中频和高频的明显下降。 因此,必须特别注意iLoud MTM的摆放。 确保从监听到耳朵之间没有障碍物。你应该能够完全看到音箱。iLoud MTM专为垂直和水平设置而设计。音箱 必须放置在坚固的地面或支架上。 请注意,附近物体的振动可能会遮挡声音。 14
中文 桌面摆放 高音扬声器的中心应位于大约耳朵的高度。如果您需要将扬声器放置在较低或较高的位置,则监听应相应地成角 度。如果扬声器放置在低于耳线的位置,您可以使用可调节支脚将它们倾斜,这样也可以改善扬声器与表面的声 学去耦 15
中文 听音位置 当您将iLoud MTM用于立体声应用时,最佳听音位置应位于假想三角形的中间。这意味着您的聆听点(最佳听 音位置)将位于等边三角形的顶部,两个音箱应放置在此三角形的另外两个点上。此外,对称位置也很重要:这 适用于音箱之间以及墙壁,天花板和地板之间的距离。为了获得对称的立体图像,对称反射也很重要:我们建议 与墙壁保持至少20厘米(8英寸)的距离,以避免低频增强。 房间声学 室内声学在监听系统的表现中起着关键作用。始终建议至少对您的环境进行最低限度的声学处理。这与正确的监 听摆放一起,将改善聆听的线性度和精确度。 16
中文 麦克风支架安装 得益于音箱底部的螺纹适配器,iLoud MTM可以安装在任何标准的3/8”麦克风支架上。这使您可以将音箱放 置在理想的高度,最重要的是,有助于减少桌面(或外壳)的典型反射,从而提高音箱的频率响应/线性度。 DFU 模式 要更新iLoud MTM的固件,您需要进入DFU模式。要更新您的iLoud MTM: • 使用USB线将iLoud MTM连接到电脑; • 进入DFU模式:进入DFU模式,在启动iLoud MTM的同时按住SENS按钮。在DFU模式下,正面LED将开 始闪烁白色。 • 打开固件更新应用程序(可从www.ikmultimedia.
中文 规格参数 - 类型:2路/3个扬声器双功放、数字控制的录音棚监听 - 低频驱动器:2 x 3.5”聚丙烯定制中低音扬声器 - 高清驱动器:1”低失真,后腔丝绸球顶高音扬声器 - 声学设计:DSP调谐低音反射 - 每个扬声器的放大器数:2 - 放大器类型:高效D类 - 总功率: 100W RMS - LF功率: 70W RMS - HF功率: 30W RMS - 交叉类型:线性相位变量顺序 - 交叉频率: 3.
中文 图表 - 频率响应 19
中文 - 相位 - IR图 20
中文 质保 请访问: www.ikmultimedia.com/warranty 查看完整的保修政策。 技术支持和更多信息 www.ikmultimedia.com/support www.iloudmtm.
iLoud®MTM是IK Multimedia Production Srl的商标或注册商标。所有其他产品名称和图像、商标和艺术家姓名均为其各自所有者的财产,与IK Multimedia无任何关联或附属关系。 2020/08/31 22