User Manual
Manuals
Brands
IK Multimedia Manuals
Pro Audio
iLoud MTM High Resolution Compact Studio Monitor
1
2
3
4
5
6
7
8
9
10
Table Of Contents
English
Contents
iLoud MTM
Register your iLoud MTM
Safety Instructions
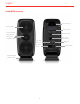
iLoud MTM overview
Installation and setup
Control panel
Audio inputs
ARC Mic input
Volume
USB port
Power
Rear controls
LF extension
HF filter
LF filter
CAL/Preset
Custom Calibration
Front LED
MTM design
Desktop positioning
Listening position
Room acoustics
Microphone stand mounting
DFU mode
Troubleshooting
Specifications
Graphics
Warranty
Support and more info
Japanese (日本語)
目次
iLoud MTM
iLoud MTMの登録
安全上のご注意
iLoud MTM 概要
設置方法
オーディオ入力
ARCマイク入力
音量
USB端子
電源
リア・コントロール
LF エクステンション
HFフィルター
LFフィルター
CAL/PRESET
カスタム・キャリブレーション
フロントのLED
MTMのデザイン
卓上の設置
リスニング・ポジション
部屋の音響
マイクロフォン・スタンドへの取り付け
DFUモード
トラブルシューティング
仕様
グラフィック
保証
サポートおよびその他の情報
Chinese (中文)
内容
iLoud MTM
注册iLoud MTM
安全说明
iLoud MTM 简介
安装和设置
控制面板
音频输入
ARC麦克风输入
音量
USB端口
电源
后置控件
LF扩展
HF滤波器
LF滤波器
CAL/预设
自定义校准
正面 LED
MTM 设计
桌面摆放
听音位置
房间声学
麦克风支架安装
DFU 模式
故障排除
规格参数
图表
质保
技术支持和更多信息
English
8
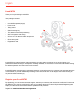
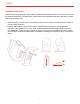
3.
Adjust the
vertical alignment
of the speaker
. This step is crucial to fully benefit from the MTM design (for
more information r
efer to the dedicated paragraph in this manual).
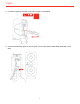
4.
Connect the power cord.
1
...
...
7
8
9
10
11
...
...
73