TRUE ANALOG SYNTHESIZER USER MANUAL English 日本語
TRUE ANALOG SYNTHESIZER USER MANUAL
UNO Synth Table of Contents English Table of Contents Introduction In the box Register your UNO Synth Precautions 2 1 2 4 4 5 5 1 – Installation and setup 7 2 – Turning the unit ON/OFF - Calibration process 9 3 – Overview 10 4 – Front panel interface 4.1 – Sound Editor 4.1.1 – Oscillator Row 4.1.2 – Filter Row 4.1.3 – Envelope Row 4.1.4 – LFO Row 4.2 – Master Section 4.2.1 – Display 4.2.2 – Tempo Knob 4.2.3 – Volume Knob 4.2.4 – Data Buttons 4.2.5 – Preset Button 4.2.
UNO Synth 7.3 7.4 7.5 7.6 – – – – Step Edit Recording Deleting a sequence Sequencer Length and Direction Keyboard Priority 8 – MIDI Implementation 8.1 – General 8.2 – Control External Devices with UNO Synth 8.3 – Control UNO Synth from External Devices 8.4 – Connecting UNO Synth to a computer via MIDI 8.5 – Connecting UNO Synth to a computer via USB 8.6 – Setting the MIDI Channel 8.7 – Setting the Sync Mode 8.8 – MIDI Soft Thru 8.9 – MIDI Interface Mode 8.
UNO Synth Introduction Thank you for purchasing UNO Synth.
UNO Synth Register your UNO Synth By registering, you can access technical support, activate your warranty and receive free JamPoints™ which will be added to your account. JamPoints™ allow you to obtain discounts on future IK purchases! Registering also keeps you informed of all the latest software updates and IK products. Register at: www.ikmultimedia.com/registration Precautions Locations Using the unit in the following locations can result in a malfunction.
UNO Synth Be careful not to let metal objects get into the equipment. If something does slip into the unit, unplug the USB cable, then contact your nearest IK Multimedia dealer or the store where the equipment was purchased. Specification subject to change The information contained in this manual is believed to be correct at the time of printing. However, IK Multimedia reserves the right to change or modify any of the specifications without notice or obligation to update existing units.
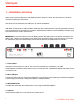
UNO Synth 1 – Installation and setup Please note: To prevent malfunction and equipment failure, always turn down the volume and turn off all the units before making any connections. UNO Synth can be powered by the USB bus or by internal AA batteries. USB: When connected to an USB host (MAC, Windows), all the required power is typically provided by the host.
UNO Synth 5 - Audio OUT Connect the UNO Synth output to an external amp, mixer or audio interface or to your headphones with stereo mini-plug here. 6 - Knobs Behavior UNO Synth knob behavior uses “Absolute Mode” by default. This means that the knob value is recalled using the absolute value of the position of the knob when edited (i.e.: turn a pot and the value jumps immediately from the stored value to the edited value). The other 2 modes are Pass-Through and Relative.
UNO Synth 2 – Turning the unit ON/OFF - Calibration process When the unit is powered ON, it automatically starts the first tuning and capacitance sensing calibration. During the calibration the display will first show a static “UNO,” then blink “CAL.” At the end of the calibration, it will display the firmware version. The unit will then be ready for use and the last used preset will be loaded and indicated on the display.
UNO Synth 3 – Overview UNO synth is a powerful and portable monophonic synthesizer with features that change the meaning of “complete instrument” for the price range. It is an instrument that will become known for its sound and flexibility, ready for creative artists that need inspiration. Raw, warm, tight and everything in-between, this monophonic beast is the first of its kind thanks to the easy and powerful analog architecture and the complex digital controls.
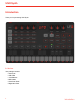
UNO Synth 4 – Front panel interface The synth has 3 main sections: the Sound Editor, the Master Section and the Performance Controls.
UNO Synth 4.1 – Sound Editor The sound editor section uses a matrix of 4 buttons and 4 knobs to modify the synthesis parameters in realtime. However, the sound editing capabilities of the synth are not limited to the matrix, and with the help of MIDI Continuous Controllers, it is possible to additional synth parameters (see MIDI implementation chart for more). Here is the description of each row of the sound programming matrix. 4.1.
UNO Synth To change the tuning of the oscillators, a semitone and detune control for each oscillator is available. The controls are labeled TUNE 1 and TUNE 2. From the center position of the knob, detune the oscillator +/- 100 cents. Then at the outer extremes, the tune adjustment switches to quantized semitones to transpose the oscillator. To adjust the levels of OSC1, OSC2 and the noise generator, hold the OSC button for 1 second unitl the OSC LED starts blinking.
UNO Synth 4.1.3 – Envelope Row Envelopes are modulation sources in a synthesizer that create shapes that change the filter cutoff frequency, the amplitude (volume) or even the oscillator shape. The UNO Synth has two separate envelopes, one for the filter and one for the amplitude (volume). The panel provides Attack and Decay controls for the Filter Envelope and Attack and Release controls for the Amplitude Envelope. Full ADSR controls are editable via MIDI continuous controllers (MIDI CC).
UNO Synth The Pitch and Filter controls set the amount that the LFO modulates the master pitch and the filter cutoff. The LFO modulation is also routed to the Pulse With Modulation and Waveshaper of both of the VCOs, and to the performance buttons called Tremolo, Wah and Vibrato. The relative amounts of modulation are editable via MIDI continuous controllers (MIDI CC). See the UNO Synth MIDI Implementation Chart for the specific CC numbers. 4.
UNO Synth 4.2.2 – Tempo Knob This knob sets the tempo for the sequencer and the arpeggiator. Note that if the sync is set to USB or external, the tempo knob will work as note value selector in units from 1/4 to 2x. 4.2.3 – Volume Knob This knob adjusts the output volume. 4.2.4 – Data Buttons The UP and DOWN buttons adjust the value for the functions selected using the buttons with the red outline. These buttons also move between steps during the step-by-step recording of a sequence. 4.2.
UNO Synth The available Scales are: • • • • • • • • • • • • • • • CHR: Chromatic MAJ: Major MIN: Minor 1: Major Pentatonic 2: Major Blues 3: Minor Pentatonic 4: Minor Blues 5: Minor Harmonic 6: Mixolydian 7: Dorian 8: Klezmer 9: Hungarian Gypsy 10: Spanish Gypsy 11: Japanese 12: South-East Asian 4.2.9 – Delay Time and Mix The DELAY and MIX buttons adjust the delay time and the delay mix amount using the data buttons. Note that the feedback amount of the delay is fixed.
UNO Synth 4.2.11 – Arpeggiator and Sequencer These are the controls for the Arpeggiator and Sequencer. ARP: activates the arpeggiator SEQ: activates the sequencer DIR: When the ARP button is active, the DIRection button lets the data buttons set the order in which the held notes are arpeggiated. There are 10 different arpeggiator modes. When the SEQ button is active, the DIRection button lets the data buttons move between 3 sequence playback modes: Forward, Backward and ForwardBackward.
UNO Synth 4.3.1 – Performance Buttons The performance buttons provide instant musical articulations that can be used with live playing or while the arpeggiator or sequencer are running. Note that the LFO drives the Vibrato, Wah and Tremolo effects. So the selected LFO waveform and rate in the LFO row affects the behavior of these performance buttons. The amount of modulation for the performance buttons is editable via MIDI continuous controllers (MIDI CC).
UNO Synth Scale keyboard or Sequencer’s steps 4.3.3 – HOLD Button The HOLD button sustains the played note or the chord of an arpeggio when the ARP function is enabled. When in step recording, pressing HOLD lets you change the duration of the note in the step from 0.5 to 16 steps.
UNO Synth 5 – Presets UNO Synth contains 100 presets, each with its own sequence and settings. The first 20 presets are factory, meaning that it is not possible to overwrite them. Also, the first 20 presets are used for the DEMO. The demo it is the perfect way to discover the powerful feature of the UNO synth simply by listening. To activate the demo, press ARP and SEQ simultaneously. 5.1 – Loading a Preset Every time the UNO synth is powered up, the last preset selected is loaded.
UNO Synth number will stop blinking. To store the preset in another slot, select the new slot with the data buttons, then press the PRESET again. Please note that presets cannot be stored on the first 20 location, and cannot be deleted. 5.3 – Factory Presets UNO Synth comes with a collection of 100 ready-to-use presets to inspire your creativity. The presets cover many genres and styles, and they are organized for easy browsing and management.
UNO Synth 6 – The Arpeggiator What is an arpeggiator? Music is typically based around chord progressions. These may not be presented in an obviously “chordal” way when the notes of the chord are not played together simultaneously. For example, think of a guitarist playing with fingerpicking and using intricate plucks to create a more complex pattern. Often the pattern is still based on simple chord shapes.
UNO Synth To select a mode, activate the arpeggiator by pressing ARP, then press DIR (direction). Use the the data buttons to select the desired mode. You can also specify the the arpeggio RANGE and select a range from 1 to 4 octaves. Press the RANGE button when the arpeggiator is active, and select the desired range from 1 to 4 using the data buttons.
UNO Synth 7 – The Sequencer The UNO Synth’s sequencer is a particularly deep section because it integrates some great features which are rarely available at this price point. For example, the parameter recording is particularly powerful. Each preset on the UNO Synth has its own sequence. The UNO Synth’s sequencer has up to 16 steps whihc are represented by the 16 “white” keys of the keyboard. There are 16 LEDs, one for each step, below the keys.
UNO Synth To record a note, press the desired note on the keyboard. The display will show the name of the note, and the step will stop blinking and will light solid. To change the note for the step, simply play another note To change the octave, press OCT and select the desired octave with the data buttons (the synth will play the note each time the octave is changed). When the selection is done, press OCT again to go back to the editing of the step. To change the duration of the note, press HOLD.
UNO Synth To record a parameter change, simply turn the knob and insert the desired parameter with the desired value. Use the data buttons to move between steps. The current step will light below the keyboard. To delete a step, press ALT+DOWN to empty the current step. The step will blink and the display will show a “double minus.” To exit Step Recording, simply press REC again. 7.2 – Real-Time Recording Real-time Recording is the most common and easy to use method.
UNO Synth one iteration of the loop, and then it automatically stops recording to avoid overlapping your motion events. A metronome is also available for real-time recording in the ALT section. When is ON, it will play only when in the sequencer is recording, and it will automatically stop when recording is stopped. To exit Real-Time Recording, press REC again. 7.3 – Step Edit Recording Step Recording is available when ALT + REC is pressed. It is available regardless of whether the sequencer is playing.
UNO Synth 7.4 – Deleting a sequence To delete a sequence, press ALT+DOWN when the sequencer is active. Please note that after deleting a sequence, it is not possible to restore it unless it was previously saved with the preset. Please note that after deleting a sequence is not possible to restore it, unless it was previously saved on the preset. 7.
UNO Synth 8 – MIDI Implementation 8.1 – General MIDI stands for Musical Instrument Digital Interface, and is the worldwide standard for exchanging musical data between electronic musical instruments and computers. When MIDI cables are used to connect two or more MIDI devices, performance data can be exchanged between the devices, even if they were made by different manufacturers.
UNO Synth 8.5 – Connecting UNO Synth to a computer via USB The UNO Synth is recognised as a standard USB device, so the installation of proprietary drivers is not needed. The USB MIDI has both IN and OUT capabilities and can be used as a MIDI Interface. 8.6 – Setting the MIDI Channel To select the MIDI channels, press the ALT button, and then the MIDI button. MIDI channels can be selected between 1 and 16 using the data buttons. The default MIDI IN and OUT channel is the 1.
UNO Synth 8.10 – MIDI Implementation Chart [Monophonic Analog Synthesizer] Model: UNO Synth MIDI Implementation Chart 1.
UNO Synth [Monophonic Analog Synthesizer] Model: UNO Synth Control # 0 1 2 3 4 5 6 7 8 9 10 11 12 13 14 15 16 17 18 19 20 21 22 23 24 25 26 27 28 29 30 31 32 33 34 35 36 37 38 39 40 41 42 43 44 45 46 47 48 49 50 51 52 53 54 55 56 57 58 59 60 61 62 63 33 Function Bank Select (MSB) Modulation Wheel (MSB) Breath Controller (MSB) Foot Controller (MSB) Portamento Time (MSB) Data Entry (MSB) Channel Volume (MSB) Balance (MSB) Pan (MSB) Expression (MSB) Effect Control 1 (MSB) Effect Control 2 (MSB) Ge
UNO Synth [Monophonic Analog Synthesizer] Model: UNO Synth Control # 64 65 66 67 68 69 70 71 72 73 74 75 76 77 78 79 80 81 82 83 84 85 86 87 88 89 90 91 92 93 94 95 96 97 98 99 100 101 102 103 104 105 106 107 108 109 110 111 112 113 114 115 116 117 118 119 120 121 122 123 124 125 126 127 34 MIDI Implementation Chart Function Sustain Pedal Portamento On/Off Sostenuto Soft Pedal Legato Footswitch Hold 2 Sound Controller 1 (default: Sound Variation) Sound Controller 2 (default: Timbre / Harmonic
UNO Synth [Monophonic Analog Synthesizer] Model: UNO Synth MIDI Implementation Chart Function SysEx Enter Setup Mode [SETUP] Pot Mode: Absolute (default) [SETUP] Pot Mode: Relative [SETUP] Pot Mode: Pass-Through [SETUP] MIDI Soft Thru ON (default) [SETUP] MIDI Soft Thru OFF [SETUP] MIDI Interface Mode ON (default) [SETUP] MIDI Interface Mode OFF [SETUP] Send Program Change ON [SETUP] Send Program Change OFF (default) F0 00 21 1A 02 01 11 01 7F F7 F0 00 21 1A 02 01 21 00 01 00 F7 F0 00 21 1A 02 01 21 0
UNO Synth 9 – Specifications Synthesis • • • • • • • • Type: Analog Polyphony: 1 voice Synthesis structure: 2 VCO, Noise generator, 1 VCF, 1 VCA, 2 EG, 1 LFO VCO variable shape waveforms: Triangle, Sawtooth, Pulse with variable pulse width VCF: 2-pole resonant multimode filter with Cutoff, Resonance, Env Amount, Drive LFO: 7 shapes (Sine, Triangle, Square, Saw Up, Saw Down, Random, Sample & Hold), Rate Modulation Destinations: Amp, Pitch, Filter, PWM, Waveshape (PWM and Waveshape via MIDI CC) EG: 2 for Fil
UNO Synth Connections • • • • Audio Out: Mini-jack 3.5mm stereo (mono summed) Audio In: Mini-jack 3.5mm stereo (mono summed) 2 x MIDI 2.5mm mini-jack to DIN cables (IN/OUT) 1 Micro USB* Power • 4x AA Batteries • Micro USB connector Dimensions • Size: 25.6cm/10.1” x 15cm/8.9” x 4.9cm/1.93” • Weight: 400g/14.
UNO Synth 10 – Troubleshooting There is excessive noise or interference in the audio. If your UNO Synth is connected to your computer via the UNO Synth’s USB port, the ground noise and interference from the USB may be increased. The easiest way to avoid this is to instead power the UNO Synth using a standard wall charger or with batteries and then use the 2.5mm to MIDI DIN cables for the MIDI connection to your computer.
UNO Synth 11 – Support For any questions you may have, please refer to the FAQ webpage at: www.ikmultimedia.com/faq Here you will find answers to the most commonly asked questions. To submit a Technical Support Form, go to: www.ikmultimedia.com/support For warranty information, please visit: www.ikmultimedia.com/warranty For other requests such as Product, Sales, or Web info, please go to: www.ikmultimedia.com/contact-us 11.
IK Multimedia Production Srl Via dell’Industria, 46, 41122 Modena Italy IK Multimedia US, LLC 590 Sawgrass Corporate Pkwy. Sunrise, FL 33325 USA IK Multimedia Asia TB Tamachi Bldg. 1F, MBE #709 4-11-1 Shiba Minato-ku, Tokyo 108-0014 Japan www.ikmultimedia.com UNO® Synth is a registered trademark property of IK Multimedia Production Srl.
TRUE ANALOG SYNTHESIZER USER MANUAL
UNO Synth 目次 日本語 (Japanese) 1 目次 2 イントロダクション 4 パッケージ同梱物 4 UNO Synthの登録 5 ご利用に関する注意 5 1 – インストールと設定 6 2 – ユニットのオン・オフ - キャリブレーション 8 3 – 概要 9 4 – フロントパネル 10 4.1 – サウンドディター(Sound Editor) 11 4.1.1 – オシレーター(OSC) 11 4.1.2 – フィルター(FILTER) 12 4.1.3 – エンベロープ(ENV) 12 4.1.4 – LFO 13 4.2 – マスターセクション (Master Section) 14 4.2.1 – ディスプレイ 14 4.2.2 – テンポノブ (TEMPO) 14 4.2.3 – ボリュームノブ (VOLUME) 14 4.2.4 – データーボタン (DATA、▼と▲) 14 4.2.5 – プリセットボタン (PRESET) 15 4.2.6 – オクターブボタン (OCT) 15 4.2.7 – グライドボタン (GLIDE) 15 4.2.
UNO Synth 5.2 – プリセット保存(STORE) 19 5.3 – ファクトリープリセット 20 6 – アルペジエーター 21 7 – シーケンサー 22 7.1 – ステップレコーディング (Step Recording) 22 7.2 – リアルタイムレコーディング (Real-Time Recording) 24 7.3 – ステップエディットレコーディング (Step Edit Recording) 25 7.4 – シーケンスの削除 25 7.5 – シーケンサーの長さと再生方向 26 7.6 – キーボードプライオリティ (Keyboard Priority) 26 8 – MIDIインプリメンテーション 27 8.1 – 一般 27 8.2 – UNO Synthを使用した外部MIDI機器のコントロール 27 8.3 – 外部機器を使用したUNO Synthのコントロール 27 8.4 – UNO SynthとコンピューターをMIDI接続 27 8.5 – UNO SynthとコンピューターをUSB接続 27 8.6 – MIDIチャンネル設定 28 8.
UNO Synth イントロダクション UNO Synthをお求め頂き、誠に有難うございます。 パッケージ同梱物 以下、 パッケージ同梱物になります: • • • • • • 4 UNO Synth本体 USBケーブル x1本 単三型乾電池 x4 MIDI変換ケーブル x2 クイックスタートガイド (Quick Start Guide)x1 登録カード (Registration Card)x1 Introduction
UNO Synth UNO Synthの登録 登録をすることで、 テクニカルサポートへのアクセス、 保証の有効および無料のJamPoints™をお客様のアカウントを通じて受け取ることが 可能になります。 JamPoints™は、 将来IK製品をお求め頂く際の割引としてご利用頂けます。 また、 ご登録頂くことで、 最新のソフトウェアアップ デートやIK製品に関する情報を随時受け取ることが可能になります。 登録はこちらから:www.ikmultimedia.
UNO Synth 1 – インストールと設定 ご注意:誤作動や故障を防ぐ為、ボリュームと電源を落としてから、結線を外して下さい。 UNO Synthは、USBバス電源、 または単三型乾電池で動作します。 USB接続:USBホスト (MAC / Windows)と接続した場合、USB規格に従ってホストコンピューターから動作に必要な電源が供給されます。 もし、供給電力が不足の場合、電池駆動に切替えてご利用下さい。 (例えば、 カメラコネクションキットを用いて、iOSデバイスと接続をした場 合、 その可能性はあります。 ) 重要:電池を装着している場合、電源スイッチのポジションがUSBで、USB接続されている場合、UNO Synthは電池駆動で動作いたします。 1 - 電源スイッチ(POWER) 本体の電源をオンとオフを行います。 USBバス電源を使用する場合、USBポジションに設定します。 電池駆動の場合は電池アイコンのポジ ションに設定します。 .
UNO Synth 6 - コントロールノブ UNO Synthのノブコントローラーは通常、“Absolute Mode”に設定されています。 このモードではノブポジションに応じた絶対値でパラメー ターを扱います。 つまり、操作をした際、常にノブポジションの応じたパラメーター値が出力されることを意味します。 (例:プリセット変更後、 ノブポジションと保存値が異なる場合、 ノブを操作するとパラメーター値 がノブポジションにジャンプします。 ) 上記の現象を防ぐ為、2つのモード:Pass-ThroughとRelativeが用意されています。 Pass-Through Modeでは、 ノブポジションが保存値に達するまで、 パラメーター値の変化が発生しないモードです。 Relative Modeでは、 ノブの正逆操作によって、保存値から増減をするモードになります。 ただし、 このモードではノブ操作の最大と最小が実 際の値と一致しない場合があります。 7 1- Installation and setup
UNO Synth 2 – ユニットのオン・オフ - キャリブレーション 本体の電源を投入した際、 アナログシンセサイザーの安定動作に必要なチューニングと静電容量センシング (タッチセンス)の調整が自動で 行われます。 この際、本体画面はまず、“UNO”と表示し、 そして“CAL”の文字が点滅をして、 その状況を示します。 最後に画面にファームウェア バージョンが表示され、調整が完了しましたことを示します。 調整後、電源オフ前に使用したプリセットが読み込まれ、 そのプリセット番号が 表示されましたらユニットが使用可能な状態になります。 調整が正しく行われる為、完了するまで、本体上に物を載せたり、ボタンやノブ類に触れないようにして下さい。 万が一、調整が正しくない場 合、電源を再投入して、調整を再実行します。 調整中、様々なノイズやキャリブレーションを行う為の音が発生しますので、起動をする前にボリュームを下げておくことをお勧めします。 8 2- Turning the unit ON/OFF - Calibration process
UNO Synth 3 – 概要 UNO synthは、強力かつコンパクトなモノフォニックシンセサイザーです。 そしてポータブルサイズでありながら、同価格帯で最も“機能が充 実した楽器”の1つです。 そのサウンド、 その柔軟さによって、 アーティストの創作意欲を刺激する楽器として仕上げられています。 生々しさ、温もり、引き締まったサウンドをはじめ、凡てがこの小さなモノフォニックビーストに備えられています。 その核となるのは、IK Multimediaの設計によるSound Machinesと呼ばれるシンセアーキテクチャーが根幹で、 アナログオーディオパスとデジタルコントロール エンジンを融合したものです。 その為、 アナログ固有の存在感、扱いやすさに精巧かつ正確なデジタルコントロールを可能します。 • ボイスごとに2つのアナログオシレーターを装備。オシレーターはマルチ波形仕様で、三角波、ノコギリ波、矩形波+PWM(パルスワイズ 9 モジュレーション)を含む • • • • ノイズジェレーター • • • • • • • • 5つのパフォーマンスボタン。 演奏に使用 2ポール仕
UNO Synth 4 – フロントパネル UNO Synthのフロントパネルは、大きく3つのセクション:サウンドエディター(Sound Editor)、 マスターセクション (Master Section)とパ フォーマンスコントロール(Performance Controls)で構成されています。 10 4 – Front panel interface
UNO Synth 4.1 – サウンドディター(Sound Editor) サウンドエディターセクションは、4つのボタンと4つのノブのマトリクスコントロールで構成されています。 これらのボタンとノブの組み合わせ で、目的のシンセパラメーターをリアルタイム操作することが出来ます。 パラメーター操作は、 このマトリクス上のみならず、MIDI CC(コンティ ニュアスコントローラー)情報を用いて行うことも可能です。 このことで、追加のシンセパラメーターを操ることも可能です。 (詳細はMIDIイン プリメンテーション表の項目に記載しています。 ) サウンドプログラミングマトリクスの各列でアクセス可能なパラメーターは以下の通りです:. 4.1.
UNO Synth OSCボタンを1秒以上押すことで、 マトリクス表の二次パラメーター操作に切り替わり、OSC1、OSC2とノイズジェネレーター(NOISE)の音量 調節が可能になります。 この際、OSCボタンのLEDは点滅し、操作対象がレベルになっていることを示します。 なお、 この際、 ノブ4の操作は無 効となります。 UNO Synthのオシレーターチューニングはデジタルコントロールされていますので、 ユニット起動時に更新され、自動調節されます。 また、 ALT+TUNEボタン操作で、 いつでもオシレーターチューニングの手動設定が可能です。 4.1.2 – フィルター(FILTER) フィルターはオシレーターから発した音を色付けるシンセサイザーにおける重要な要素です。 .
UNO Synth UNO Synthには2器のエンベロープジェネレーターが用意され、1つはフィルター、もう1つはアプリチュード (音量)に作用します。 パネル上 では、 フィルターエンベロープの立ち上がり (ATTACK)と減衰(DECAY)、 アンプリチュード エンベロープの立ち上がり (ATTACK)と伸びやかさ (RELEASE)を操作します。 UNO Synthのエンベロープは、一般的なADSR(Attack/Decay/Sustain/Relase)の4段階仕様で、ADSRのフルコントロールは、MIDI CC(コ ンティニュアスコントローラー)を使用します。 各パラメーターのCC割り当ては、MIDIインプリメンテーション表に記載しています。 4.1.
UNO Synth 4.2 – マスターセクション (Master Section) パネル上、右側がUNO Synthのマスターセクションとなります。 ここでは、UNO Synth全体に関する設定や操作を行うボタン類とパラメー ター値を表示するディスプレイ、 テンポ (TEMPO)と音量(VOLUME)を扱うノブが配置されています。 4.2.1 – ディスプレイ ノブやボタン操作をした際のパラメーター値を表示します。 4.2.2 – テンポノブ (TEMPO) 内蔵シーケンサーとアルペジエーターの演奏速度を決定づけるテンポを設定します。 同期設定(Sync)をUSBまたは外部MIDI(External)に 設定した場合、 このノブは、同期したソーステンポの倍率:1/4から2x(2倍)を設定します。 4.2.3 – ボリュームノブ (VOLUME) UNO Synth全体の音量出力を調節します。 4.2.
UNO Synth 4.2.5 – プリセットボタン (PRESET) PRESETボタンは、UNO Synthに保存された100のプリセット音色選択、保存に使用します。 また、UNO Synthのホームポジションに戻る 際にも使用します。プリセット選択は、 このボタンを押した後、DATAボタンでプリセット切り替えをします。 プリセット保存をするには、 このボ タンを押したままにします。 詳細はこのマニュアルの第5章に記載しています。 4.2.6 – オクターブボタン (OCT) キーボードのオクターブ範囲を設定します。 OCTボタンを押した後、DATAボタンを使用して、 オクターブ範囲を設定します。 4.2.7 – グライドボタン (GLIDE) ポルタメント量、或いはおさえたノート間の“間引き”量を決定づけます。 設定はGLIDEボタンを押した後、DATAボタンを使用します。 4.2.
UNO Synth 4.2.9 – ディレイタイムとミックスボタン (DELAY TIMEとMIX) DELAYのTIMEとMIXボタンは、 それぞれ内蔵デジタルディレイのディレイタイムとエフェクトバランスを設定します。 ボタンを押した後、DATA ボタンを使用して、値を設定します。 このディレイのフィードバック量は固定となります。 4.2.
UNO Synth 4.3 – パフォーマンスコントロール(Performance controls) パネル上のキーボードとパフォーマンスボタンは、UNO Synthのみでプリセット音色を演奏する際に使用します。 4.3.
UNO Synth 4.3.2 – キーボード / 16ステップボタン UNO Synthには、27のタッチセンス仕様のボタンによるキーボードが用意されています。 これらのボタンに触れたり、横にスライドすること で、演奏をすることが可能です。 この装備により、UNO Synthに扱いやすさと究極のポータブル性をもたらします。 特定のスケール設定をした 場合、下側のキーボタンを使用し、曲調から外れないソロやリフの演奏をサポートします。 下側の“白鍵”に相当するキーボタンはまた、16のステップボタンとして扱います。 ステップボタンについては別の章で解説をします。 キーボードモード(クロマチックスケール) スケールモードのキーボード、 またはシーケンサーモード 4.3.3 – ホールドボタン (HOLD) HOLDボタンは演奏ノートや、ARPオン時のアルペジオコードを持続させる際に使用します。 また、 ステップレコーディング時では、選択ステッ プのノート長:0.
UNO Synth 5 – プリセット UNO Synthは、 シーケンスと音色設定を100のプリセットとして本体に保持することが可能です。 最初の20プリセットはファクトリープリセットで、書き換えは出来ません。 また、内蔵デモは、 この20のプリセットを使用します。 用意されたデモは、UNO Synthに秘められた強力な機能を見つけるのに役立ちます。 まずはご自身の耳でそのことをご確認下さい。 デモを 再生するには、ARPとSEQボタンを同時に押します。 5.1 – プリセット切替 UNO Synthの毎回起動時、前回選択したプリセットが読み込まれます。 プリセットを切り替えるには、PRESETボタンを押した後、上下のDATAボタンを使用して、目的のプリセットを選びます。 5.2 – プリセット保存(STORE) エディットされた音色をプリセットとして保存することが出来ます。 この際、21から100番までのプリセットスロットを使用します。 プリセット保存をするにはまず、 ディスプレイの数字が点滅するまで、PRESETボタンを1.
UNO Synth プリセット番号の1から20は、 ファクトリースペースですので、書き換えや削除することは出来ませんので、 ご注意下さい。 5.
UNO Synth 6 – アルペジエーター アルペジエーターとは?通常、音楽はコード進行に従って構成されています。 しかしながら、全ての音が“和音”として演奏されているわけ ではありません。 例えば、 ギタリストのフィンガーピッキングやつま弾いた音が複雑なパターンを構成します。 また、時にはシンプルに和音を 分散して演奏をすることがあります。 このことをアルペジオと呼びます。 アルペジエーターは自動アルペジオ演奏をする機能で、 シンセ奏者 がシンプルなコードから、複雑なシンセパートを簡単かつ効率よく、印象的なフレーズとして演奏をする為の便利機能です。 まず、ARPボタンを押し、 アルペジエーターをオンにして、 コードをおさえ、 それぞれのノートがどのように演奏されるのかをご確認下さい。 お さえられたノートがマスターテンポに従って、 パターン演奏をします。 通常、 ノートをおさえている間のみ、 アルペジーターが機能します。 “ラッ チ”機能がオンになっている場合、指を離しても、 アルペジエーターはパターン演奏をし続けます。 別のノートやコードをおさえると、 それらの ノートに従って、演奏が変化します。 U
UNO Synth 7 – シーケンサー UNO Synthのシーケンサーは、 より複雑で奥深い自動演奏を行う為の機能です。このシーケンサーには、 これまで同価格帯の製品にはな い素晴らしい機能が盛り込まれています。 パラメーターレコーディングがその1つで、豊かな変化をもたらします。 UNO Synthのシーケンスパ ターンはプリセットごとに設定することが可能で、音色にマッチしたシーケンスをプリセットごとに用意することが出来ます。 UNO Synthのシーケンサーは16ステップ仕様で、 パネル下端の“白鍵”に相当するキーボタンが個々のステップを示します。 このシーケンサーには3つのデーター記録方法が用意されています: • Step Recording(ステップレコーディング) • Real-Time Recording(リアルタイムレコーディング) • Step Edit Recording(ステップエディットレコーディング) 7.
UNO Synth 入力ノートのオクターブを変更する場合は、OCTボタンを使用します。 OCTボタンを押して、DATAボタンでオクターブの範囲を変更します。 オ クターブ設定はそのまま保持されますので、次のステップで、別のオクターブに切り替える場合は、 ノート入力後に再度OCTとDATAボタンで 目的のオクターブ範囲に設定します。 ノートの長さを変更するには、HOLDボタンを使用します。 通常、 ノートの長さは0.
UNO Synth ステップを削除するには、ALT+DATA▼ボタン操作で行います。 ノート削除されたステップは点滅し、 ディスプレは再びディスプレイは、“ー ー”表示になります。 ステップレコーディングを終了するには再度、RECボタンを押します。 7.
UNO Synth 7.
UNO Synth 7.5 – シーケンサーの長さと再生方向 UNO Synthのシーケンサーは、 デフォルトで最長の16ステップを使用して再生します。 特定の長さに制限することが可能です。 長さの変 更は、RANGEボタンを押して、DATAボタンで変更をします。 この設定は、 シーケンスの再生中でも行うことが可能です。 また、 シーケンスの再生方向を変更することも可能です。 SEQボタンを押して、 シーケンサーがオンになっている状態でDIRボタン、 そして DATAボタンで設定をします。 正順(Forward)、逆順(Backward)と正逆順(Back and Forth)の再生設定を選ぶことが可能です。 7.
UNO Synth 8 – MIDIインプリメンテーション 8.
UNO Synth 8.6 – MIDIチャンネル設定 UNO SynthのMIDIチャンネルを設定するには、ALTボタンを押した後、MIDIボタン (MIDIラベル印字されたキーボタン)を押します。 そして、 DATAボタンを使用して、MIDIチャンネル:1から16のいずれかを設定します。 UNO Synthは、MIDI入力と出力チャンネルを個別に設定出来ます。 デフォルトのMIDI入力と出力チャンネルはそれぞれ、1に設定されています。 MIDI INチャンネル設定は、ボタンのLEDが緑色点灯で示されます。 MIDI OUTチャンネル設定は、ボタンのLEDが橙色点灯で示されます。 8.
UNO Synth 8.10 – MIDIインプリメンテーション表 [Monophonic Analog Synthesizer] Model: UNO Synth 1.
UNO Synth [Monophonic Analog Synthesizer] Model: UNO Synth Control # 0 1 2 3 4 5 6 7 8 9 10 11 12 13 14 15 16 17 18 19 20 21 22 23 24 25 26 27 28 29 30 31 32 33 34 35 36 37 38 39 40 41 42 43 44 45 46 47 48 49 50 51 52 53 54 55 56 57 58 59 60 61 62 63 30 Function Bank Select (MSB) Modulation Wheel (MSB) Breath Controller (MSB) Foot Controller (MSB) Portamento Time (MSB) Data Entry (MSB) Channel Volume (MSB) Balance (MSB) Pan (MSB) Expression (MSB) Effect Control 1 (MSB) Effect Control 2 (MSB) Ge
UNO Synth [Monophonic Analog Synthesizer] Model: UNO Synth Control # 64 65 66 67 68 69 70 71 72 73 74 75 76 77 78 79 80 81 82 83 84 85 86 87 88 89 90 91 92 93 94 95 96 97 98 99 100 101 102 103 104 105 106 107 108 109 110 111 112 113 114 115 116 117 118 119 120 121 122 123 124 125 126 127 31 Function Sustain Pedal Portamento On/Off Sostenuto Soft Pedal Legato Footswitch Hold 2 Sound Controller 1 (default: Sound Variation) Sound Controller 2 (default: Timbre / Harmonic Quality) Sound Controller 3
UNO Synth [Monophonic Analog Synthesizer] Model: UNO Synth MIDI Implementation Chart Function SysEx Enter Setup Mode [SETUP] Pot Mode: Absolute (default) [SETUP] Pot Mode: Relative [SETUP] Pot Mode: Pass-Through [SETUP] MIDI Soft Thru ON (default) [SETUP] MIDI Soft Thru OFF [SETUP] MIDI Interface Mode ON (default) [SETUP] MIDI Interface Mode OFF [SETUP] Send Program Change ON [SETUP] Send Program Change OFF (default) [SETUP] MIDI Local ON (default) [SETUP] MIDI Local OFF F0 00 21 1A 02 01 11 01 7F F7
UNO Synth 9 – 本体仕様 シンセシス • • • • • • • • 種類:アナログ 発音数:シングルボイス シンセシスアーキテクチャー:2 VCO、 ノイズジェネレーター、1 VCF、1 VCA、2 EG、1 LFO VCO波形:バリアブルシェイプ、三角波、 ノコギリ波、 パルス幅可変の矩形波 VCF:2-ポール、 レゾナントマルチモードフィルター、 カットオフ、 レゾナンス、 エンベロープ量、 ドライブを装備 LFO:7波形(サイン、三角、矩形、 ノコギリ、逆ノコギリ、 ランダム、S&H)とレート設定 モジュレーションディスティネーション:アンプ、 ピッチ、 フィルター、PWM、波形(MIDI CCによるPWMと波形の連続変化) EG:フィルターとアンプ、 それぞれ1つを装備(MIDIによるADSRフルコントロール) プリセット • 100(20ファクトリー、80ユーザー)、ファクトリープリセットは上書き不可 キーボードとコントロール • 7x ノブ(4xマトリクス、3x固定) • 13x スケール設定(クロマチック、メジャー、マイナー、メジャーペンタトニック、マイナーペン
UNO Synth 寸法と重量 :25.6cm/10.1” x 15cm/8.9” x 4.9cm/1.93” • サイズ(W x D x H) • Weight: 400g/14.
UNO Synth 10 – トラブルシューティング オーディオ信号にノイズや外部干渉があります。 UNO SynthとコンピューターをUSB接続してご利用されている場合、 コンピューターのグランドノイズがUSBに混入していることが原因と 想像します。 この場合、2つの方法で解決することが可能です。 コンピューターとのUSB接続の代わりに、MIDIで接続をすることで、USBグラン ドノイズを回避します。 この場合、 コンピューターにMIDIインターフェイスを用意して (あるいはオーディオインターフェイスのMIDI入出力)、 UNO SynthのMIDI入出力を繋ぎます。 そして、UNO Synthの電源は電池またはUSB電源アダプターで供給をします。 もう1つの方法は、 この マニュアルの製品仕様の項目に記載されています専用のバランスケーブルをオーディオ出力に用いることで、回避、改善することが可能で す。 この際、受け側のオーディオインターフェイスやプリアンプ、 ミキサーの入力もバランス入力に対応していることが必須です。 IK Multimedia製品のシリアル番号はどこ? 製品のシリアル番号(Seria
UNO Synth 11 – サポート ご質問があります場合、 まずWebページのFAQにてご確認下さい:www.ikmultimedia.com/faq 一般的なご質問とその回答をご用意しております。 テクニカルサポートがご必要の場合はサーポートフォームを通じてお問い合わせ願います:www.ikmultimedia.com/support 保証に関する情報は、Webページにてご確認下さい:www.ikmultimedia.com/warranty その他の製品、販売、情報に関するご質問はこちらモーフォームを通じてお問い合わせ願います:www.ikmultimedia.com/contact-us 11.
IK Multimedia Production Srl Via dell’Industria, 46, 41122 Modena Italy IK Multimedia US, LLC 590 Sawgrass Corporate Pkwy. Sunrise, FL 33325 USA IK Multimedia Asia TB Tamachi Bldg. 1F, MBE #709 4-11-1 Shiba Minato-ku, Tokyo 108-0014 Japan www.ikmultimedia.