UNO Synth Pro Analog Paraphonic Dual-Filter Synthesizer USER MANUAL
UNO Synth Pro Table of Contents Contents 2 Introduction 3 In The Box 3 Register Your UNO Synth Pro 3 Precautions 3 1 – Installation and Setup 5 2 – Turning The Unit On/Off - Calibration Process 7 3 – Overview 8 4 – Front Panel Interface 10 4.1 – Home Display 11 4.2 – Sound Editing Matrix 11 4.2.1 – Oscillators (OSC) 12 4.2.2 - Mixer (MIX) 13 4.2.3 – Filters (FILTER) 14 4.1.4 – LFOs (LFO) 16 4.2.5 – Envelopes (FILTER ENV - AMP ENV) 17 4.2.6 – Modulation Matrix (MATRIX) 19 4.2.6 – Effects (FX) 21 4.2.
UNO Synth Pro Introduction Thank you for purchasing UNO Synth Pro. In The Box • • • • UNO Synth Pro USB cable Power Supply (not on Desktop version) Registration Card with QR Code User Manual Register Your UNO Synth Pro By registering, you can access technical support, activate your warranty and receive free JamPoints™, which will be added to your account.
UNO Synth Pro Handling To avoid breakage, do not apply excessive force to the knobs, capacitive controls, buttons or the OLED display. Care If the exterior becomes dirty, wipe it with a clean and dry cloth. Do not use liquid cleaners such as benzene or thinner, or cleaning compounds of flammable polishes. Keep this manual After reading, please keep this manual for later reference. Keep foreign matter out of your unit Never set any container with liquid in it near this unit.
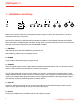
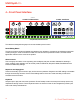
UNO Synth Pro 1 – Installation and Setup 2 1 3 4 5 6 7 DESKTOP VERSION ONLY Please note: To prevent malfunction and equipment failure, always turn down the volume and turn off all the units before making any connections. UNO Synth Pro Desktop is USB powered and includes two USB micro ports labeled USB and AUX POWER. When connected to a USB host (Mac, Windows), enough power may be provided by the host. If the connected host does not provide enough power, then AUX POWER is needed.
UNO Synth Pro 6 – Audio OUT Connect the UNO Synth Pro output to an external amp, mixer or audio interface. Note that the output is stereo because of the integrated digital effects. 7 – MIDI IN/OUT ports Connect the UNO Synth Pro to a MIDI interface, controller, synthesizer or drum machine with standard 5-pin MIDI DIN connectors.
UNO Synth Pro 2 – Turning The Unit On/Off - Calibration Process UNO Synth Pro powers on as soon as the power supply is connected to the unit. The unit can then be powered on and off by pressing and holding the HOLD Button. Once powered ON it automatically starts the first tuning and capacitance sensing calibration. During the calibration the display will first show a static “UNO,” the FW version and then a blinking “CALIBRATION.” FW V 1.0.
UNO Synth Pro 3 – Overview UNO synth Pro is a powerful and portable monophonic synthesizer with features that change the meaning of “complete instrument” for the price range. It’s an instrument that will become known for its sound and flexibility, ready for creative artists that need inspiration. Raw, warm, tight and everything in-between, this monophonic beast is the first of its kind thanks to the easy and powerful analog architecture and the complex digital controls.
UNO Synth Pro Advanced connectivity · Noiseless balanced stereo/headphone outs · USB and MIDI In/Out · 2 Programmable CV/Gate In/Out · Audio input for filters and FX, daisy-chain UNO for all · Tabletop – ultra-lightweight and portable · Keyboard – compact metal housing · Full-size 37 keys Fatar keyboard with pitch/mod wheels · Powered via USB or power bank 9 3 – Overview
UNO Synth Pro 4 – Front Panel Interface DESKTOP VERSION ONLY SOUND EDITING MATRIX GLOBAL CONTROLS SEQUENCER/ARPEGGIATOR The interface is designed with groups of controls divided by their function. Sound Editing Matrix: The group of buttons, knobs and lighted text indicators work together to navigate the sound design parameters of the synth engine. These controls are located on the left and are comprised of 8 buttons, 6 knobs and the lighted text indicators in the center of the product.
UNO Synth Pro 4.1 – Home Display The display of the USP on the home page gives information about the Preset, BPM/Sync and the Voice mode. On the top left, when sync is set to INTERNAL, the BPM is shown, otherwise the EXT will let you know that the machine will wait for external tempo. On the top right the Voice mode of the preset is shown as LEG for legato, MON for mono and PAR for paraphonic. 120 LEG 4.
UNO Synth Pro 4.2.1 – Oscillators (OSC) The UNO Synth Pro voice is comprised of 3 analog oscillators and a noise generator. To enter the editing of the oscillators, press OSC; the OSC button will light, and the 1st row of the oscillator text indicators in the center section will light. Pressing OSC again lights the 2nd row. Pressing OSC toggles between the two rows.
UNO Synth Pro 4.2.2 - Mixer (MIX) Pressing the MIXER button lights the 3rd row of text indicators. LEVEL 1: adjusts the pre-filter volume of Oscillator 1 from 0 to 127. LEVEL 2: adjusts the pre-filter volume of Oscillator 2 from 0 to 127. LEVEL 3: adjusts the pre-filter volume of Oscillator 3 from 0 to 127. NOISE: adjusts the pre-filter volume of the Noise Generator from 0 to 127.
UNO Synth Pro 4.2.3 – Filters (FILTER) The UNO Synth Pro is equipped with 2 filters for its voice that can be routed either in series or parallel. Filter 1 is a 2-pole OTA based filter with HP and LP modes. This is a version of the original UNO Synth filter with improved stability and control. Filter 2 is a selectable 2 or 4-Pole LP based on the SSI2164 chip. The CUTOFF and RESonance controls are shared for the 2 filters. They are located outside the matrix and are always available.
UNO Synth Pro The Spacing control is a fixed modulation route like the Envelope Amount to Filter control. MODE: Depending on the selected filter, selects the mode, slope and routing of the two filters using as following: FILTER 1: • • • • • 2P LP 0° 2P LP 180° 2P HP 0° 2P HP 180° BYPASS FILTER 2 • • • • • • 2P LP SERIAL 4P LP SERIAL 2P LP PARALLEL 4P LP PARALLEL BYPASS SERIAL BYPASS PARALLEL Other parameters are accessible from the EDIT PRESET menu.
UNO Synth Pro 4.1.4 – LFOs (LFO) There are 2 LFOs that extend into the audio range Press the LFO button to light the 5th row of text indicators and access the LFO 1 controls. The 1 above the LFO button will light. Press the LFO button again to light the 2 indicator and access the LFO 2 parameters. Pressing LFO toggles between the two LFOs. Each LFO has these identical controls: WAVE: Hard switch between Sine, Triangle, Falling Sawtooth, Rising Sawtooth, Square, Random, S&H, Noise.
UNO Synth Pro 4.2.5 – Envelopes (FILTER ENV - AMP ENV) There are two ADSR envelopes, the Filter Envelope and the Amp Envelope. The Filter Envelope modulates the cutoff frequency of the two filters with the modulation amount set by the Envelope Amount controls for each filter. The Amp Envelope modulates the volume of the VCA by 100%. The envelopes can also be used as sources to modulate other parts of the synth in the Modulation Matrix.
UNO Synth Pro is from 0 to 127. RELEASE: Sets the amount of time for the sustain level to 0. The range is 0.1ms to 30 sec. Other parameters are accessible from the EDIT PRESET menu. LOOP: Both envelopes have the ability to loop. When the control is set to ON, it goes back to the attack stage after the end of the decay stage, and repeats the envelope cycle until stopped.
UNO Synth Pro 4.2.6 – Modulation Matrix (MATRIX) The Modulation Matrix is the way to create modulation connections between parts of the engine, which are usually not connected (ex: the amp envelope modulating the OSC2 wave). There are 16 modulation slots available, each with a source, destination and amount. Modulation amounts can have unipolar or bipolar values depending on the destination. For bipolar destinations, negative values create inverted modulations.
UNO Synth Pro MODULATION SOURCES MODULATION DESTINATIONS Velocity OFF Mod Wheel Osc 1 Tune Aftertouch Osc 1 Wave Key Pitch Osc 1 Level Key Gate Osc 2 Tune Osc 1 Tune Osc 2 Wave Osc 1 Level Osc 2 Level Osc 2 Tune Osc 2 FM Amount Osc 2 Tune Osc 3 Tune Osc 3 Tune Osc 3 Wave Osc 3 Level Osc 3 Level Noise Osc 3 FM Amount Filter 1 Cuto Noise level Filter 1 Res Filter 1 Cuto Filter 2 Cuto Filter 1 Res Filter 2 Res Filter 2 Cuto Filter Spacing Filter 2 Res LFO 1 Filter Spacing
UNO Synth Pro 4.2.6 – Effects (FX) UNO Synth Pro is equipped with 3 slots of digital effects, which are MODulation, DELAY and REVERB, plus an analog DRIVE. All effects are mono-to-stereo, 48kHz 16-bit. The FX amounts are available by pressing the FX button, which lights the 9th and last row of the text indicators. DRIVE: Adjusts the amount of signal going to the drive circuit, which is built around 2 diodes positioned after the filter stage. The range is 0 to 127.
UNO Synth Pro 4.2.7 – Effects Type List And Parameters The controls for the effects are: DELAY: TYPE: Selects between MONO, STEREO, DOUBLER, PING PONG and LCR. SYNC: Enables or disables the sync of the delay division to the master tempo. TIME (both L and R when available): Adjusts the delay tempo and division. When sync is off, the tempo goes from 1ms to 350ms without decimal values.
UNO Synth Pro 4.2.8 – Other Sound Editing Shortcuts Due to the complexity of the engine and the limitation of the UI, some shortcuts are handy to speed up the process of sound design for advanced users. For editing, depending on which sound editing button is pressed, pressing the DATA encoder will show the relative menu or parameter inside the EDIT PRESET menu (e.g. OSC will show the OSC menu).
UNO Synth Pro 5 – Global Controls The global settings are a group of buttons dedicated to the play mode, the presets and the internal MIDI and system settings. 5.1 – Presets The unit is capable of storing 256 presets. The presets can be recalled by Program Change with 2 banks of 128 presets each. All presets can be renamed on the machine itself using a maximum of 14 characters each.
UNO Synth Pro 5.1.3 – Recall Preset To recall a preset, the PRESET button has to be lit, meaning preset operations are enabled. Turning the DATA knob will show the preset lists, but only PUSH will recall the preset. BACK discards the operation.
UNO Synth Pro 5.2 – Setup The setup menu is where the global utility settings are selected. Machine settings includes MIDI and system management. 5.2.1 – Master Tuning In this first voice of the menu, you can select the Master Tuning between +/-50cents from the standard A at 440Hz. 5.2.2 – MIDI UNO Synth Pro transmits the front panel knob and button movements via Control Change messages (CC), and also receives CC messages for external control.
UNO Synth Pro 5.2.3 – Sync You can synchronize the UNO tempo to the clock of an external sequencer or other devices. SEND: the send of the MIDI Clock can be turned ON or OFF, or you can use the CV SYNC. Note that the CV Sync uses both CV OUT ports: on CV OUT 1 it will send the clock, while on CV OUT 2 it will send the gate. The gate information will be used by some devices as RUN/STOP trigger. RECEIVE: you can select the sync between Internal, External and USB, or you can use the CV SYNC.
UNO Synth Pro TRANSPOSE You can transpose the entire keyboard +/- 12 semitones. PITCH WHEEL Adjust the Pitch Wheel range between 0 and 12 semitones KNOB UNO Synth Pro knob behavior uses “Absolute Mode” by default: this means that the knob value is recalled using the absolute value of the position of the knob when edited (i.e.: turn a pot and the value jumps immediately from the stored value to the edited value). The other 2 modes are Pass-Through and Relative.
UNO Synth Pro 5.3 – Song Pressing SONG will activate song mode. In Song mode you can chain up to 64 presets. When the chain is active, the steps of the sequencer become the presets to chain. By default, the patterns are empty. Pressing the step lets you enter or modify the preset number to insert in the step. Pressing play will start the playback of the song from the selected step.
UNO Synth Pro 5.4 – Arpeggiator UNO Synth Pro is equipped with a multimode arpeggiator with 10 modes, a 4-octave range and hold functionality. The modes are: UP: Held notes play from the lowest to the highest (default). DOWN: Held notes play from the highest to the lowest. U/D: Held notes play from the lowest to the highest then down to the lowest again. UD+: A variation of U/D (up/down) where the upper note and the lower note play twice at the top and bottom of the pattern instead of just playing once.
UNO Synth Pro Holding the arpeggio You can hold the arpeggio notes by pressing HOLD. The button will light up when engaged. Recording the arpeggio into the sequencer To record the arpeggio into the sequencer, while holding the notes for the arpeggio with the arpeggiator engaged, press REC+PLAY: the sequencer button will blink and it will record the arpeggio in 16 steps. Once the 16th step is recorded, the arpeggiator will disengage and the sequencer will playback what has been recorded.
UNO Synth Pro 5.5 – Sequencer The sequencer is a 64-step sequencer capable of recording notes, chords and parameters. Recording options are REALTIME and STEP. Majority of the editing parameters can be recorded in the sequencer, plus some additional sequencer-only parameters such as Accent, Tie and Gate. Activate sequencer The sequencer activates when the SEQ button is pressed and the button lights up, or when PLAY is pressed and the playback of the sequencer starts. Everything is active apart from the ARP.
UNO Synth Pro 5.5.1 – ALT(ernative) Editing button When enabled, the ALT editing option become available and the buttons of the sound editing section become the alternate editing buttons. Please note that only CUTOFF, RES and DATA remain editable. CLEAR: This is the tool used to clear the majority of the events recorded or saved. While holding CLEAR: - Press any step to delete all the events stored in the step (valid also on SONG mode). - Press SEQ to delete the entire sequence.
UNO Synth Pro Use the keyboard range of 1 octave above or below to transpose the sequence accordingly.
UNO Synth Pro 5.6 – Voice Mode: Assign System The voice assign system is responsible for the allocation of the voices composing the analog engine, and change behavior based on the VOICE MODE selected. Using the VOICE button, the screen will show the selection and the relative options to customize the selected mode. The voice mode is a parameter saved in a preset.
UNO Synth Pro 6 – FAQ and Troubleshooting 1.The ARP is not working properly, what could be the issue? This can occur when no MIDI Clock data is being sent to the unit. Please check your SYNC setting in the UNO Synth Pro as this may be set to USB, or EXTERNAL which could result in no incoming data. Setting the SYNC setting to INTERNAL will correct this behavior. 2. How come the Sequencer/Patterns are not playing back? This can occur when no MIDI Clock data is being sent to the unit.
UNO Synth Pro 7 – Support For any questions you may have, please refer to the FAQ webpage at: ikmultimedia.com/faq Here you will find answers to the most commonly asked questions. To submit a Technical Support Form, go to: ikmultimedia.com/support For warranty information, please visit: ikmultimedia.com/warranty For other requests such as Product, Sales, or Web info, please go to: ikmultimedia.
IK Multimedia Production Srl Via dell’Industria, 46, 41122 Modena Italy IK Multimedia US, LLC 590 Sawgrass Corporate Pkwy. Sunrise, FL 33325 USA IK Multimedia Asia TB Tamachi Bldg. 1F, MBE #709 4-11-1 Shiba Minato-ku, Tokyo 108-0014 Japan www.ikmultimedia.com UNO® Synth Pro is registered trademark property of IK Multimedia Production Srl.