
Instructions
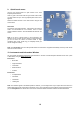

Table Of Contents
- 1. Introduction
- 2. System requirements
- 3. Installation (Microsoft Windows)
- 4. Installation (Apple Mac OS X)
- 5. Program activation
- 6. Basic settings
- 7. Load aircraft
- 8. Load scenery
- 9. Quick launch menu
- 10. Instruments and Information Window
- 11. Various camera modes
- 12. Moving the camera and model
- 13. Menu „Controller“
- 14. Seecond-player mode
- 15. Contests and flight training modes
- 16. Adjust wind (F3)
- 17. Simulation setup (F2)
- 18. Record and play back flights
- 19. Multiplayer mode
- 20. Model editor
- 21. Contact and Support

13. Menu „Controller“
All settings that are associated with your controller are summarized in
this menu.
Scan for new controllers
Choose this menu item if you wish to connect a new controller for yourself or
for a second player. After scanning, controllers are displayed in the menu and
can be selected as required. See following point.
Assign controllers
In the menu under 'Controller Player 1' and 'Controller Player 2' you can
directly assign a controller to a player. All the identified controllers are
displayed for selection (in this case a transmitter at the interface cable and a
joystick).
Controller mode
Assign the sticks to each individual player.
Assign sliders
Opens the relevant window from the Easy Setup mode in which you can assign the sliders or keys to the most common
model functions. See 5.1.Setting up your input device
Advanced channel setups
This menu contains the advanced setups in which the professionals have access to all possible model functions. You can
also make more customized setups.
Initial controller setup
Here you can return to the various easy function setups of the Easy Setup mode.
Compare 5.1.Setting up your input device above.
Calibrate and Configure: Re-start complete Easy Setup.
Calibrate only: If one/several channels are incorrectly calibrated, you can recalibrate here.
(Steps 1 and 2 of the Easy Setup mode)
Mode selection: Reopens Step 4 of the Easy Setup mode, in which you can choose the
transmitter modes for aircraft’s and helicopters and see which stick
controls which function.
Assign Controller (Expert)
Click here to go to the advanced settings in which experts have access to all kinds of model functions. You can find more
individualized settings here.
Re-calibrate
Here you can once again return to the different basic settings of the EasySetup.
you´ll be guided through the calibration in two steps.
Re-configure
Here you can once again perform all 5 steps of the control device base setting of the EasySetup.
19