FORNEBY en
ENGLISH Please refer to the last page of this manual for the full list of IKEA appointed After Sales Service Provider and relative national phone numbers.
ENGLISH 4
ENGLISH 4 Contents Safety information Safety instructions Installation Product description Control panel Before first use Daily use Clock functions Using the accessories Additional functions 4 7 10 10 11 11 13 20 21 22 Hints and tips Care and cleaning Troubleshooting Technical data Energy efficiency Menu structure Environmental concerns IKEA guarantee 23 26 28 29 30 30 31 31 Subject to change without notice.
ENGLISH • • • 5 WARNING: The appliance and its accessible parts become hot during use. Keep children and pets away from the appliance when in use and when cooling down. If the appliance has a child safety device, it should be activated. Children shall not carry out cleaning and user maintenance of the appliance without supervision. General Safety • • • • • • • • • • • Only a qualified person can install this appliance and replace the cable.
ENGLISH • • • • • • • • • • • • 6 If the door or door seals are damaged, the appliance must not be operated until it has been repaired by a competent person. Only a qualified person can carry out any service or repair operation that involves the removal of a cover which gives protection against exposure to microwave energy. Do not heat liquids and other foods in sealed containers. They are liable to explode. Metallic containers for food and beverages are not allowed during microwave cooking.
ENGLISH • 7 Failure to maintain the appliance in a clean condition could lead to deterioration of the surface that could adversely affect the life of the appliance and possibly result in a hazardous situation. Safety instructions Installation Warning! Only a qualified person must install this appliance. • • • • • • • • Remove all the packaging. Do not install or use a damaged appliance. Follow the installation instructions supplied with the appliance.
ENGLISH • • • • • • • replaced, this must be carried out by our Authorised Service Centre. Do not let mains cables touch or come near the appliance door or the niche below the appliance, especially when it operates or the door is hot. The shock protection of live and insulated parts must be fastened in such a way that it cannot be removed without tools. Connect the mains plug to the mains socket only at the end of the installation.
ENGLISH • • • • • Replace immediately the door glass panels when they are damaged. Contact the Authorised Service Centre. Make sure the cavity and the door are wiped dry after each use. Steam produced during the operation of the appliance condensates on cavity walls and can cause corrosion. Clean regularly the appliance to prevent the deterioration of the surface material. Fat and food remaining in the appliance can cause fire and electric arcing when the microwave function operates.
ENGLISH 10 Installation Warning! Refer to Safety chapters. The manufacturer is not responsible if you do not follow the safety precautions from the Safety chapters. Assembly This oven is only supplied with a main cable. Refer to the Assembly Instructions for the installation. Electrical installation Warning! Only a qualified person must do the electrical installation.
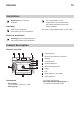
ENGLISH 11 Control panel Control panel overview Fast Heat Up Timer Light Microwave power Confirm set‐ ting Press Turn the knob Select a heating function to turn on the appliance. Turn the knob for the heating functions to the off position to turn the appliance off. Display Display with key functions. Display indicators Basic indicators Lock Assisted Cooking Settings Microwave function indicator Timer indicators Minute minder End time Progress bar - for temperature or time.
ENGLISH 12 Initial cleaning Before the first use, clean the empty appliance and set the time: 00:00 Set the time. Press . Initial preheating Preheat the empty oven before the first use. Step 1 Remove all accessories and removable shelf supports from the oven. Step 2 Set the maximum temperature for the function: Let the oven operate for 1 h. . The oven can emit an odour and smoke during preheating. Make sure that the room is ventilated.
ENGLISH 13 Step 1 Open the door and remove the child lock with the torx key supplied with the oven. Step 2 Fix the screw back after removing the child lock. Daily use Warning! Refer to Safety chapters. How to set: Heating functions Step 1 Step 2 Turn the knob for the heating functions and select a heating function. Turn the control knob to set the temperature. Press . - press and hold to turn on the function: Fast Heat Up. It is available for some oven func‐ tions.
ENGLISH 14 MICROWAVE POWER W MAXIMUM TIME min 100 - 600 59:55 >600 7 If you open the door, the microwave function stops. To start it again, close the door. Press . How to set: Microwave combi functions Step 1 Remove all accessories. Insert microwave bottom glass plate. Put the food on the microwave bottom glass plate. Step 2 Turn the knob for the heating functions and select the function: The display shows: temperature and microwave power.
ENGLISH 15 Heating function Application To bake pizza. To make intensive browning and a crispy bottom. Pizza Function To roast large pieces of meat on one level. To make gratins and to brown.The function with MW boost, power range: 100 - 600 W. Turbo Grilling + MW Baking on one shelf position.The function with MW boost, power range: 100 - 600 W.
ENGLISH 16 P1 - P... Enter the menu. Select Assisted Cook‐ ing. Press Select the dish. Press . . Assisted Cooking Legend Weight Automatic available. 3 Frozen To make convenience food Foods (e.g., french fries, potato wedges or spring rolls) crispy. 4 Con‐ ven‐ tional Cook‐ ing + MW Baking and roasting food on one shelf position. The function with MW boost, power range: 100 - 600 W. Grill + MW To cook food in a short time and to brown it. The function with MW boost, power range: 100 - 600 W.
ENGLISH 17 Dish 5 Beef roast / braised (prime rib, top round, thick flank) 6 Roast Beef, rare (slow cooking) 7 Roast Beef, medi‐ um (slow cooking) 8 Roast Beef, well done (slow cook‐ ing) 9 Fillet, rare (slow cooking) 10 Fillet, medium (slow cooking) 11 Fillet, done (slow cooking) 12 Veal roast (e.g. shoulder) 13 14 15 16 17 Weight Shelf level / Accessory 1.5 - 2 kg 1; roasting dish on wire shelf 1; baking tray 1 - 1.
ENGLISH 18 Dish Whole chicken Weight Shelf level / Accessory 1 - 1.5kg; fresh 1; ceramic or glass casserole dish on wire shelf, MW suitable Use your favourite spices. Put the chicken breast-side down and turn it over after half of the cooking time. 18 19 20 21 Half chicken Chicken breast 0.5 - 0.8 kg 180 - 200 g per piece 1; casserole dish on wire shelf Use your favourite spices. Fry the meat for a few minutes on a hot pan.
ENGLISH 19 Dish Weight Shelf level / Accessory 32 Chocolate muf‐ fins - 2; muffin tray on wire shelf 33 Loaf cake - 1; loaf pan on wire shelf 34 35 Baked potatoes 1 kg 1; baking tray Put the whole potatoes with skin on baking tray. Wedges 1 kg 2; baking tray lined with baking paper Use your favourite spices. Cut potatoes into pieces. 36 Grilled mixed vegetables 37 Croquets, frozen 0.5 kg 2; baking tray 38 Pommes, frozen 0.
ENGLISH 20 Clock functions Clock functions Clock Function Application When the timer ends, the signal sounds. Minute minder Cooking time When the timer ends, the signal sounds and the heating function stops. To postpone the start and / or end of cooking. Time Delay Maximum is 23 h 59 min. This function has no effect on the opera‐ tion of the oven. To turn on and off the Uptimer select: Menu, Settings.
ENGLISH 21 How to set: Cooking time Step 1 Step 2 Step 3 Step 4 The display shows: 0:00 Choose a heating function and set the temperature. Press repeatedly: Set the cooking time. . Press: . Timer starts counting down immediately. How to set: Time Delay Step 1 Select the heating function. Step 2 Step 3 Press re‐ peatedly: Step 4 Step 5 The dis‐ play shows: the time of day . START Step 6 The dis‐ play shows: --:-Set the start time. Press: . STOP Set the end time.
ENGLISH 22 Wire shelf: Push the shelf between the guide bars of the shelf support and make sure that the feet point down. Baking tray: Push the tray between the guide bars of the shelf support. Microwave bottom glass plate: Use the microwave bottom glass plate only with microwave function. It is not suitable for combined microwave func‐ tion (e.g. microwave grilling). Put the accessory on the bottom of the cavity. You can put the food directly on the mi‐ crowave bottom glass plate.
ENGLISH 23 Automatic switch-off For safety reasons the appliance turns off after some time, if a heating function works and you do not change any settings. (°C) (h) (°C) 200 - 230 (h) 5.5 The Automatic switch-off does not work with the functions: Light, Time Delay. 30 - 115 12.5 Cooling fan 120 - 195 8.5 When the appliance operates, the cooling fan turns on automatically to keep the surfaces of the appliance cool.
ENGLISH 24 Put the frozen, unwrapped food on a small upturned plate with a container below it, or on a defrosting rack or plastic sieve so that the defrosting liquid can leak out. To cook fruit and vegetables without defrosting them first, you can use a higher microwave power. Remove defrosted pieces subsequently. Microwave suitable cookware and materials For the microwave use only suitable cookware and materials. Use below table as a reference. Check the cookware / material specification before use.
ENGLISH 25 Cookware / Material Baking tray X X Wire shelf X X X Microwave glass bottom plate Cookware for microwave use, e.g. crisp pan X X X Recommended power settings for different kinds of food The data in the table is for guidance only.
ENGLISH 26 Microwave function Use wire shelf unless otherwise specified. Food Power W Quantity kg Shelf posi‐ tion Time min Comments Sponge cake 600 0.475 Bottom 8-9 Turn container around by 1/4, half‐ way through the cooking time. Meatloaf 400 0.9 1 25 - 27 Turn container around by 1/4, half‐ way through the cooking time. Egg custard 500 1 2 30 - 33 - Meat defrosting 100 0.5 1 15 Turn the meat up‐ side down halfway through the cooking time.
ENGLISH 27 Notes on cleaning Clean the front of the appliance only with a microfibre cloth with warm wa‐ ter and a mild detergent. Use a cleaning solution to clean metal surfaces. Cleaning Agents Clean stains with a mild detergent. Clean the cavity after each use. Fat accumulation or other residue may cause fire. Clean the appliance ceiling carefully from residue and fat. Everyday Use Do not store the food in the appliance for longer than 20 minutes.
ENGLISH 28 Before you replace the lamp: Step 1 Step 2 Step 3 Turn off the oven. Wait until the oven is cold. Disconnect the oven from the mains. Put a cloth on the bottom of the cavity. Top lamp Step 1 Turn the glass cover to remove it. Step 2 Clean the glass cover. Step 3 Replace the lamp with a suitable 300 °C heat-resistant lamp. Step 4 Install the glass cover. Troubleshooting Warning! Refer to Safety chapters. What to do if...
ENGLISH 29 Error codes ---°C The appliance door is closed. Turn the appli‐ ance off and on and set the microwave func‐ tion again. If the display shows an error code that is not in this table turn the house fuse off and on to restart the appliance. If the error code recurs contact an Authorised Service Centre. Service data If you cannot find a solution to the problem yourself, contact an Authorised Service Centre. The necessary data for the service centre is on the rating plate.
ENGLISH 30 Energy efficiency Energy saving Make sure that the appliance door is closed when the appliance operates. Do not open the appliance door too often during cooking. Keep the door gasket clean and make sure it is well fixed in its position. Use metal cookware to improve energy saving (only when you use a non-microwave function). When possible, do not preheat the appliance before cooking. Keep breaks between baking as short as possible when you prepare a few dishes at one time. the residual heat.
ENGLISH 31 Settings 01 Time of day Change 02 Display brightness 1-5 03 Key tones 1 - Beep 2 - Click 3 - Sound off 04 Buzzer volume 1-4 05 Uptimer On / Off 06 Light On / Off 07 Demo mode Activation code: 2468 08 Software version Check 09 Reset all settings Yes / No Environmental concerns Recycle materials with the symbol . Put the packaging in relevant containers to recycle it.
ENGLISH • • • • • • • • • • • Deliberate or negligent damage, damage caused by failure to observe operating instructions, incorrect installation or by connection to the wrong voltage, damage caused by chemical or electro-chemical reaction, rust, corrosion or water damage including but not limited to damage caused by excessive lime in the water supply, damage caused by abnormal environmental conditions. Consumable parts including batteries and lamps.
ENGLISH 3. ask for clarification on user manual contents and specifications of the IKEA appliance. To ensure that we provide you with the best assistance, please read carefully the Assembly Instructions and/or the User Manual section of this booklet before contacting us. How to reach us if you need our service Please refer to the last page of this manual for the full list of IKEA appointed contacts and relative national phone numbers.
Country Phone number België Call Fee Opening time Binnenlandse gesprekskosten 8 tot 18.30 Weekdagen Zaterdag 9 tot 13u Tarif des appels nationaux 8 à 18.30 en semaine Samedi 9 à 13h От 8:30 до 17:30 ч в работни дни 02/716.24.44 Belgique България +359 2 492 9397 Според тарифата на оператора за обаждания към стационарен номер Česká Republika 246 019721 Cena za místní hovor Danmark 70 15 09 09 Landstakst Deutschland +49 1806 33 45 32* * 0,20 €/Verbindung aus dem Festnetz max.
867371988-A-042023 © Inter IKEA Systems B.V.