
User manual


2. Connect the wire coloured blue to the ter-
minal either marked with the letter “N“ or
coloured black.
3. Connect the wire coloured brown to the
terminal either marked with the “L“ or col-
oured red.
4. Check that no cut, or stray strands of wire
is present and the cord clamp
4
is secure
over the outer sheath.
5. Make sure the electricity supply voltage is
the same as that indicated on the appli-
ance rating plate.
6. Switch on the appliance.
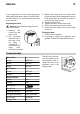
The appliance is supplied with a 13 amp plug
fitted
2
. In the event of having to change the
fuse in the plug supplied, a 13 amp ASTA ap-
proved (BS 1362) fuse must be used.
Warning! A cut off plug inserted into a
13 amp socket is a serious safety (shock)
hazard. Ensure that it is disposed of safely.
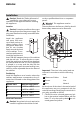
Rear spacers
In the accessory bag you find two spacers
which must be fitted as shown in the picture.
Slacken the screws and insert the spacer under
the screw head, then tighten the screws.
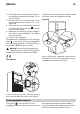
Levelling
When placing the appliance ensure that it
stands level. This can be achieved by two ad-
justable feet at the bottom in front.
Environmental concerns
The symbol on the product or on its
packaging indicates that this product may not
be treated as household waste. Instead it
should be taken to the appropriate collection
point for the recycling of electrical and
ENGLISH 14