LAGAN GB DE FR IT
ENGLISH 4 DEUTSCH 17 FRANÇAIS 31 ITALIANO 45
ENGLISH 4 Contents Safety information Safety instructions Installation Product description Before first use Daily use Additional functions 4 5 7 8 8 9 9 Cooking tables Care and cleaning What to do if… Technical data Environment concerns IKEA GUARANTEE 9 11 12 13 14 14 Subject to change without notice. Safety information Before the installation and use of the appliance, carefully read the supplied instructions.
ENGLISH 5 • Internally the appliance becomes hot when in operation. Do not touch the heating elements that are in the appliance. Always use oven gloves to remove or put in accessories or ovenware. • Do not use a steam cleaner to clean the appliance. • Before maintenance cut the power supply. • Do not use harsh abrasive cleaners or sharp metal scrapers to clean the glass door since they can scratch the surface, which may result in shattering of the glass.
ENGLISH • Connect the mains plug to the mains socket only at the end of the installation. Make sure that there is access to the mains plug after the installation. • If the mains socket is loose, do not connect the mains plug. • Do not pull the mains cable to disconnect the appliance. Always pull the mains plug. • Use only correct isolation devices: line protecting cut-outs, fuses (screw type fuses removed from the holder), earth leakage trips and contactors.
ENGLISH Internal light • The type of light bulb or halogen lamp used for this appliance, is only for household appliances. Do not use it for house lighting. Warning! Risk of electrical shock. • Before replacing the lamp, disconnect the appliance from the power supply. • Only use lamps with the same specifications. 7 Disposal Warning! Risk of injury or suffocation. • Disconnect the appliance from the mains supply. • Cut off the mains cable and discard it.
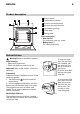
ENGLISH 8 Product description 2 3 4 1 5 6 7 1 2 3 4 5 6 7 Control panel Temperature indicator Knob for the temperature Knob for the oven functions Ventilation openings Oven lamp Rating plate Oven accessories • Wire shelf x 1 For cookware, cake tins, roasts. • Baking tray x 1 For cakes and biscuits. Before first use Warning! Refer to the Safety chapters. Initial cleaning • Remove all accessories. • Clean the appliance before first use. Important! Refer to the chapter "Care and cleaning".
ENGLISH 9 Daily use Warning! Refer to the Safety chapters. Activating and deactivating the appliance 1. Turn the oven functions control knob to an oven function. 2. Turn the temperature control knob to a temperature. The temperature indicator comes on while the temperature in the appliance increases. 3. To deactivate the appliance, turn the oven functions control knob and the temperature control knob to the Off position. Oven functions Oven function Application Off position The appliance is off.
ENGLISH 10 • Moisture can condense in the appliance or on the door glass panels. This is normal. Always stand back from the appliance when you open the appliance door while cooking. To decrease the condensation, operate the appliance for 10 minutes before cooking. • Clean the moisture after each use of the appliance. • Do not put the objects directly on the appliance floor and do not put aluminium foil on the components when you cook. This can change the baking results and cause damage to the enamel.
ENGLISH Weight (kg) Food 2 11 Oven Function Level Oven temperature (°C) Cooking Time (min) Lasagne 2 180 45 - 60 1 White Bread 2 190 50 - 60 1 Pizza 1 190 25 - 35 Care and cleaning Warning! Refer to the Safety chapters. • Clean the front of the appliance with a soft cloth with warm water and a cleaning agent. • To clean metal surfaces use a usual cleaning agent. • Clean the oven interior after each use. Then you can remove dirt more easily and it does not burn on.
ENGLISH 12 2 1 7 1 2 Open the door fully. Lift and turn the levers on the two hinges. Carefully lift (step 1) and remove (step 2) the glass panel. 3 Clean the glass panel with water and soap. Dry the glass panel carefully. Installing the door and the glass panel When the cleaning is completed, install the glass panel and the oven door. Do the above steps in the opposite sequence. The screen-printing zone must face the inner side of the door.
ENGLISH 13 Problem Possible cause The appliance does not operate. The appliance is not activated. Activate the appliance. Refer to the chapter "Daily Use". The appliance does not operate. The fuse in the fuse box is released. Do a check of the fuse. If the fuse is released more than one time, contact a qualified electrician. The oven lamp does not operate. The oven lamp is defective. Replace the oven lamp. Steam and condensation collect on the food and in the oven.
ENGLISH 14 Number of functions 3 Energy consumption 0,79 kWh Energy Consumption with a standard load and bottom heating 0,79 kWh Environment concerns Recycle the materials with the symbol . Put the packaging in applicable containers to recycle it. Help protect the environment and human health and to recycle waste of electrical and electronic appliances. Do not dispose appliances marked with the symbol with the household waste.
ENGLISH What is not covered under this guarantee? • Normal wear and tear. • Deliberate or negligent damage, damage caused by failure to observe operating instructions, incorrect installation or by connection to the wrong voltage, damage caused by chemical or electro-chemical reaction, rust, corrosion or water damage including but not limited to damage caused by excessive lime in the water supply, damage caused by abnormal environmental conditions. • Consumable parts including batteries and lamps.
ENGLISH – connections to electricity (if machine comes without plug and cable), to water and to gas since they have to be executed by an authorized service engineer. 3. ask for clarification on user manual contents and specifications of the IKEA appliance. To ensure that we provide you with the best assistance, please read carefully the Assembly Instructions and/or the User Manual section of this booklet before contacting us.
DEUTSCH 17 Inhalt Sicherheitsinformationen Sicherheitshinweise Montage Gerätebeschreibung Vor der ersten Inbetriebnahme Täglicher Gebrauch Zusatzfunktionen 17 18 20 21 21 22 22 Kochtabellen Reinigung und Pflege Was tun, wenn … Technische Daten Umwelttipps IKEA Garantie 23 24 26 27 27 28 Änderungen vorbehalten. Sicherheitsinformationen Lesen Sie vor der Montage und Verwendung des Geräts sorgfältig die mitgelieferte Anleitung.
DEUTSCH 18 Allgemeine Sicherheit • Nur eine qualifizierte Fachkraft darf den elektrischen Anschluss des Geräts vornehmen und das Kabel austauschen. • Der Geräteinnenraum wird während des Betriebs heiß. Berühren Sie nicht die Heizelemente im Geräteinnern. Verwenden Sie zum Anfassen des Zubehörs und der Töpfe wärmeisolierende Handschuhe. • Benutzen Sie zum Reinigen des Geräts keinen Dampfreiniger. • Trennen Sie vor Wartungsarbeiten das Gerät von der Stromversorgung.
DEUTSCH • Alle elektrischen Anschlüsse sind von einem geprüften Elektriker vorzunehmen. • Das Gerät muss geerdet sein. • Stellen Sie sicher, dass die elektrischen Daten auf dem Typenschild den Daten Ihrer Stromversorgung entsprechen. Wenden Sie sich andernfalls an eine Elektrofachkraft. • Das Gerät darf ausschließlich an eine ordnungsgemäß installierte Schutzkontaktsteckdose angeschlossen werden. • Verwenden Sie keine Mehrfachsteckdosen oder Verlängerungskabel.
DEUTSCH – Legen Sie keine Alufolie direkt auf den Boden des Geräts. – Stellen Sie kein Wasser in das heiße Gerät. – Lassen Sie nach dem Abschalten des Geräts kein feuchtes Geschirr oder feuchte Speisen im Backofeninnenraum stehen. – Gehen Sie beim Herausnehmen oder Einsetzen der Innenausstattung sorgfältig vor. • Verfärbungen der Emailbeschichtung haben keine Auswirkung auf die Leistung des Geräts. Sie stellen keinen Mangel im Sinne des Gewährleistungsrechtes dar.
DEUTSCH 21 Näheres zum Kabelquerschnitt siehe Gesamtleistung (auf dem Typenschild) und in der Tabelle: Gesamtleistung Kabelquerschnitt maximal 1380 W 3 x 0,75 mm² maximal 2300 W 3 x 1 mm² Gesamtleistung maximal 3680 W Kabelquerschnitt 3 x 1,5 mm² Die Erdleitung (gelb/grünes Kabel) muss 2 cm länger sein als die Phasenleitung und der Nullleiter (blaues und braunes Kabel).
DEUTSCH 22 Zum Öffnen der Backofen-Tür mit aktivierter Kindersicherung ziehen Sie den Griff der Kindersicherung wie in der Abbildung gezeigt nach oben. Schliessen Sie dann die Backofentür, ohne an der Kindersicherung zu ziehen. Zum Entfernen der Kindersicherung, öffnen Sie die Backofentür und entfernen Sie die Kindersicherung mit einem Torxschlüssel. Der Torxschlüssel befindet sich in der Einsparung. Täglicher Gebrauch Warnung! Siehe Sicherheitshinweise. Ein- und Ausschalten des Geräts 1.
DEUTSCH 23 Stromzufuhr unterbrechen kann. Die Wiedereinschaltung erfolgt automatisch bei einen Temperaturabfall. Kochtabellen • Das Gerät hat vier Einschubebenen. Die Einschubebenen werden vom Boden des Backofens aus gezählt. • Das Gerät hat ein exklusives Umluft- und Dampfsystem, das die Luft umwälzt und den Dampf wieder aufbereitet. Das Garen mit Dampf macht Ihre Speisen innen weich und außen knusprig. Gardauer und Energieverbrauch werden dabei auf ein Minimum reduziert.
DEUTSCH Gewicht (kg) Gargut 4 Pute 1 1 24 BackEinofenfunk- schubtion ebene Backofentemperatur (°C) Garzeit (Min.) 1 180 210 - 240 Fisch 2 190 30 - 40 Gefüllte Paprika oder Tomaten/Ofenkartoffeln 2 190 50 - 70 Fertigkuchen 2 160 45 - 55 Pasteten, Kuchen usw. 2 160 80 - 100 Bisquitboden 3 140 25 - 35 2 Lasagne 2 180 45 - 60 1 Weißbrot 2 190 50 - 60 1 Pizza 1 190 25 - 35 1 Reinigung und Pflege Warnung! Siehe Sicherheitshinweise.
DEUTSCH Backofenlampe Warnung! Gehen Sie beim Austauschen der Backofenlampe sorgsam vor. Es besteht die Gefahr eines elektrischen Schlags. Bevor Sie die Backofenlampe austauschen: • Schalten Sie den Backofen aus. • Entfernen Sie die Sicherungen aus dem Sicherungskasten, oder schalten Sie den Schutzschalter aus. Legen Sie ein Tuch auf den Backofenboden, um die Lampe und das Glas zu schützen. 1. 2. 3. 4. Drehen Sie die Glasabdeckung gegen den Uhrzeigersinn und nehmen Sie sie ab.
DEUTSCH 26 Der bedruckte Bereich muss zur Innenseite der Tür zeigen. Vergewissern Sie sich nach der Montage, dass sich der Glasscheibenrahmen an den bedruckten Zonen nicht rau anfühlt. Achten Sie darauf, die innere Glasscheibe korrekt in die Halterung einzusetzen. Orientieren Sie sich an der Abbildung. 7 1 2 Heben Sie die Glasscheibe vorsichtig an (Schritt 1) und entfernen Sie sie (Schritt 2). Reinigen Sie die Glasscheibe mit Wasser und Spülmittel. Trocknen Sie die Glasscheiben sorgfältig ab.
DEUTSCH 27 Garraums. Entfernen Sie nicht das Typenschild vom Garraum. Wir empfehlen, hier folgende Daten zu notieren: Modell (MOD.) ......................................... Produktnummer (PNC) ......................................... Seriennummer (S.N.) .........................................
DEUTSCH Verpackungsmaterial 28 Das Verpackungsmaterial ist umweltfreundlich und wieder verwertbar. Kunststoffteile sind mit internationalen Abkürzungen wie PE, PS usw. gekennzeichnet. Entsorgen Sie das Verpackungsmaterial in den dafür vorgesehenen Behältern der kommunalen Entsorgungsstellen.
DEUTSCH • Bewusste oder durch Fahrlässigkeit entstandene Schäden, die durch eine Missachtung der Bedienungsanweisung, eine unsachgemäße Installation oder durch den Anschluss an eine falsche Spannung, sowie Schäden, die durch eine chemische oder elektrochemische Reaktion (Rost, Korrosion oder Wasserschäden eingeschlossen - aber nicht darauf beschränkt) - Schäden, die durch übermäßigen Kalk in der Wasserzuleitung entstanden sind, und Schäden, die durch ungewöhnliche Umweltbedingungen entstanden sind.
DEUTSCH • das Gerät in Übereinstimmung mit den Montageanleitungen und den Sicherheitsinformationen im Benutzerhandbuch installiert wurde und diesen Anleitungen und Informationen entspricht. Der spezielle Kundendienst (Service) für IKEA Geräte: Bitte zögern Sie nicht, den speziellen IKEA Kundendienst (Service) zu kontaktieren für: 1. einen Anspruch unter dieser Garantie; 2. die Bitte um Klärung von Fragen zur Installation des IKEA Gerätes im speziellen IKEA Küchenmöbel.
FRANÇAIS 31 Sommaire Consignes de sécurité Instructions de sécurité Installation Description de l'appareil Avant la première utilisation Utilisation quotidienne Fonctions supplémentaires 31 32 34 35 35 36 36 Tableaux de cuisson Entretien et nettoyage En cas d'anomalie de fonctionnement Caractéristiques techniques En matière de protection de l'environnement GARANTIE IKEA 37 38 40 41 41 42 Sous réserve de modifications.
FRANÇAIS 32 Sécurité générale • L'appareil doit être installé et le câble remplacé uniquement par un professionnel qualifié. • L'intérieur de l'appareil devient chaud lorsqu'il est en fonctionnement. Ne touchez pas les éléments chauffants se trouvant dans l'appareil. Utilisez toujours des gants de cuisine pour retirer ou enfourner des accessoires ou des plats allant au four. • N'utilisez pas de nettoyeur vapeur pour nettoyer l'appareil.
FRANÇAIS • L'appareil doit être relié à la terre. • Vérifiez que les données électriques figurant sur la plaque signalétique correspondent à celles de votre réseau. Si ce n'est pas le cas, contactez un électricien. • Utilisez toujours une prise de courant de sécurité correctement installée. • N'utilisez pas d'adaptateurs multiprises ni de rallonges. • Veillez à ne pas endommager la fiche secteur ni le câble d'alimentation.
FRANÇAIS – Ne laissez jamais d'aliments ou de plats humides à l'intérieur de l'appareil une fois la cuisson terminée. – Faites attention lorsque vous retirez ou remettez en place les accessoires. • La décoloration de l'émail est sans effet sur les performances de l'appareil. Il ne s'agit pas d'un défaut dans l'acception de la garantie. • Utilisez un plat à rôtir pour obtenir des gâteaux moelleux. Les jus de fruits causent des taches qui peuvent être permanentes.
FRANÇAIS 35 Puissance totale maximum 3 680 W Le fil de masse (fil jaune/vert) doit faire 2 cm de plus que les fils de phase et neutre (fils bleu et marron).
FRANÇAIS 36 Pour ouvrir la porte du four lorsque la sécurité enfants est activée, tirez la manette vers le haut comme illustré sur la figure. Fermez la porte du four sans tirer la sécurité enfants. Pour désactiver la sécurité enfants, ouvrez la porte du four et désactivez la sécurité enfants à l'aide de la clé torx. La clé torx est fournie dans le sachet des accessoires du four. Utilisation quotidienne Avertissement Reportez-vous aux chapitres concernant la sécurité.
FRANÇAIS 37 Tableaux de cuisson • Le four dispose de quatre niveaux de gradins. Comptez les niveaux de gradins à partir du bas de l'appareil. • L'appareil est doté d'un système spécial qui permet à l'air de circuler et qui recycle perpétuellement la vapeur. Dans cet environnement, ce système permet de cuisiner des plats tout en maintenant ceux-ci tendres à l'intérieur et croquants à l'extérieur. Le temps de cuisson et la consommation énergétique sont donc réduits au minimum.
FRANÇAIS Poids (kg) Plat 1 38 Niveau Température du four (°C) Temps de cuisson (min.) Tomates farcies aux poivrons / pommes de terre au four 2 190 50 - 70 Gâteaux instantanés 2 160 45 - 55 Tartes 2 160 80 - 100 Biscuits/Gâteaux secs 3 140 25 - 35 2 Lasagnes 2 180 45 - 60 1 Pain blanc 2 190 50 - 60 1 Pizza 1 190 25 - 35 1 Fonction du four Entretien et nettoyage Avertissement Reportez-vous aux chapitres concernant la sécurité.
FRANÇAIS 39 Avant de remplacer l'éclairage du four : • Éteignez le four. • Retirez les fusibles de la boîte à fusibles ou coupez le disjoncteur. 3 4 Fermez la porte du four à la première position d'ouverture (mi-parcours). Tirez la porte vers l'avant et retirez-la de son logement. Déposez la porte sur une surface stable recouverte d'un tissu doux. 5 6 Désengagez le système de verrouillage afin de retirer le panneau de verre intérieur.
FRANÇAIS 40 Nettoyez le panneau de verre à l'eau savonneuse. Séchez soigneusement le panneau de verre. Réinstallation de la porte et du panneau de verre Une fois le nettoyage terminé, replacez le panneau de verre et la porte du four. Suivez les étapes ci-dessus dans l'ordre inverse. La zone imprimée doit faire face à l'intérieur de la porte. Après l'installation, vérifiez que la surface du panneau de verre où se trouve la zone imprimée est lisse au toucher (le relief doit être de l'autre côté).
FRANÇAIS 41 Caractéristiques techniques Dimensions (internes) Largeur Hauteur Profondeur Volume utile 55 l Surface du plateau de cuisson 1 140 cm² Résistance inférieure 1 000 W Résistance supérieure 800 W Four complet (voûte et sole) 1 800 W Éclairage du four 15 W Ventilateur de refroidissement 25 W Puissance totale 1 850 W Tension 400 V Fréquence 50 Hz Nombre de fonctions 3 Consommation énergétique 0,79 kWh Consommation d'énergie avec charge standard et résistance inférieure 0,
FRANÇAIS 42 GARANTIE IKEA Pendant combien de temps la garantie IKEA est-elle valable ? Cette garantie est valable cinq (5) ans à compter de la date d'achat de votre appareil chez IKEA, à moins qu'il ne s'agisse d'un appareil LAGAN, auquel cas la garantie ne dure que deux (2) ans. Le ticket de caisse original est nécessaire et constitue la preuve d'achat. Les réparations effectuées sous couvert de la garantie ne prolongent pas la durée de garantie, ni pour l'appareil ni pour les pièces échangées.
FRANÇAIS • Les cas où aucune défectuosité n'a été constatée par le technicien. • Les réparations qui n'ont pas été effectuées par des techniciens de service après-vente désignés et/ou un partenaire contractuel autorisé ni celles où l'on n'a pas utilisé des pièces d'origine. • Les dommages résultant d'une installation incorrecte ou non respectueuse des spécifications d’installation. • L'utilisation de l'appareil dans un environnement non domestique (par exemple pour un usage professionnel).
FRANÇAIS Comment nous contacter en cas de besoin ? Vous trouverez la liste complète des contacts de service après-vente choisis par IKEA et leurs numéros de téléphone respectifs à la fin de cette notice. Important Pour que nous puissions vous fournir un service rapide et compétent, nous vous conseillons d'utiliser les numéros de téléphone spécifiques indiqués à la fin de cette notice. Vous trouverez tous les numéros de téléphone utiles dans la notice d'utilisation correspondant à votre appareil.
ITALIANO 45 Indice Informazioni per la sicurezza Istruzioni di sicurezza Installazione Descrizione del prodotto Preparazione al primo utilizzo Utilizzo quotidiano Funzioni aggiuntive 45 46 48 49 49 50 51 Tabelle di cottura Pulizia e cura Cosa fare se… Dati tecnici Considerazioni ambientali GARANZIA IKEA 51 52 54 55 55 56 Con riserva di modifiche. Informazioni per la sicurezza Leggere attentamente le istruzioni fornite prima di installare e utilizzare l'apparecchiatura.
ITALIANO 46 • La pulizia e gli interventi di manutenzione non devono essere eseguiti dai bambini senza supervisione. Avvertenze di sicurezza generali • L'installazione dell'apparecchiatura e la sostituzione del cavo devono essere svolte unicamente da personale qualificato. • All'interno l'apparecchiatura si scalda mentre è in funzione. Non toccare le resistenze dell'apparecchiatura. Servirsi sempre degli appositi guanti da forno per estrarre o inserire accessori o pentole resistenti al calore.
ITALIANO • I lati dell'apparecchiatura devono restare adiacenti ad apparecchiature o unità con la stessa altezza. Collegamento elettrico Avvertenza! Rischio di incendio e scossa elettrica. • Tutti i collegamenti elettrici dovrebbero essere realizzati da un elettricista qualificato. • L'apparecchiatura deve disporre di una messa a terra. • Verificare che i dati elettrici riportati sulla targhetta dei dati corrispondano a quelli dell'impianto. In caso contrario, contattare un elettricista.
ITALIANO • Non appoggiare o tenere liquidi o materiali infiammabili, né oggetti facilmente incendiabili sull'apparecchiatura, al suo interno o nelle immediate vicinanze. Avvertenza! Vi è il rischio di danneggiare l'apparecchiatura. • Per evitare danni o scolorimento dello smalto: - Non mettere pentole resistenti al calore o altri oggetti direttamente sulla superficie inferiore dell'apparecchiatura. - Non appoggiare la pellicola di alluminio direttamente sulla superficie inferiore dell'apparecchiatura.
ITALIANO 49 Il produttore non è responsabile qualora non vengano applicate le precauzioni del capitolo "Informazioni per la sicurezza". Per la sezione del cavo fare riferimento alla potenza totale (sulla targhetta dati) ed alla tabella: La dotazione standard dell'apparecchiatura al momento della fornitura non prevede una spina e un cavo di rete.
ITALIANO 50 Gli accessori possono riscaldarsi più del solito. L'apparecchiatura può produrre un odore sgradevole e fumo. Non si tratta di un’anomalia. Accertarsi che il flusso d'aria sia sufficiente. Per rimuovere il blocco di sicurezza, aprire la porta del forno ed estrarlo utilizzando una chiave scanalata Torx. La chiave scanalata Torx si trova nel sacchetto degli accessori del forno. Blocco di sicurezza bambini meccanico L'apparecchiatura è dotata di un blocco di sicurezza bambini attivo.
ITALIANO 51 Funzione forno Rosolatura Applicazione Per completare la cottura degli alimenti. Funziona solo la resistenza superiore. Funzioni aggiuntive Ventola di raffreddamento Quando l'apparecchiatura è in funzione, la ventola di raffreddamento si attiva in modo automatico per tenere fresche le superfici dell'apparecchiatura. Dopo aver disattivato l'apparecchiatura, la ventola di raffreddamento continua a funzionare fino a che l'apparecchiatura non si è raffreddata.
ITALIANO Peso (kg) Cibo 1 52 Livello Temperatura del forno (°C) Durata cottura (min.
ITALIANO Pulizia della guarnizione della porta • Controllare regolarmente la guarnizione della porta. La guarnizione della porta si trova attorno al telaio della cavità del forno. Non utilizzare l'apparecchiatura se la guarnizione della porta è danneggiata. Contattare il Centro di Assistenza. • Per pulire la guarnizione della porta, utlizzare un panno morbido immerso in acqua tiepida e detergente. 53 1 2 Lampadina del forno Aprire completamente la porta.
ITALIANO 54 Accertarsi che la serigrafia sia sul lato interno della porta. Verificare che dopo l'installazione, la superficie della cornice del pannello in vetro, nei punti delle serigrafie, non risulti ruvida al tatto. Accertarsi di installare i pannelli interni in vetro nelle sedi corrette. Fare riferimento all'immagine. 7 1 2 Sollevare con cura (passo 1) ed estrarre (passo 2) i pannelli in vetro. Pulire i pannelli in vetro con dell'acqua saponata. Asciugare i pannelli in vetro facendo attenzione.
ITALIANO 55 muovere la targhetta dei dati dalla cavità dell'apparecchiatura. Consigliamo di annotarle in questo spazio: Modello (MOD.) ......................................... Numero Prodotto (PNC) ......................................... Numero di serie (S.N.) ......................................... Dati tecnici Dimensioni (interne) Larghezza Altezza Profondità Volumi utili 55 l Area lamiera dolci 1.140 cm² Resistenza inferiore 1.
ITALIANO Dove portare gli apparecchi fuori uso? In qualsiasi negozio che vende apparecchi nuovi oppure si restituiscono ai centri di raccolta ufficiali della SENS oppure ai riciclatori ufficiali della SENS. La lista dei centri di raccolta ufficiali della SENS è visibile nel sito www.sens.ch. 56 Materiale d’imballaggio I materiali utilizzati sono ecologici e riciclabili. I componenti in plastica sono identificati mediante marchi quali PE, PS ecc.
ITALIANO • Danni provocati deliberatamente o per negligenza e danni provocati dalla mancata osservanza delle istruzioni di funzionamento, da un'installazione non corretta o dal collegamento a un voltaggio errato. Danni provocati da reazioni chimiche o elettrochimiche, ruggine, qualità dell'acqua (per esempio presenza di eccessivo calcare nelle condutture idriche), eventi atmosferici o condizioni ambientali anomale. • Parti soggette ad usura, per esempio batterie e lampadine.
ITALIANO 1. 2. usufruire della garanzia; chiedere chiarimenti sull'installazione degli elettrodomestici IKEA nei mobili da incasso specifici di IKEA. Il servizio non fornirà assistenza o chiarimenti in merito a: – installazione di cucine complete IKEA; – collegamenti elettrici (se l'apparecchio è fornito senza cavi e spine), allacciamenti idraulici e collegamenti all'impianto del gas che devono essere eseguiti da un tecnico di assistenza autorizzato. 3.
Country België Belgique Phone number 070 246016 Call Fee Opening time Binnenlandse gesprekskosten 8 tot 20 Weekdagen Tarif des appels nationaux 8 à 20. En semaine България 00359 888 16 0 8 Такса за повикване от страната От 9 до 18 ч в работни дни Česká republika 246 019721 Cena za místní hovor 8 až 20 v pracovních dnech Danmark 70 15 09 09 Landstakst man.-fre. 09.00-20.00 lør. 09.00-16.00 1 søndag pr.
892954048-C-242013 © Inter IKEA Systems B.V.