FRAMTID OV5 GB
ENGLISH 4
ENGLISH Table of contents Safety information Product description Control panel Daily use Cooking tables Cleaning and maintenance What to do if ... Safety Information 4 4 6 8 8 11 13 16 Your safety and that of others are very important This manual and the appliance itself provide important safety warnings, to be read and observed at all times. This is the danger symbol, pertaining to safety, which alerts users to potential risks to themselves and others.
ENGLISH -- The accessible parts of the appliance may become very hot during use. Young children should be kept away from the appliance and supervised to ensure that they do not play with it. -- During and after use, do not touch the heating elements or interior surfaces of the appliance - risk of burns. Do not allow the appliance to come into contact with cloths or other flammable materials until all the components have cooled sufficiently.
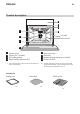
ENGLISH 6 Product description 1 2 3 4 5 Top shelf Bottom shelf 6 7 8 1 2 3 4 Control panel Cooling fan1) (hidden) Grill safety guard2) Upper heating element/Grill 5 6 7 8 Rear oven lamp Oven fan Bottom heating element (not visible) Oven cool door 1) The cooling fan may continue running even after the oven is switched off. 2) Prevents food from coming into direct contact with the grill. Nevertheless, you are advised not to touch the safety guard whilst the oven is on.
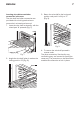
ENGLISH 7 Inserting wire shelves and other accessories in the oven The wire shelf and other accessories are provided with a locking mechanism to prevent their unintentional removal. 1. Insert the wire shelf horizontally, with the raised part “A” upwards (Fig. 1). 3. Return the wire shelf to the horizontal position and push it in fully to “C” (Fig. 3). C A Fig. 3 Fig. 1 2. Angle the wire shelf when it reaches the locking position “B” (Fig. 2). B Fig. 2 4.
ENGLISH 8 Control panel °C 120 90 250 150 45 60 A B C D 100 15 30 75 A 50 0 105 200 B C D Function selector knob Cooking time selector knob Thermostat knob Thermostat red led. Daily use How to operate the oven • Turn the selector knob to the required function. • Select a cooking time using the cooking time selector knob. The oven light switches on. • Turn the thermostat knob clockwise to the required temperature.
ENGLISH 9 Oven Functions table Function 0 Temperature range / Grill range – Description of function OVEN OFF Preset temperature / Power level – LAMP – – To switch on the oven light. CONVENTIONAL 225°C 50 - 250°C CONVECTION BAKE 200°C 50 - 250°C GRILL – – Function suitable for cooking any type of dish on one level. Preheat the oven to the required temperature and place the food in it when the set temperature is reached. It is advisable to use the second or third level for cooking.
ENGLISH Function 10 DUAL GRILL Preset temperature / Power level – Temperature range / Grill range – TURBO GRILL – – Description of function To cook meat (smoked bacon, steaks, sausages, etc.) and for making toast. This function activates the entire top grill element. Pre-heat the oven for 5 min. with the door closed. Arrange food on the wire shelf. When cooking meat, to avoid spatters of fat and smoke, pour a little water into the drip tray. Turn the food during grilling.
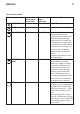
ENGLISH 11 Cooking tables Type of food Function Preheating Shelf (from the bottom) SWEETS, PASTRY, ETC X 2 Leavened cakes Temperature (°C) Cooking time (min) 150-175 35-90 X 2-4 150-170 30-90 Filled pies (cheesecake, strudel, fruit pie) X 2 150-190 30-85 X 2-4 150-190 35-90 Biscuits/tartlets X 2 160-175 20-45 X 2-4 160-170 20-45 X 2 175-200 30-40 X 2-4 170-190 35-45 X 2 100 110-150 X 2-4 100 130-150 Bread/pizza/ focaccia X 2 190-250 12-50 X 2-4 190-250 2
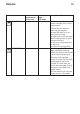
ENGLISH Type of food MEAT Lamb/Veal/Beef/ Pork 1Kg Chicken/Rabbit/ Duck 1Kg Turkey/Goose 3Kg FISH 12 Function Preheating Shelf (from the bottom) Baked fish/en papillote (fillet, whole) VEGETABLES Stuffed vegetables (tomatoes, courgettes, aubergines) Temperature (°C) Cooking time (min) X 2 200 80-110 X 2 200 50-100 X 1/2 200 80-130 X 2 175-200 40-60 X 2 175-200 50-60 Cooking table with GRILL function Type of food Function Preheating X Shelf (from the bottom) 4 Temperature (°C) 2
ENGLISH Cleaning and maintenance CLEANING WARNING! -- Never use steam cleaning equipment. -- Only clean the oven when it is cool to the touch. -- Disconnect the appliance from the power supply. Oven exterior IMPORTANT: do not use corrosive or i abrasive detergents. If any of these products accidentally comes into contact with the appliance, clean immediately with a damp cloth. • Clean the surfaces with a damp cloth. If it is very dirty, add a few drops of washing up detergent to the water.
ENGLISH 14 • The appliance could be equipped with 2 pyrolysis functions: • Energy-saving cycle (PYRO EXPRESS/ ECO): which consumes approximately 25% less energy than the standard cycle. Select it at regular intervals (after cooking meat on 2 or 3 consecutive occasions). • Standard cycle (PYRO): which is suitable for cleaning a very dirty oven. • In any case, after a certain number of uses and depending on how dirty the oven is, a message on the oven display advises you to run a self-cleaning cycle.
ENGLISH To refit the door 1. Insert the hinges in their seats. 2. Open the door fully. 3. Lower the two catches. 4. Close the door To replace the rear lamp 1. Disconnect the oven from the power supply. Fig. 5 2. Unscrew the lamp cover (Fig. 5), replace the lamp (see note for lamp type) and screw the lamp cover back on. 3. Reconnect the oven to the power supply. NOTE: Only use 25-40W/230V type E-14, T300°C incandescent lamps. Lamps are available from IKEA After Sales Service.
ENGLISH 16 What to do if ... Problem Possible cause Solution The oven does not work: No electrical power supply. Verify the presence of mains electrical power The oven is not plugged into the mains socket. Connect the oven to the power supply. The selector knob is set to “0”. Turn the selector knob to select a cooking function. The selector knob is set to “ ”. Turn the selector knob to select a cooking function.
ENGLISH Before calling the After-Sales Service: 1. See if you can solve the problem yourself with the help of the suggestions given in the “What to do if ...” table. 2. Switch the appliance off and back on again it to see if the fault persists. If after the above checks the fault still occurs, contact IKEA After Sales Service.
ENGLISH 18 Technical data Dimensions Width 595 Height 595 Depth 538 Usable Volumes (L) 59 Area of largest baking sheet (net surface) cm2 1200 Top+ bottom heating element W 2050 Grill W 1400 Defrost W 45 Cooling Fan W 21 Dual Grill W 2300 Oven Lamp W 40 Total rating W 2400 Number of functions 5 Energy consumptions kWh 0,79 Energy consumptions with a standard load and top + bottom heating kWh 0,79 Energy Consumpion with a standard load and ventilated kWh 0,90 The technical in
ENGLISH Installation After unpacking the oven, make sure that it has not been damaged during transport and that the oven door closes properly. In the event of problems, contact the dealer or your nearest After-sales Service. To prevent any damage, only remove the oven from its polystyrene foam base at the time of installation. Preparing the housing unit • Kitchen units in contact with the oven must be heat resistant (min 90°C).
ENGLISH 20 Door lock device To open the door with the door lock device see Fig 1. Fig. 1 The door lock device can be removed by following the sequence of images (see Fig. 2). Fig.
ENGLISH Electrical connection Make sure the power voltage specified on the appliance rating plate is the same as the mains voltage. The rating plate is on the front edge of the oven (visible when the door is open). Environmental concerns Disposal of packing material -- The packing material is 100% recyclable and is marked with the recycle symbol ( ).
ENGLISH 22 Electrical connection for Great Britain and Ireland only Warning - this appliance must be earthed Fuse replacement If the mains lead of this appliance is fitted with a BS 1363A 13amp fused plug, to change a fuse in this type of plug use an A.S.T.A. approved fuse to BS 1362 type and proceed as follows: 1. Remove the fuse cover (A) and fuse (B). 2. Fit replacement 13A fuse into fuse cover. 3. Refit both into plug.
ENGLISH Ikea guarantee How long is the IKEA guarantee valid? This guarantee is valid for five (5) years from the original date of purchase of your appliance at IKEA, unless the appliance is named LAGAN in which case two (2) years of guarantee apply. The original sales receipt, is required as proof of purchase. If service work is carried out under guarantee, this will not extend the guarantee period for the appliance.
ENGLISH • Cost for carrying out the initial installation of the IKEA appliance. However, if an IKEA appointed Service Provider or its authorized service partner repairs or replaces the appliance under the terms of this guarantee, the appointed Service Provider or its authorized service partner will reinstall the repaired appliance or install the replacement, if necessary.
BELGIË - BELGIQUE - BELGIEN Telefoon/Numéro de téléphone/Telefon-Nummer: 026200311 Tarief/Tarif/Tarif: Lokaal tarief/Prix d’un appel local/Ortstarif Openingstijd: Maandag - Vrijdag 8.00 - 20.00 Heures d’ouverture: Lundi - Vendredi 8.00 - 20.00 Öffnungszeiten: Montag - Freitag 8.00 - 20.00 ČESKÁ REPUBLIKA Telefonní číslo: Sazba: Pracovní doba: DANMARK Telefonnummer: Takst: Åbningstid: 225376400 Místní sazba Pondělí - Pátek 8.00 - 20.00 70150909 Lokal takst Mandag - fredag 9.00 - 21.00 Lørdag 9.
5019 610 01186 © Inter IKEA Systems B.V.