GB KULINARISK
ENGLISH Please refer to the last page of this manual for the full list of IKEA appointed After Sales Service Provider and relative national phone numbers.
ENGLISH 4
ENGLISH Contents Safety information Safety instructions Installation Product description Control panel Before first use Daily use Clock functions Automatic programmes 4 6 8 8 9 11 12 17 18 Using the accessories Additional functions Hints and tips Care and cleaning Troubleshooting Technical data Energy efficiency ENVIRONMENTAL CONCERNS IKEA GUARANTEE 19 21 22 23 26 27 28 29 29 Subject to change without notice.
ENGLISH • • 5 Children shall not carry out cleaning and user maintenance of the appliance without supervision. Children aged 3 years and under must be kept away from this appliance when it is in operation at all times. General Safety • • • • • • • • • • Only a qualified person must install this appliance and replace the cable. WARNING: The appliance and its accessible parts become hot during use. Care should be taken to avoid touching heating elements.
ENGLISH Safety instructions Installation Warning! Only a qualified person must install this appliance. • Remove all the packaging. • Do not install or use a damaged appliance. • Follow the installation instruction supplied with the appliance. • Always take care when moving the appliance as it is heavy. Always use safety gloves and enclosed footwear. • Do not pull the appliance by the handle. • Keep the minimum distance from the other appliances and units.
ENGLISH • Do not apply pressure on the open door. • Do not use the appliance as a work surface or as a storage surface. • Open the appliance door carefully. The use of ingredients with alcohol can cause a mixture of alcohol and air. • Do not let sparks or open flames to come in contact with the appliance when you open the door. • Do not put flammable products or items that are wet with flammable products in, near or on the appliance. Warning! Risk of damage to the appliance.
ENGLISH 8 Plastic parts are marked with international abbreviations such as PE, PS, etc. Dispose of the packaging material in the containers provided for this purpose at your local waste management facility. Disposal Warning! Risk of injury or suffocation. • Disconnect the appliance from the mains supply. • Cut off the mains electrical cable close to the appliance and dispose of it. • Remove the door to prevent children and pets to get closed in the appliance.
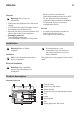
ENGLISH 9 10 Shelf support, removable 11 Shelf positions For absorbing the remaining water from the steam generator. Warning! Remove the sponge from the cavity before cooking. Do not use the sponge when the appliance is hot. Accessories • Wire shelf x 1 For cookware, cake tins, roasts. • Baking tray x 1 For cakes and biscuits. • Core temperature sensor x 1 To measure how far the food is cooked.
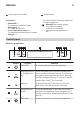
ENGLISH 10 Symbol - 6 7 8 9 10 11 Function Comment Display Shows the current settings of the appliance. Up key To move up in the menu. Down key To move down in the menu. Time and additional functions To set different functions. When a heating function operates, touch the symbol to set the timer or the functions: Function Lock, Favourites, Heat + Hold, Set + Go. You can also change the settings of the core temperature sensor. Minute Minder To set the function: Minute Minder.
ENGLISH 11 Symbol Function Time Indication The display shows how long the heating function operates. Press and at the same time to reset the time. Calculation The appliance calculates the time for cooking. Heat-up Indicator The display shows the temperature in the appliance. Fast Heat Up Indicator The function is active. It decreases the heat up time. Weight Automatic The display shows that the automatic weight system is active or that weight can be changed. Heat + Hold The function is active.
ENGLISH 12 Close the oven door without pulling the child lock. To remove the child lock, open the oven door and remove the child lock with the torx key. The torx key is in the oven fitting bag. Screw back the screw into the hole after removing the child lock. Daily use Warning! Refer to Safety chapters. Navigating the menus 1. Activate the appliance. 2. Press or to select the menu option. 3. Press to move to the submenu or accept the setting. At each point you can go back to the main menu with .
ENGLISH 13 Symbol Submenu Description Heat + Hold Keeps the prepared food warm for 30 minutes after a cooking cycle finished. Time Extension Activates and deactivates the time extension function. Display Contrast Adjusts the display contrast by degrees. Display Brightness Adjusts the display brightness by degrees. Set Language Sets the language for the display. Buzzer Volume Adjusts the volume of press-tones and signals by degrees.
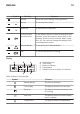
ENGLISH 14 Heating function Application Steam Regenerating Food reheating with steam prevents surface drying. Heat is distributed a gentle and even way, which allows to recover taste and aroma of food as just prepared. This function can be used to reheat food directly on a plate. You can reheat more than one plate at the same time, using different shelf positions. True Fan Cooking To bake on up to two shelf positions at the same time and to dry food.
ENGLISH 15 Heating function Application Grilling To grill flat food and to toast bread. Fast Grilling To grill flat food in large quantities and to toast bread. Turbo Grilling To roast larger meat joints or poultry with bones on one shelf position. Also to make gratins and to brown. The lamp may automatically deactivate at a temperature below 60 °C during some oven functions. Specials Heating function Application Bread Baking To bake bread.
ENGLISH Activating a heating function 1. 2. 3. 4. 5. 6. 7. Activate the appliance. Select the menu: Heating Functions. Press to confirm. Select a heating function. Press to confirm. Set the temperature. to confirm. Press Steam cooking The water drawer cover is in the control panel. Warning! Do not put water directly into the steam generator. Use only water. Do not use filtered (demineralised) or distilled water. Do not use other liquids.
ENGLISH Clock functions Clock functions table Clock function Minute Minder Application To set a countdown (max. 2 h 30 min). This function has no effect on the operation of the appliance. Use to activate the function. Press to set the minutes and or to start. Duration To set the length of an operation (max. 23 h 59 min). End Time To set the switch-off time for a heating function (max. 23 h 59 min). If you set the time for a clock function, the time starts to count down after 5 seconds.
ENGLISH 18 Heat + Hold Time Extension Conditions for the function: The function: Time Extension makes the heating function continue after the end of Duration. • The set temperature is more than 80 °C. • The function: Duration is set. The function: Heat + Hold keeps prepared food warm at 80 °C for 30 minutes. It activates after the baking or roasting procedure ends. You can activate or deactivate the function in the menu: Basic Settings. 1. 2. 3. 4. Activate the appliance. Select the heating function.
ENGLISH 2. Select the menu: Assisted Cooking. Press to confirm. 3. Select the category and dish. Press to confirm. 4. Select the function: Weight Automatic. to confirm. Press 5. Touch or to set the food weight. Press to confirm. The automatic programme starts. 19 6. You can change the weight at any time. Press or to change the weight. 7. When the time ends, an acoustic signal sounds. Press any symbol to deactivate the signal. With some programmes turn over the food after 30 minutes.
ENGLISH Small indentation at the top increase safety. The indentations are also anti-tip devices. The high rim around the shelf prevents cookware from slipping of the shelf. Core temperature sensor There are two temperatures to be set: the oven temperature and the core temperature. The core temperature sensor measures the core temperature of the meat. When the meat is at the set temperature, the appliance deactivates. Caution! Only use the core temperature sensor supplied or the correct replacement parts.
ENGLISH Additional functions Favourites Using the Child Lock You can save your favourite settings, such as duration, temperature or heating function. They are available in the menu: Favourites. You can save 20 programmes. When the Child Lock is on, the appliance cannot be activated accidentally. Saving a programme 1. Activate the appliance. 2. Set a heating function or an automatic programme. 3. Touch again and again until the display shows: SAVE. 4. Press to confirm.
ENGLISH 22 Press any symbol (except for ) to start the function: Set + Go. The set heating function starts. When the heating function ends, an acoustic signal sounds. • Function Lock is on when the heating function operates. • The menu: Basic Settings lets you activate and deactivate the function: Set + Go. Automatic Switch-off For safety reasons the appliance deactivates automatically after some time if a heating function operates and you do not change any settings.
ENGLISH normal. Always stand back from the appliance when you open the appliance door while cooking. If you notice moisture inside of the oven, keep the door open for a couple of minutes. • Clean the moisture after each use of the appliance. • Do not put the objects directly on the appliance floor and do not put aluminium foil on the components when you cook. This can change the baking results and cause damage to the enamel. Baking cakes • Do not open the oven door before 3/4 of the set cooking time is up.
ENGLISH To clean the appliance, remove the shelf supports. 1. Pull carefully the supports up and out of the front catch. Steam generation system Caution! Dry the steam generator after each use. Remove the water with the sponge. Remove the limescale with water and vinegar. 1 3 2 2. Pull the front end of the shelf support away from the side wall. 3. Pull the supports out of the rear catch. Install the shelf supports in the opposite sequence. Steam Cleaning Remove the worst dirt manually. 1.
ENGLISH 2. Fully press the clamping levers (A) on the two door hinges. A A 3. Close the oven door to the first opening position (approximately 70° angle). 4. Hold the door with one hand on each side and pull it away from the appliance at an upwards angle. 5. Put the door with the outer side down on a soft cloth on a stable surface. This is to prevent scratches. 6. Hold the door trim on the top edge of the door at the two sides and push inwards to release the clip seal. 7.
ENGLISH 26 3. Turn the lamp glass cover counterclockwise to remove it. 4. Clean the glass cover. 5. Replace the oven light bulb with a 40 W, 230 V (50 Hz), 350 °C heat resistant oven light bulb (connection type: G9). 6. Install the glass cover. Troubleshooting Warning! Refer to Safety chapters. What to do if... Problem Possible cause Remedy The oven does not heat up. The oven is deactivated. Activate the oven. The oven does not heat up. The clock is not set. Set the clock.
ENGLISH 27 Problem Possible cause Remedy The display shows an error code that is not in this table. There is an electrical fault. • Deactivate the oven with the house fuse or the safety switch in the fuse box and activate it again. • If the display shows the error code again, contact an Authorised Service Centre. Steam and condensation settle on the food and in the cavity of the oven. You left the dish in the oven for too long.
ENGLISH 28 Grill 1900 W Ring 1650 W Total rating 3000 W Voltage 230 - 240 V Frequency 50 Hz Number of functions 24 Energy efficiency Product information according to EU 66/2014 Model identification KULINARISK 103.074.48 Energy Efficiency Index 94.5 Energy consumption with a standard load, conventional mode 0.93 kWh/cycle Energy consumption with a standard load, fan-forced 0.
ENGLISH 29 the cooking time, depending on the duration of the cooking. The residual heat inside the oven will continue to cook. elements deactivate automatically 10% faster in some oven functions. Use the residual heat to warm up other dishes. Keep food warm Choose the lowest possible temperature setting to use residual heat and keep a meal warm. The display shows the residual heat indicator or temperature. Cooking with fan When possible, use the cooking functions with fan to save energy.
ENGLISH 99/44/EG) and the respective local regulations are applicable. Replaced parts become the property of IKEA. What will IKEA do to correct the problem? IKEA appointed service provider will examine the product and decide, at its sole discretion, if it is covered under this guarantee.
ENGLISH normal in the new country. An obligation to carry out services in the framework of the guarantee exists only if the appliance complies and is installed in accordance with: • the technical specifications of the country in which the guarantee claim is made; • the Assembly Instructions and User Manual Safety Information; The dedicated After Sales Service for IKEA appliances: Please do not hesitate to contact IKEA After Sales Service to: 1. make a service request under this guarantee; 2.
Country België Belgique Phone number 070 246016 Call Fee Opening time Binnenlandse gesprekskosten 8 tot 20 Weekdagen Tarif des appels nationaux 8 à 20. En semaine България 00359888164080 0035924274080 Такса за повикване от страната От 9 до 18 ч в работни дни Česká republika 246 019721 Cena za místní hovor Danmark 70 15 09 09 Landstakst 8 až 20 v pracovních dnech man. - fre. 09.00 - 20.00 lør. 09.00 - 16.00 1 søndag pr.
867335920-B-112017 © Inter IKEA Systems B.V.