GB KULINARISK
ENGLISH Please refer to the last page of this manual for the full list of IKEA appointed After Sales Service Provider and relative national phone numbers.
ENGLISH 4
ENGLISH Contents Safety information Safety instructions Installation Product description Control panel Before first use Daily use Clock functions Automatic programmes 4 6 8 8 9 11 12 17 18 Using the accessories Additional functions Hints and tips Care and cleaning Troubleshooting Technical data Energy efficiency ENVIRONMENTAL CONCERNS IKEA GUARANTEE 19 20 22 23 25 27 27 28 29 Subject to change without notice.
ENGLISH • • 5 Children shall not carry out cleaning and user maintenance of the appliance without supervision. Children aged 3 years and under must be kept away from this appliance when it is in operation at all times. General Safety • • • • • • • • • • Only a qualified person must install this appliance and replace the cable. WARNING: The appliance and its accessible parts become hot during use. Care should be taken to avoid touching heating elements.
ENGLISH Safety instructions Installation Warning! Only a qualified person must install this appliance. • Remove all the packaging. • Do not install or use a damaged appliance. • Follow the installation instruction supplied with the appliance. • Always take care when moving the appliance as it is heavy. Always use safety gloves and enclosed footwear. • Do not pull the appliance by the handle. • Keep the minimum distance from the other appliances and units.
ENGLISH • Do not apply pressure on the open door. • Do not use the appliance as a work surface or as a storage surface. • Open the appliance door carefully. The use of ingredients with alcohol can cause a mixture of alcohol and air. • Do not let sparks or open flames to come in contact with the appliance when you open the door. • Do not put flammable products or items that are wet with flammable products in, near or on the appliance. • Do not use microwave function to preheat the oven.
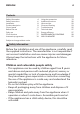
ENGLISH 8 Plastic parts are marked with international abbreviations such as PE, PS, etc. Dispose of the packaging material in the containers provided for this purpose at your local waste management facility. Disposal Warning! Risk of injury or suffocation. • Disconnect the appliance from the mains supply. • Cut off the mains electrical cable close to the appliance and dispose of it. • Remove the door to prevent children and pets to get closed in the appliance.
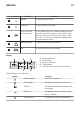
ENGLISH 9 10 Shelf support, removable 11 Shelf positions Accessories To measure how far the food is cooked. • Sponge x 1 For absorbing the remaining water from the steam generator. • Wire shelf x 1 For cookware, cake tins, roasts. • Baking tray x 1 For cakes and biscuits. • Core temperature sensor x 1 Control panel Electronic programmer 1 2 3 4 Symbol Function ON / OFF 1 6 7 8 9 10 11 Comment To activate and deactivate the appliance.
ENGLISH 10 Symbol 7 8 9 10 11 Function Comment Up key To move up in the menu. Down key To move down in the menu. Time and additional functions To set different functions. When a heating function operates, touch the symbol to set the timer or the functions: Function Lock, Favourites, Heat + Hold, Set + Go. You can also change the settings of the core temperature sensor. Minute Minder To set the function: Minute Minder. OK To confirm the selection or setting. Display A B C E D A. B. C.
ENGLISH 11 Symbol Function Time Indication The display shows how long the heating function operates. Press and at the same time to reset the time. Calculation The appliance calculates the time for cooking. Heat-up Indicator The display shows the temperature in the appliance. Fast Heat Up Indicator The function is active. It decreases the heat up time. Weight Automatic The display shows that the automatic weight system is active or that weight can be changed. Heat + Hold The function is active.
ENGLISH 12 Close the oven door without pulling the child lock. To remove the child lock, open the oven door and remove the child lock with the torx key. The torx key is in the oven fitting bag. Screw back the screw into the hole after removing the child lock. Daily use Warning! Refer to Safety chapters. Navigating the menus 1. Activate the appliance. 2. Press or to select the menu option. 3. Press to move to the submenu or accept the setting. At each point you can go back to the main menu with .
ENGLISH 13 Symbol Submenu Description Heat + Hold Keeps the prepared food warm for 30 minutes after a cooking cycle finished. Time Extension Activates and deactivates the time extension function. Display Contrast Adjusts the display contrast by degrees. Display Brightness Adjusts the display brightness by degrees. Set Language Sets the language for the display. Buzzer Volume Adjusts the volume of press-tones and signals by degrees.
ENGLISH 14 Heating function Application Steam Regenerating Food reheating with steam prevents surface drying. Heat is distributed a gentle and even way, which allows to recover taste and aroma of food as just prepared. This function can be used to reheat food directly on a plate. You can reheat more than one plate at the same time, using different shelf positions. True Fan Cooking To bake on up to two shelf positions at the same time and to dry food.
ENGLISH 15 Heating function Application Fast Grilling To grill flat food in large quantities and to toast bread. Turbo Grilling To roast larger meat joints or poultry with bones on one shelf position. Also to make gratins and to brown. Specials Heating function Bread Baking To bake bread. Au Gratin For dishes such as lasagna or potato gratin. Also to gratinate and brown. Dough Proving For controlled rising of yeast dough before baking. Plate Warming To preheat plates for serving.
ENGLISH Steam cooking The water drawer cover is in the control panel. Warning! Do not put water directly into the steam generator. Use only water. Do not use filtered (demineralised) or distilled water. Do not use other liquids. Do not put flammable or alcoholic liquids into the water drawer. 1. Prepare the food in the correct cookware. 2. Press the cover of the water drawer to open it. 3. Fill the water drawer with 800 ml of water. The water supply is sufficient for approximately 50 minutes.
ENGLISH Clock functions Clock functions table Clock function Minute Minder Application To set a countdown (max. 2 h 30 min). This function has no effect on the operation of the appliance. Use to activate the function. Press to set the minutes and or to start. Duration To set the length of an operation (max. 23 h 59 min). End Time To set the switch-off time for a heating function (max. 23 h 59 min). If you set the time for a clock function, the time starts to count down after 5 seconds.
ENGLISH 18 Heat + Hold Time Extension Conditions for the function: The function: Time Extension makes the heating function continue after the end of Duration. • The set temperature is more than 80 °C. • The function: Duration is set. The function: Heat + Hold keeps prepared food warm at 80 °C for 30 minutes. It activates after the baking or roasting procedure ends. You can activate or deactivate the function in the menu: Basic Settings. 1. 2. 3. 4. Activate the appliance. Select the heating function.
ENGLISH 2. Select the menu: Assisted Cooking. Press to confirm. 3. Select the category and dish. Press to confirm. 4. Select the function: Weight Automatic. to confirm. Press 5. Touch or to set the food weight. Press to confirm. The automatic programme starts. 19 6. You can change the weight at any time. Press or to change the weight. 7. When the time ends, an acoustic signal sounds. Press any symbol to deactivate the signal. With some programmes turn over the food after 30 minutes.
ENGLISH Core temperature sensor There are two temperatures to be set: the oven temperature and the core temperature. The core temperature sensor measures the core temperature of the meat. When the meat is at the set temperature, the appliance deactivates. Caution! Only use the core temperature sensor supplied or the correct replacement parts. The core temperature sensor must stay in the meat and in the socket during the cooking. 1. Activate the appliance. 2.
ENGLISH The display shows the first free memory position. 5. Press to confirm. 6. Enter the name of the programme. The first letter flashes. 7. Touch or to change the letter. . 8. Press The next letter flashes. 9. Do step 7 again as necessary. 10. Press and hold to save. You can overwrite a memory position. When the display shows the first free memory position, touch or and press to overwrite an existing programme. You can change the name of a programme in the menu: Edit Programme Name.
ENGLISH Temperature (°C) 22 Switch-off time (h) 30 - 115 12.5 120 - 195 8.5 200 - 230 5.5 The Automatic switch-off does not work with the functions: Light, core temperature sensor, End Time, Duration. Brightness of the display There are two modes of display brightness: • Night brightness - when the appliance is deactivated, the brightness of the display is lower between 10 PM and 6 AM. • Day brightness: – when the appliance is activated.
ENGLISH Cooking meat and fish • Use a deep pan for very fatty food to prevent the oven from stains that can be permanent. • Leave the meat for approximately 15 minutes before carving so that the juice does not seep out. • To prevent too much smoke in the oven during roasting, add some water into the deep pan. To prevent the smoke condensation, add water each time after it dries up. Cooking tables For cooking tables please refer to the Recipe Book which you can find on our website.
ENGLISH Steam Cleaning Remove the worst dirt manually. 1. Put 250 ml of water with 3 tablespoons of vinegar directly into the steam generator. 2. Activate the function: Steam Cleaning. The display shows the duration of the function. An acoustic signal sounds when the programme is completed. 3. Touch any symbol to deactivate the signal. 4. Wipe out the appliance with a soft cloth. Remove the water from the steam generator. Keep the appliance door open for approximately 1 hour.
ENGLISH 25 A B 7. Pull the door trim to the front to remove it. 8. Hold the door glass panels on their top edge one by one and pull them up out of the guide. Replacing the lamp 9. Clean the glass panel with water and soap. Dry the glass panel carefully. When the cleaning is completed, install the glass panels and the oven door. Do the above steps in the opposite sequence. Make sure that you put the glass panels (A and B) back in the correct sequence. The first panel (A) has a decorative frame.
ENGLISH 26 What to do if... Problem Possible cause Remedy The oven does not heat up. The oven is deactivated. Activate the oven. The oven does not heat up. The clock is not set. Set the clock. The oven does not heat up. The necessary settings are not set. Make sure that the settings are correct. The oven does not heat up. The automatic switch-off is activated. Refer to "Automatic switchoff". The oven does not heat up. The Child Lock is on. Refer to "Using the Child Lock".
ENGLISH 27 not remove the rating plate from the appliance cavity. We recommend that you write the data here: Model (MOD.) ......................................... Product number (PNC) ......................................... Serial number (S.N.) .........................................
ENGLISH 28 Energy consumption with a standard load, fan-forced 0.69 kWh/cycle mode Number of cavities 1 Heat source Electricity Volume 43 l Type of oven Built-In Oven Mass 31.3 kg EN 60350-1 - Household electric cooking appliances - Part 1: Ranges, ovens, steam ovens and grills - Methods for measuring performance. Energy saving The appliance contains features which help you save energy during everyday cooking.
ENGLISH with the household waste. Return the product to your local recycling facility or contact your municipal office. IKEA GUARANTEE How long is the IKEA guarantee valid? This guarantee is valid for five (5) years from the original date of purchase of Your appliance at IKEA, unless the appliance is named LAGAN in which case two (2) years of guarantee apply. The original sales receipt is required as proof of purchase.
ENGLISH 30 baskets, feed and drainage pipes, seals, lamps and lamp covers, screens, knobs, casings and parts of casings. Unless such damages can be proved to have been caused by production faults. • Cases where no fault could be found during a technician’s visit. • Repairs not carried out by our appointed service providers and/or an authorized service contractual partner or where non-original parts have been used. • Repairs caused by installation which is faulty or not according to specification.
ENGLISH Please refer to the last page of this manual for the full list of IKEA appointed contacts and relative national phone numbers. In order to provide You with a quicker service, we recommend that You use the specific phone numbers listed at the end of this manual. Always refer to the numbers listed in the booklet of the specific appliance You need an assistance for.
Country België Belgique Phone number 070 246016 Call Fee Opening time Binnenlandse gesprekskosten 8 tot 20 Weekdagen Tarif des appels nationaux 8 à 20. En semaine България 00359888164080 0035924274080 Такса за повикване от страната От 9 до 18 ч в работни дни Česká republika 246 019721 Cena za místní hovor Danmark 70 15 09 09 Landstakst 8 až 20 v pracovních dnech man. - fre. 09.00 - 20.00 lør. 09.00 - 16.00 1 søndag pr.
867314742-D-202016 © Inter IKEA Systems B.V.