SMAKSAK AU
ENGLISH Please refer to the chapter IKEA GUARANTEE for contact details of the after sales customer service centre.
ENGLISH 4
ENGLISH Contents Safety information Conditions of Use Safety instructions Installation Product description Control panel Before first use Daily use Clock functions 4 6 6 9 10 10 11 12 14 Using the accessories Additional functions Hints and tips Care and cleaning Troubleshooting Technical data Energy efficiency Environmental concerns IKEA guarantee 16 18 19 24 27 30 30 31 32 Subject to change without notice.
ENGLISH • • • 5 Keep children and pets away from the appliance when it operates or when it cools down. Accessible parts are hot. If the appliance has a child safety device, it should be activated. Children shall not carry out cleaning and user maintenance of the appliance without supervision. General Safety • • • • • • • • • • • • Only a qualified person must install this appliance and replace the cable. WARNING: The appliance and its accessible parts become hot during use.
ENGLISH Conditions of Use This appliance is intended to be used in household and similar applications such as: • Farm houses • By clients in serviced apartments, holiday apartments and other residential type environments. Safety instructions Installation Warning! Only a qualified person must install this appliance. • Remove all the packaging. • Do not install or use a damaged appliance. • Follow the installation instructions supplied with the appliance.
ENGLISH • Make sure that the ventilation openings are not blocked. • Do not let the appliance stay unattended during operation. • Deactivate the appliance after each use. • Be careful when you open the appliance door while the appliance is in operation. Hot air can release. • Do not operate the appliance with wet hands or when it has contact with water. • Do not apply pressure on the open door. • Do not use the appliance as a work surface or as a storage surface. • Open the appliance door carefully.
ENGLISH • • • • • • – any removable objects (including shelves, side rails etc. provided with the product) particularly any nonstick pots, pans, trays, utensils etc. Read carefully all the instructions for Pyrolytic cleaning. Keep children away from the appliance while the Pyrolytic cleaning is in operation. The appliance becomes very hot and hot air is released from the front cooling vents.
ENGLISH 9 Installation Warning! Refer to Safety chapters. Assembly Refer to the Assembly Instructions for the installation. Electrical installation Warning! Only a qualified person must do the electrical installation. The manufacturer is not responsible if you do not follow the safety precautions from the Safety chapters. This oven is supplied without a main plug and a main cable.
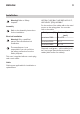
ENGLISH 10 Product description General overview 1 2 3 4 5 6 5 7 4 12 3 8 9 2 1 11 10 Accessories • Wire shelf x 2 For cookware, cake tins, roasts. • Baking tray x 1 For cakes and biscuits. • Grill- / Roasting pan x 1 To bake and roast or as pan to collect fat.
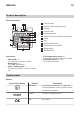
ENGLISH Display A G F E B D C A. Timer / Temperature B. Heat-up and residual heat indicator C. Core temperature sensor (selected models only) D. Door lock (selected models only) E. Hours / minutes F. Demo mode (selected models only) G. Clock functions Before first use Warning! Refer to Safety chapters. To set the Time of day refer to "Clock functions" chapter. Initial Cleaning Remove all accessories and removable shelf supports from the oven. Refer to "Care and cleaning" chapter.
ENGLISH 12 Screw back the screw into the hole after removing the child lock. Warning! Be careful not to scratch the control panel. Daily use Warning! Refer to Safety chapters. Heating function To bake cakes with crispy bottom and to preserve food. Heating functions Heating function Application The oven is off. Off position To bake on up to three shelf positions at the same time Forced Air and to dry food. Set the temCooking perature 20 - 40 °C lower than for Conventional (Top and Bottom Heat).
ENGLISH Heating function Eco Fan Cooking Pyrolysis Application This function is designed to save energy during cooking. For the cooking instructions refer to "Hints and tips" chapter, Eco Fan Cooking. The oven door should be closed during cooking so that the function is not interrupted and to ensure that the oven operates with the highest energy efficiency possible. When you use this function, the temperature in the cavity may differ from the set temperature. The residual heat is used.
ENGLISH 6. Remove water from the cavity embossment. Warning! Make sure that the oven is cold before you remove the remaining water from the cavity embossment. Heat-up indicator When the oven function operates, the bars in the display appear one by one when the temperature in the oven increases, and disappear when it decreases. Clock functions Clock functions table Clock function Application To show or change the TIME OF DAY time of day. You can change the time of day only when the oven is off.
ENGLISH Setting the DURATION function 1. Set a heating function. Press to confirm. 2. Press again and again until starts to flash. 3. Turn the control knob to set the minutes to confirm. Turn the control and press knob to set the hours and press to confirm. When the set Duration time ends the signal sounds for 2 minutes. and time setting flash in the display. The oven turns off automatically. 4. Press any button or open the oven door to stop the signal. 5. Turn the knobs to the off position.
ENGLISH After 90% of the set time the signal sounds. 5. When the set time ends the signal sounds for 2 minutes. "00:00" and flash in the display. Press any button to stop the signal. COUNT UP TIMER Press again and again until the display shows time without any symbols. Using the accessories Warning! Refer to Safety chapters.
ENGLISH Recommended core temperatures 50 °C Rare 60 °C Medium 70 °C Well done Caution! Only use the core temperature sensor supplied with the oven, or genuine replacement parts. 1. Set the oven function and the oven . temperature. Press 2. Put the point of the core temperature sensor into the centre of the meat. 3. Put the plug of the core temperature sensor into the socket on the top of the cavity. 4.
ENGLISH 18 Make sure you push back the telescopic runners fully in the oven before you close the oven door. Using the telescopic runners Keep the installation instructions for the telescopic runners for future use. With telescopic runners you can put in and remove wire shelves and trays easily. Warning! Refer to "Product description" chapter. Caution! Do not clean the telescopic runners in the dishwasher. Do not lubricate the telescopic runners.
ENGLISH Temperature (°C) Switch-off time (h) Cooling fan 30 - 115 12.5 120 - 195 8.5 200 - 245 5.5 When the oven operates, the cooling fan turns on automatically to keep the surfaces of the oven cool. If you turn off the oven, the cooling fan can continue to operate until the oven cools down. 250 - maximum 3 Safety thermostat After an automatic switch-off, press any button to operate the oven again.
ENGLISH 20 cooking time, etc.) for your cookware, recipes and quantities when you use this appliance. Food Accessories Eco Fan Cooking For best results follow suggestions listed in the table below. Temperature (°C) Shelf position Time (min) Sweet rolls, 12 pieces baking tray or dripping pan 180 2 20 - 30 Rolls, 9 pieces baking tray or dripping pan 180 2 30 - 40 Pizza, frozen, 0.
ENGLISH 21 Food Accessories Temperature (°C) Shelf position Time (min) Macaroons, 20 pieces baking tray or dripping pan 180 2 25 - 35 Muffins, 12 pieces baking tray or dripping pan 170 2 30 - 40 Savory pastry, 16 pieces baking tray or dripping pan 180 2 25 - 30 Short crust biscuits, 20 pieces baking tray or dripping pan 150 2 25 - 35 Tartlets, 8 pieces baking tray or dripping pan 170 2 20 - 30 Poached vegetables, 0.
ENGLISH 22 Accessories Size Picture Ramekins, ceramic 8 cm diameter, 5 cm height Flan base tin, dark, nonreflective 28 cm diameter Information for test institutes Tests according to IEC 60350-1. Food Function Accessories Shelf Temposi- peration ture (°C) Time (min) Comments Small cake Convention- Baking al (Top and tray Bottom Heat) 3 170 20 - 30 Put 20 small cakes per one baking tray.
ENGLISH 23 Food Function Fatlessponge cake Forced Air Cooking Wire shelf 2 160 40 - 50 Use a cake mould (26 cm diameter). Preheat the oven for 10 minutes. Fatlessponge cake Forced Air Cooking Wire shelf 2 and 4 160 40 - 60 Use a cake mould (26 cm diameter). Diagonally shifted. Preheat the oven for 10 minutes.
ENGLISH Care and cleaning Warning! Refer to Safety chapters. Notes on cleaning Clean the front of the oven with a soft cloth with warm water and a mild cleaning agent. To clean metal surfaces, use a dedicated cleaning agent. Clean the oven interior after each use. Fat accumulation or other food remains may result in a fire. The risk is higher for the grill pan. Clean all accessories after each use and let them dry. Use a soft cloth with warm water and a cleaning agent.
ENGLISH 1 2 Install the removed accessories in the opposite sequence. The retaining pins on the telescopic runners must point to the front. Pyrolysis Warning! The oven becomes very hot. There is a risk of burns. Caution! Do not use the hob at the same time as the Pyrolysis function. It can cause damage to the oven. Before you turn on the Pyrolysis: • remove all the accessories and removable shelf supports. • clean the oven floor with warm water and mild detergent.
ENGLISH 7. Hold the door glass panels by their top edge and carefully pull them out one by one. Start from the top panel. Make sure the glass slides out of the supports completely. 2. Lift and turn the levers fully on both hinges. 3. Close the oven door halfway to the first opening position. Then lift and pull forward and remove the door from its seat. 4. Put the door on a soft cloth on a stable surface. 5.
ENGLISH A 27 Warning! Danger of electrocution! Disconnect the fuse before you replace the lamp. The lamp and the lamp glass cover can be hot. B Caution! Always hold the halogen lamp with a cloth to prevent grease residue from burning on the lamp. Make sure that you install the middle panel of glass in the seats correctly. A B 1. Turn off the oven. 2. Remove the fuses from the fuse box or turn off the circuit breaker. 3. Turn the lamp glass cover counterclockwise to remove it. 4.
ENGLISH Problem 28 Possible cause Remedy The oven does not heat up. The automatic switch-off is activated. Refer to "Automatic switchoff". The oven does not heat up. The Child Lock is on. Refer to "Using the Child Lock". The oven does not heat up. The door is not closed correctly. Fully close the door. The oven does not heat up. The fuse is blown. Make sure that the fuse is the cause of the malfunction. If the fuse is blown again and again, contact a qualified electrician.
ENGLISH Problem 29 Possible cause Remedy • Deactivate the oven with the house fuse or the safety switch in the fuse box and activate it again. • If the display shows the error code again, contact an Authorised Service Centre. The display shows an error code that is not in this table. There is an electrical fault. There is no good cooking performance using the function: Direct Steam. You did not turn on the func- Refer to "Activating the function: Direct Steam. tion: Direct Steam".
ENGLISH 30 We recommend that you write the data here: Model (MOD.) ......................................... Product number (PNC) ......................................... Serial number (S.N.) .........................................
ENGLISH 31 Number of cavities 1 Heat source Electricity Volume 72 l Type of oven Built-In Oven Mass 32.5 kg EN 60350-1 - Household electric cooking appliances - Part 1: Ranges, ovens, steam ovens and grills - Methods for measuring performance. Energy saving The oven contains features which help you save energy during everyday cooking. General hints Make sure that the oven door is closed properly when the oven operates. Do not open the door too often during cooking.
ENGLISH electrical and electronic appliances. Do not dispose of appliances marked with the symbol the product to your local recycling facility or contact your municipal office. with the household waste. Return IKEA guarantee How long is the IKEA guarantee valid? This guarantee is valid for 5 years from the original date of purchase of Your appliance at IKEA Pty Ltd, ABN 84006270757 or at Cebas Pty Ltd, ABN 15 009 156 003 (Both Trading as IKEA).
ENGLISH • The technical specifications. • The Assembly Instructions and user manual Safety Information. IKEA's guarantee is subject to Australian Consumer Law - see Schedule 2 to Competition and Consumer Act, 2010. This guarantee is in addition to (and does not exclude, restrict or modify in any way) any non-excludable statutory warranties in Australia.
ENGLISH 34 You are also entitled to have the goods repaired or replaced if the goods fail to be of acceptable quality and the failure does not amount to a major failure. sembly Instructions and/or the User Manual section of this booklet before contacting us. How to reach us if you need our service This guarantee is not intended in any way to limit or exclude such rights and remedies that you may have under law. You can find out more information about the Australian Consumer Law on the ACCC website: www.
ENGLISH 35
867341587-A-112018 © Inter IKEA Systems B.V.