SUPERBT GB
ENGLISH 4
ENGLISH Contents Safety information Safety instructions Installation Product description Operation Daily Use 4 5 7 9 10 14 Hints and tips Care and cleaning Troubleshooting Technical information IKEA GUARANTEE ENVIRONMENT CONCERNS 17 18 20 23 24 26 Subject to change without notice. Safety information Before the installation and use of the appliance, carefully read the supplied instructions. The manufacturer is not responsible if an incorrect installation and use causes injuries and damages.
ENGLISH 5 By clients in hotels, motels, bed and breakfast and other residential type environments Keep ventilation openings, in the appliance enclosure or in the built-in structure, clear of obstruction. Do not use mechanical devices or other means to accelerate the defrosting process, other than those recommended by the manufacturer. Do not damage the refrigerant circuit.
ENGLISH Electrical connection Warning! Risk of fire and electrical shock. • The appliance must be earthed. • Make sure that the electrical information on the rating plate agrees with the power supply. If not, contact an electrician. • Always use a correctly installed shockproof socket. • Do not use multi-plug adapters and extension cables. • Make sure not to cause damage to the electrical components (e.g. mains plug, mains cable, compressor).
ENGLISH 7 • The refrigerant circuit and the insulation materials of this appliance are ozonefriendly. • The insulation foam contains flammable gas. Contact your municipal authority for information on how to discard the appliance correctly. • Do not cause damage to the part of the cooling unit that is near the heat exchanger. Installation Warning! Refer to Safety chapters.
ENGLISH A 8 B C D E • A - green and yellow: Earth • C - brown: Live • D - blue: Neutral As the colours of the wires in the mains lead of this appliance may not correspond with the coloured markings identifying the terminals in your plug, proceed as follows: 1. Connect the wire coloured green and yellow to the terminal marked either with the letter “E“ or by the earth symbol or coloured green and yellow. 2.
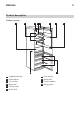
ENGLISH 9 Product description Product overview 1 2 3 4 5 6 10 1 2 3 4 5 6 Vegetable drawer Glass shelves Fan-cooling Bottle rack Control panel Butter shelf 7 9 7 8 9 10 Door shelves Bottle shelf Freezer baskets Rating plate 8
ENGLISH 10 Operation Control panel 1 7 6 5 4 3 2 1 Display 2 Bottle Chill button and Appliance ON/OFF button 3 Temperature colder button 4 Temperature warmer button 5 Fridge Compartment button 6 Freezer Compartment button 7 Mode button It is possible to change predefined sound of buttons to a louder one by pressing together the Mode button and Temperature colder button for some seconds. Change is reversible.
ENGLISH M) Free Store mode After selection of the fridge or freezer compartment the animation starts After selection of the temperature the animation flashes for a few minutes. Switching on 1. Connect the mains plug to the power socket. 2. Press the ON/OFF button if the display is off. 3. If DEMO appears on the display, the appliance is in demonstration mode. Refer to "Troubleshooting" paragraph (DEMO mode is a function for the retailer to show the functionality of the appliance).
ENGLISH button until you can see none of the special icons. If the function is activated automatically the Free Store indicator is not shown (refer to "Daily use"). The activation of the Free Store mode increases the energy consumption. Eco Mode for fridge and freezer compartment For optimal food storage select the Eco Mode. 1. To switch on the function: a. Select the fridge/freezer compartment. b. Press Mode until the corresponding icon appears.
ENGLISH to forget the bottles placed in the freezer for fast cooling. To switch on the function: 1. Press the Bottle Chill button The Bottle Chill indicator appears. The timer shows the set value (30 minutes). 2. Press the Temperature colder button and the Temperature warmer button to change the Timer set value from 1 to 90 minutes. At the end of the countdown the Bottle Chill indicator flashes and an audible alarm sounds: 1. Remove any drinks contained in the freezer compartment. 2.
ENGLISH Daily Use Freezing Calendar 1-2 3-4 Freezer blocks 3-6 3-6 3-6 x2 Ice-cube production 3-6 10-12 10-12 10-12 10-12 The symbols show different types of frozen goods. The numbers indicate storage times in months for the appropriate types of frozen goods. Whether the upper or lower value of the indicated storage time is valid depends on the quality of the foods and treating before freezing. Accessories Egg tray This appliance is equipped with tray for the production of ice-cubes. 1.
ENGLISH The freezing process lasts 24 hours: during this period do not add other food to be frozen. When the freezing process is completed, return to the required temperature (see "FastFreeze function"). In this condition, the refrigerator compartment temperature might drop below 0°C. If this occurs reset the temperature regulator to a warmer setting. 15 depending on the time available for this operation.
ENGLISH To permit storage of food packages of various sizes, the door balconies can be placed at different heights. To make these adjustments proceed as follows: gradually pull upwards the balcony until it comes free (1), remove it by pushing towards inside (2), then reposition as required. Movable shelves This bottle holder shelf can be tilted in order to store previously opened bottles. To obtain this result, pull the shelf up so it can rotate upwards and be placed on the next higher level.
ENGLISH Removal of freezing baskets from the freezer The freezing baskets have a limit stop to prevent their accidental removal or falling out. At the time of its removal from the freezer, pull the basket towards yourself (1) and, upon reaching the end point, remove the basket by tilting its front upwards (2). 1 2 At the time of putting it back, slightly lift the front of the basket to insert it into the freezer. Once you are over the end points, push the baskets back in their position.
ENGLISH • Bananas, potatoes, onions and garlic, if not packed, must not be kept in the refrigerator. Hints for freezing To help you make the most of the freezing process, here are some important hints: • the maximum quantity of food which can be frozen in 24 hrs. is shown on the rating plate; • the freezing process takes 24 hours.
ENGLISH Initial power on Caution! Before inserting the power plug in to the outlet and switching on the cabinet for the first time, leave the appliance standing upright for at least 4 hours. This will assure a sufficient amount of time for the oil to return to the compressor. Otherwise the compressor or electronic components may sustain damage. 2. Remove all food. 3. Clean the appliance and all accessories. 4. Leave the door/doors open to prevent unpleasant smells.
ENGLISH 20 The absence of frost is due to the continuous circulation of cold air inside the compartment, driven by an automatically controlled fan. Troubleshooting Warning! Refer to Safety chapters. What to do if... Problem The appliance does not operate. Possible cause Solution The appliance is switched off. Switch on the appliance. The mains plug is not connected to the mains socket correctly. Connect the mains plug to the mains socket correctly. There is no voltage in the mains socket.
ENGLISH Problem The compressor operates continually. 21 Possible cause Solution Temperature is set incorrectly. Refer to "Operation" chapter. Many food products were put in at the same time. Wait some hours and then check the temperature again. The room temperature is too high. Refer to climate class chart on the rating plate. Food products placed in the appliance were too warm. Allow food products to cool to room temperature before storing. The door is not closed correctly.
ENGLISH Problem 22 Possible cause Solution Temperature cannot be set. The Shopping Function function is switched on. Switch off Shopping Function manually, or wait until the function resets automatically to set the temperature. Refer to " Shopping Function function". Temperature cannot be set. The FastFreeze function is switched on. Switch off FastFreeze manually, or wait until the function resets automatically to set the temperature. Refer to "FastFreeze function". DEMO appears on the display.
ENGLISH If your appliance still is not working properly after making the above checks, contact the After Sales Service. You can find the list at the end of this manual. 23 3. If necessary, replace the defective door gaskets. Contact the Authorised Service Centre. Replacing the lamp Closing the door The appliance is equipped with a longlife LED interior light. 1. Clean the door gaskets. 2. If necessary, adjust the door. Refer to the assembly instructions.
ENGLISH 24 Noise level 42 dB (A) Energy class A++ Voltage 230 - 240 V Frequency 50 Hz The technical information are situated in the rating plate on the internal left side of the appliance and in the energy label.
ENGLISH service provider or its authorized service partner through its own service operations, will then, at its sole discretion, either repair the defective product or replace it with the same or a comparable product. What is not covered under this guarantee? • Normal wear and tear.
ENGLISH The dedicated After Sales Service for IKEA appliances: Please do not hesitate to contact IKEA After Sales Service to: 1. make a service request under this guarantee; 2. ask for clarification on installation of the IKEA appliance in the dedicated IKEA kitchen furniture.
Country België Belgique Phone number 070 246016 Call Fee Opening time Binnenlandse gesprekskosten 8 tot 20 Weekdagen Tarif des appels nationaux 8 à 20. En semaine България 00359888164080 0035924274080 Такса за повикване от страната От 9 до 18 ч в работни дни Česká republika 246 019721 Cena za místní hovor Danmark 70 15 09 09 Landstakst 8 až 20 v pracovních dnech man. - fre. 09.00 - 20.00 lør. 09.00 - 16.00 1 søndag pr.
0154370-A-332014 © Inter IKEA Systems B.V.