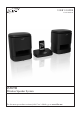
USER’S GUIDE V:1407-0603-09 IS809B Wireless Speaker System For the most up-to-date version of this User’s Guide, go to www.ilive.
WARNINGS AND PRECAUTIONS • CAUTION: TO PREVENT ELECTRIC SHOCK, MATCH WIDE BLADE OF PLUG TO WIDE SLOT, FULLY INSERT. • WARNING: While these speakers are water resistant, to prevent the risk of fire or shock, do not immerse these speakers in water and remove these speakers from an outdoor environment that is experiencing rain. • CAUTION: Use of controls or adjustments or performance of procedures other than those specified may result in hazardous radiation exposure.
FCC Warnings What’s Included NOTE: This equipment has been tested and found to comply with the limits for a Class B digital device, pursuant to Part 15 of the FCC Rules. These limits are designed to provide reasonable protection against harmful interference in a residential installation. This equipment generates, uses, and can radiate radio frequency energy and, if not installed and used in accordance with the instructions, may cause harmful interference to radio communications.
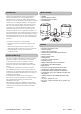
POWERING THE BASE STATION AND REMOTE Base Station AC Power Base Station Battery Backup Power the base station by connected it to a standard AC outlet using the attached AC power cord. Requires 2 AAA batteries (not included). Remote Requires 2 AAA batteries (not included). Power the remote by inserting 2 AAA batteries into the battery compartment on the back of the remote. 4 iLive | IS809B The battery backup is meant for keeping the clock and timer settings during short unexpected power outages.
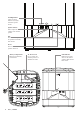
POWERING THE WIRELESS SPEAKERS Wireless Speaker AC Power Power the wireless speakers by connected them to a standard AC outlet using the attached AC power cord. The AC cord is stored inside of the wireless speaker’s battery compartment. After extending the AC cord out from the battery compartment, snap the battery compartment door back into position to keep the internal elements of the wireless speaker from being exposed. Wireless Speaker DC Battery Power Requires 6 D batteries (not included).
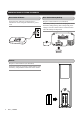
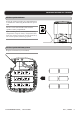
INTRODUCTION Timer Press and hold to set the timer. Dock for iPod Use to connect an iPod to the wireless speaker system. Dimmer Press to adjust the brightness on the wireless speaker system’s display Display Sleep Press repeatedly to set the sleep timer. Time Set Press and hold to set the wireless speaker system’s clock. Source Press to switch between iPod and Auxiliary modes. Power Press to turn the unit off and on.
Power Press to turn the unit off and on. Source Press to switch between iPod and Auxiliary modes. Repeat Press to activate the repeat options on a docked iPod. Skip/Search Press to skip forwards or backwards through tracks on a docked iPod. Press and hold to search forwards or backwards through an individual track on a docked iPod. Treble Press to adjust the level of treble output from the linked speakers. Mute Press to mute the volume of the unit. Play/Pause Press to play or pause a docked iPod.
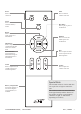
Left/Right/Mono Adjust to switch between Left, Right, snd Mono speaker modes. Speaker Volume Turn to adjust the volume of the wireless speaker. Pair Press and hold to pair the speaker with nearby base stations. Power Press to turn the speaker off and on. Battery Compartment Requires 6 D batteries, not included. 8 iLive | IS809B AC Power Cord Use to connect the wireless speaker to a standard AC outlet. Link Indicator Indicates the current status of the wireless speaker’s link with the base station.
PAIRING THE WIRELESS SPEAKERS WITH THE BASE STATION What does it mean to Pair? Pairing Pairing the base station with a wireless speaker allows the base station to recognize that wireless speaker. Once paired, the base station will remember that wireless speaker and transmit audio through it. The two wireless speakers included in the same box as the base station are pre-paired with that base station. Any additional speakers will need to be paired by following the directions below.
OPERATIONS Setting the Clock Setting the Timer 1. Press and hold the Time Set button. 1. Press and hold the Timer button. 2. While holding the Time Set button, press the Skip/Search buttons to adjust the hour and minute. 2. While holding the Timer button, press the Skip/Search buttons to adjust the hour and minute. 3. Release the Time Set button to set the adjusted time. 3. Release the Timer button to set the adjusted timer. Setting the Sleep Timer 4.
OPERATIONS Docking an iPod Left / Right / Mono Speaker Settings 1. Locate the numbered bracket that fits the iPod that will be docked. The wireless speakers can be set to Left, Right, or Mono by using the Left/Right/Mono dial on the wireless speaker. Each included Bracket has a number on it, indicating which iPod model that bracket is compatible with. See the separate bracket chart page to identify which bracket is needed. 2. Snap the bracket into place over the iPod connector in the Dock for iPod. 3.
COMPANY INFORMATION International Support To download this User’s Guide in English, Spanish, or French, visit the support section at www.ilive.net. Para transferir esta guía de usuario en inglés, español, o francés, visite la sección de la ayuda en www.ilive.net. Pour télécharger ce guide de l’utilisateur en anglais, espagnol, ou français, visitez la section de soutien chez www.ilive.net. Contact Information Address: 2116 Carr Street, St.