DUO / DUO PLUS Blu-ray/DVD/CD Duplicator User’s Manual
TABLE OF CONTENTS Introduction 1 11. Setup 11 12. HDD Manager 16 LCD Front Panel Overview 1 o Start-up Menu 12 o Select Image 16 Menu Overview 2 o Auto Start 12 o Disc => Image 16 Functions 5 o Display Mode 12 o Image Info 16 1. Copy 5 o Beep 12 o Rename Image 17 2. Test 5 o Power on Eject 12 o Delete Image 17 3. Copy + Verify 5 o Reader Speed 12 o HDD Info 17 4. Copy + Compare 6 o Compare Speed 13 o Format HDD 17 5.
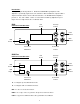
Introduction: Thank you for purchasing a DUO or DUO Plus CD/DVD/Blu-ray Duplicator. This duplicator is specifically engineered to run stand-alone without additional computer. With a simple four-button interface and a USB shortcut button, the DUO/DUO Plus Duplicator provides a fast and reliable solution for CD, DVD and Blu-ray duplication up to 11 targets from one single master disc or USB flash drive.
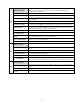
Menu Overview: Below is a quick reference of functions available on DUO/DUO Plus Blu-ray/DVD/CD Duplicator. 1 COPY 2 TEST 3 COPY + VERIFY 4 COPY + COMPARE 5 VERIFY 6 COMPARE 7 SET BURN SPEED 8 SOURCE SELECT TRACK EDIT 9.1 Copy Track 9 Copies the master CD/DVD/BD. All contents of the master disc will be duplicated on to all target disc(s) simultaneously. Simulates the copy process, but no data is recorded onto the blank disc(s).
SETUP 11.1 Startup Menu Assigns a command to be displayed first after the duplicator has been initialized. 11.2 Auto Start Sets auto start time from OFF (no auto start) to 99 sec. Allows the duplicator to automatically start one of six following functions once the master disc and desired number of target disc(s) are inserted and the drive trays are closed: Copy, Test, Copy & Verify, Copy & Compare, Verify and Compare. 11.
12 HDD MANAGER The management for various functions of the hard disk drive (HDD). Note: For this function and submenu to be displayed, a HDD must be installed in the duplicator. 12.1 Select Image Selects an image file as a source to be copied to the discs. 12.2 Disc Image Loads an image to the HDD from a master CD, DVD or BD as an Image file. 12.3 Image Info. Displays the image file information such as image order, name, file size and type of image. 12.4 Rename Image 12.
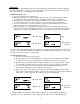
Functions: 1. Copy – This command will copy the master disc placed in the designated Source Drive to all target discs in the Writer Drives. This process burns all information contained on the master disc to the target discs so the copies are exact duplicates of the master disc. To Start the Copy Process: 1). Power on the machine (if not already on). 2). Eject disc tray of the Source Drive and place the master disc in the designated Source Drive (usually the top drive ).
Note: The verification process uses a Disc Readability Check to individually check the presence of data on each copy. This process does not compare the contents of duplicated discs against that of the master. It only verifies that the duplicated discs are readable. To start the Copy + Verify process: 1). Power on the machine (if not already on). 2). Eject disc tray of the Source Drive and place the master disc in the designated Source Drive (usually the top drive).
Copy Complete Start Compare 5. Verify – This command verified readability on the master disc and/or all target discs. This command is especially useful for audio CD duplication. Note: The verification process uses a Disc Readability Check to individually check the presence of data on each copy. This process does not compare the contents of duplicated discs against that of the master. It only verifies that the duplicated discs are readable.
Press “ENT” Start Compare Finish and Eject Discs 7. Set Burn Speed – This feature allows you to set the burn speed of various types of disc: CDs (data and VCDs), audio CDs, DVDs, dual-layer DVDs (DVD DL), and Blu-ray (BD-R SL, BD-R DL, BD-RE SL, and BD-RE DL). Selectable burn speeds: CD: 1, 2, 4, 8, 10, 12, 16, 20, 24, 32, 36, 40 (default), 44, 48, 52, 56, MAX. Audio CD: 1, 2, 4, 8, 10, 12, 16, 20, 24 (default), 32, 36, 40, 44, 48, 52, 56, MAX. DVD: 1, 2, 2.
Display Current Source Drive Press “ENT” Press “ENT” to confirm Press ▲▼ to select drive 9. Track Edit – This command allows user to select tracks from multiple audio CDs, combine and burn to target CDs. This command also closes edited audio CDs and displays the disc information. To create and copy custom compilation audio CDs from multiple master discs: 1). Power on the machine (if not already on). 2). Use the Scroll buttons to select “9. Track Edit”. Press the ENT button. 3).
10.1 PreScan: Prescans the master disc and verifies the integrity and quality of the master disc. Select Utility and press “ENT” to enter the sub-menu. Start PreScan Press “ENT” Finish and Eject Discs 10.2 Quick Erase: Performs a quick erase of rewritable (RW) media for next use Note: Do NOT perform this function on recordable (R) media. Press “ENT” Finish and Eject Discs 10.3 Full Erase: Performs a full erase of rewritable (RW) media for next use.
10.8 Update BIOS: Updates the BIOS (firmware) of the duplicator controller. Insert a firmware CD and Press “ENT” Update Complete System Reboot 10.9 Copy Counter: Tracks the numbers of successful and failed copies made by the duplicator for CDs and DVDs. There are three (3) optionsl: Show Count (to display current copy counter), Enable Counter (to turn the counter on or off) and Clear Counter (to clear counter). 1.
Press “ENT” Press ▲▼ to select function 11.2 Auto Start: Set the amount of time before the duplicator will automatically start the selected command, ranging from OFF (no auto start) to 120 seconds (3, 4, 5… .90, 100, 120). Press “ENT” Press ▲▼ to select time 11.3 Display Mode: Changes the display readout during the performance of various commands. The “Basic” mode displays a progress bar, along with the amount of total data in MB on the master DVD (or in time for the master CD).
11.7 Compare Speed: Sets the speed at which the master disc is compared with the copies disc(s). The speeds for CD are: 1, 2, 4, 8, 10, 12, 16, 20, 24, 32, 36, 40 (default), 44, 48, 52, 56, MAX. The speeds for DVD are: 1, 2, 2.4, 4, 6, 8, 12, 16 (default), 18, 20, 24, MAX. The compare speed for BD is pre-set to 4x variable upon drive and media speed. Press “ENT” Press ▲▼ to select CD speed Press ▲▼ to select DVD speed 11.
Press “ENT” Press ▲▼ to select 11.11.3 Boot Password: Sets password protection for the duplicator before the boot-up process can be started. The boot password prevents anyone unauthorized from using the duplicator system. Press “ENT” Press ▲▼ to select If Disable is selected, no password will be set and the display will direct back to the Setup sub-menu. If Enable is selected, a password must be entered using the following guidelines: Use ▲▼ to select the character desired.
For space, press “ENT” without choosing a character to leave the position empty. Press “ESC” to cancel the process. The duplicator will ask for password when “11. Setup” is selected 11.11.5 Copy CD-TEXT: Allows the copying of the CD-TEXT on the master disc(s) to the target disc(s). Press “ENT” Press ▲▼ to select 11.11.6 Copy UPC/ISRC: Allows the copying of the UPC/ISRC on the master disc(s) to the target disc(s). Press “ENT” Press ▲▼ to select Press “ENT” to confirm 11.11.
Select “By Source” or “Optimization” After select, press “ENT” to confirm 11.11.11 Show Result: Allows the result to display on LCM. Available Options: Enable or Disable 11.11.12 Performance: Allow user to set priority of burning for performance. Options are Speed, Balance, Compatibility and Auto. By option Speed, duplicator can provide maximum data transfer rate. For some ODD drive with compatibility issue, Compatibility can provide maximum range to work but less transfer rate. 11.11.
Press “ENT” Press ▲▼ to select image 12.4 Rename Image: Renames the image instead of using default file names (IMG_001, IMG_002, etc.). Up to 8 characters. Press “ENT” Press ▲▼ to Input name Press ▲▼ to select image Press “ENT” to confirm There are 8 characters for each image name. No empty space allowed in the image file name. Press “BACK” to cancel the process. 12.5 Delete Image: Deletes the image(s) from the HDD and reclaims the space occupied by the image on the HDD.
Load First: Complete loading of the image to the HDD before automatically begins the copy process from the image stored on the HDD to all target disc(s). Image is loaded one at a time and copied to the Writer Drives with blank disc(s) ready. The image is stored in a [TEMP] partition on the HDD. Synchronous: Loads the image at the same time while the duplicator is making copies from the master disc to the blank discs. As the copies being made, the image is also being created and stored on the HDD.
Take out the copied disc, put in another blank CD disc and close the tray, then press “ENT” key to continue the copy process. The second disc will copy the remaining 309MB of data from USB drive. 13. 2. Multi Session: Allows data from multiple small USB source to be copied to a single disc. In the sample below we are using a USB pen drive with 100MB of data as one source and a blank CD as target. Press “ENT” When the copy finishes, the disc will automatically be ejected.
Press “ENT” Simulates Copy 14. Flash to Flash: Allows you to copy from one source USB to one Target USB (this function only available on the DUO Plus model). 14.1 Copy File: Copy files stored in the source USB flash drive to the target USB flash drive. The copied files will be appended to the original contents of target USB flash drive. It will not erase the original contents of target USB flash drive. Press “ENT” to start copy 14.2 Copy Disk: Copy the complete contents of a disk to another disk.
Basic Troubleshooting: Follow these simple steps for quick and proper troubleshooting. 1. Power does not turn on or unit receives no power. a. Check power cord and outlet to make sure power connections are secured. b. Check voltage switch on the back of the duplicator to make sure power supply is set for correct outlet rating. c. Test with another power cord (same as a PC power cord) to eliminate cable failure. 2. Master disc cannot be read a. Change the master disc.