FORTRESS CD/DVD Duplicator System User Manual Version 1.
TABLE OF CONTENTS Introduction 1 Specifications LCD Front Panel Overview • Setup 11 o Rename Image 15 1 o Power on Time 11 o Delete Image 15 1 o Auto Start Time 11 o Show HDD Info 16 2-3 o Start-up Menu 11 o Format HDD 16 Functions 4 o Display Mode 11 o Load and Copy 16 • Copy 4 o Button Beep 11 DisckLock 17 • Test 4 o Skip Read Error 11 o Enable DiscLock 17 • Copy & Verify 5 o Eject on Start 12 o DiscLock Copy 18 • Copy & Compare 5 o Show Copy Time 12
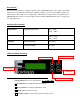
Introduction: Thank you for purchasing the standalone Spartan Fortress CD/DVD Duplicator. This system is specifically engineered to copy CD and/or DVD without additional computer or processing unit. With a simple, fourbutton interface and a LCD screen to display menu commands and real-time status, the Spartan Fortress CD/DVD Duplicator provides a fast and reliable solution for CD and DVD duplication up to 11 targets from one single master disc.
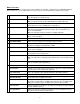
Menu Overview: Below is a quick reference chart of the functions available on all models of Spartan Fortress CD/DVD Duplicators. After the drives are successfully installed, user may access 1 the menu functions by powering on the system. 1 COPY Copies the master CD/DVD. All contents of the master disc will be duplicated on to all target disc(s) simultaneously. TEST Simulates the copy process, but no data is recorded onto the blank disc(s). Note: Test mode can only be done with DVD-R and CD-R media only.
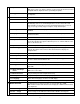
10.8 Update BIOS Updates the firmware for the controller. Note: Please make sure that the firmware is approved by the manufacturer and compatible with the duplicator before performing the update. 10.9 Copy Count Counts the number of successful and failed copies of CD and DVD made by the duplicator. 11 SETUP 11.1 Power On Time Sets system warm up time from 5 sec to 99 sec. Default is 15 seconds. 11.2 Auto Start Sets auto start time from OFF (no auto start) to 99 sec.
12.4 Image Info. Displays the image file information such as image order, name, file size and type of image. 12.5 Rename Image Renames the HDD image partition name up to 8 characters. 12.6 Delete Image Deletes an image file in HDD. Note: A file selected as the source file cannot be deleted until a different image is selected. See 12.1. 12.7 HDD Info. Displays the information in HDD, such as the number of discs stored on the HDD and the amount of space left in the HDD. 12.
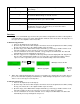
5. Once the test process is complete, the disc trays will eject and the display will read “Test Result: Pass X, Fail Y, with X being the number of discs that passed the test, and Y being the number of failed copies. Use discs that have passed the test for the actual duplication. Î Press ENT to load disc and execute Test Î Î Analyze source disc Î Î Start simulation Î Î Finish and eject discs 3.
4. Use the scroll buttons to select the “4. Copy & Compare” command and press the ENT button. The drives will automatically close trays and begin the copy process. 5. Once the copy process is complete, the tray(s) will open briefly, and then automatically close again to begin the compare process. 6. Once the compare process is completed, the trays will automatically eject discs that have passed the Copy & Compare process.
3. Eject disc tray(s) of the Writer Drives and place copied disc(s) to be compared on the tray(s). Number of drives used depends on number of copies to be compared. It is not necessary to always use all drives. 4. Use the scroll buttons to select the command “6. Compare” and press the ENT button. The drives will automatically close trays and begin the compare process. 5. Once the compare process is complete, the trays will eject the discs that have passed the compare process.
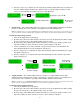
3. The current Source Drive will be displayed along with the partial model number of the drive and the port number in brackets. 4. Use the Scroll buttons to select from other available drives until the port number of the desired drive is displayed. 5. Press the ENT button. The desired drive will then become the Source Drive. Î Press ENT Î Î Display current Source Drive setting Î Î i or j to select driveÎ Î Press ENT to finish Setting 9.
a. Once all tracks to be copied have been selected, pressj to select “OK” on the display. Press ENT to confirm and begin the copy process. b. Once the track selection is entered, the LCD screen will read “Copying Audio Tracks…”, and display the track number, total time of current track and the current copying status. c. Once the copy process is completed, the LCD screen will display the total number of tracks on target CD(s), total time used and total time remained. d.
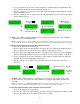
Î Press ENT Î All disc trays will open 5. Disc Info: Checks the capacity and space used on the disc(s) inside of the drive(s) of the duplicator. Î Press ENT Î 6. Drive Info: Checks the make, model, firmware and the channel (port) of the drive(s) that are connected to the duplicator controller. Î Press i or j to select different Drives Î Press ENT Î 7. System Info: Checks the model number, buffer memory and firmware version of the duplicator controller. Î Press ENTÎ 8.
Î Press ENT Î Î Î Press ENT Î Press ENT to confirm or press to ESC cancel Î 11. Setup – This command contains options to configure the duplicator system. 1. Power On Time: Set the amount of time the duplicator controller counts down before initializing the system. The default is 15 seconds. The time can be set from 5 to 99 seconds in 1-second increments (5,6,7….97,98,99). Î i or j to select seconds and press ENT to confirm Î Press ENT Î 2.
Î i or j to select mode and press ENT to confirm Î Press ENT Î 7. Eject On Start: Allows the drive(s) with disc(s) present inside to eject the disc trays when the duplicator is done initializing. Î i or j to select Eject All/ No Eject/ Eject Target/ Eject Source and press ENT to confirm Î Press ENT Î 8. Show Copy Time: Allows the display of total time taken for the copy process to be complete. Î i or j to select mode and press ENT to confirm Î Press ENT Î 9.
Î i or j to select mode and press ENT to confirm Î Press ENT Î 13. Copy CD-TEXT: Allows the copying of the CD-TEXT on the master disc(s) to the target disc(s). Î i or j to select mode and press ENT to confirm Î Press ENT Î 14. Show HDD Image: Allows the option to display the name of the HDD image name (default) or the image size (in MB). Î i or j to select Image Name/ Capacity and press to ENT confirm Î Press ENT Î 15.
If Disable is selected, no password will be set and the display will direct back to the Setup sub-menu. If Enable is selected, a password must be entered using the following guidelines: Use i or j to select the character desired. Press ENT to go to the next position. There are a total of 6 positions for the password. To enable the password, set all 6 positions. For space, press ENT without choosing a character to leave the position empty. Press ESC to cancel the process.
Î Note: The Source Disc may be placed in the Reader Drive or any of the Writer Drives. 3. Set Reader Speed: Change the read speed (load speed) for the HDD. The speeds for CD are: 1, 2, 4, 8, 10, 12, 16, 20, 24, 32, 36, 40, 44, 48, 52, 56 (default), MAX. The speeds for DVD are: 1, 2, 2.4, 4, 6, 8, 10, 12, 16, 18, 20 (default), MAX. Î i or j to select CD Read Speed and press ENT to confirm Î Press ENT Î Î i or j to select DVD Read Speed and press ENT to confirm Î 4.
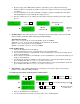
Î Press ENT Î Î Select the image file to be deleted Î Î Press ENT Î Î Delete Image completed. Repeat to delete more images. 7. Show HDD Info: Shows the amount of used and free images available on the HDD in both CD and DVD formats. Î Press ENT Î 8. Format HDD: Deletes and formats all image(s) on the HDD, restores the HDD to factory defaults and initializes the HDD for use with the duplicator. Î Press ENT to confirm format Î Î Press ENT Î Î Press ENT again to confirm and start formatting Î Î 9.
b) Synchronous: Loads the image at the same time while the duplicator is making copies from the master disc to the blank discs. As the copies being made, the image is also being created and stored in the [TEMP] directory on the HDD. Î Î Press ENT to confirm Î Î Press ESC to exit Image Manager and go back to main menu Î i or j to select “1.
z z z In order for the DiscLock Feature to be successfully implemented on your DVD-R discs, 40 MB of free space must be allocated on the blank DVD-R discs. The DiscLock feature is only used for DVD to DVD (disc-to-disc) copying. The HDD-to-disc copying cannot support this feature as the HDD cannot be used in conjunction with the DiscLock feature. This feature is only for the DVD-Video format only.
4. Utility – This command contains various tools such as Pre-Scan, the checking of the drive and controller information, firmware revisions, etc. Please refer to the “Utility” section of this manual for details. 5. Setup – This command contains options to configure the duplicator system. The Setup menu is truncated when the DiscLock feature is enabled. The three functions available under the DiscLock Setup menu are as followed: 1.
Basic Troubleshooting: Follow these simple steps for quick and proper troubleshooting. 1. Power does not turn on or unit receives no power. a. Check power cord and outlet to make sure power connections are secured. b. Check voltage switch on the back of the duplicator to make sure power supply is set for correct outlet rating. c. Test with another power cord (same as a PC power cord) to eliminate cable failure. 2. Master disc cannot be read a. Change the master disc.