SATA Blu-ray/DVD/CD Duplicator Controller User’s Manual Version 1.
T TABLE OF CONTENTS Introduction 1 11. Setup 13 12. HDD Manager 16 Operating Environment 1 o Start-up Menu 13 o Select Image 16 LCD Front Panel Overview 1 o Auto Start 13 o Disc => Image 16 Hardware Installation Guide 2 o Display Mode 13 o Image Info 17 3 Rename Image 17 o Beep 13 o 3-5 o Power on Eject 13 o Delete Image 17 6 o Reader Speed 14 o HDD Info 18 1. Copy 6 o Compare Speed 14 o Format HDD 18 2.
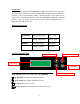
Introduction: Thank you for purchasing a SATA CD/DVD/Blu-ray Duplicator Controller. This controller is specifically engineered to run a stand-alone CD/DVD/Blu-ray duplicator without additional computer or processing unit. With a simple, four-button interface and a LCD screen to display menu commands and real-time status, the CD/DVD/Blu-ray Duplicator Controller provides a fast and reliable solution for CD, DVD and Blu-ray duplication up to 11 targets from one single master disc.
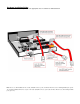
Hardware Installation Guide: Connect drives with cables provided to the appropriate slot on controller as indicated below. Note: If there is no HDD installed, then the reader (ROM) will connect to port1, and writers will connect to the following available ports (port 216). If a HDD is installed, it will connect to port 1.
Configuration Guidelines: Next are the basic operation guidelines on how to set SATA devices including optical reader, writers, and/or hard drive. The system will automatically detect the drives and assign drive numbers.
9 TRACK EDIT Allows for the selection of individual track(s) from different master audio CDs to create custom compilation. 9.1 Copy Track Allows the selection of individual track(s) from the master CD and copies the selected track(s) onto all target discs. 9.2. Close Disc Closes the target discs when all of the track(s) are burned on to all target discs. Note: The copied disc(s) will NOT play back without this step. Do NOT skip this step. 9.
11.7 Compare Speed Sets the speed at which the compare process is executed. 11.8 Skip Read Error Enables the option to halt the duplication process if there is an error on the master disc. Disables the option to allow the process to continue with the same errors as the master disc. 11.9 Language Allows different language selections for LCD display. 11.10 Clear Setup Clears the CMOS and resets the duplicator controller back to factory defaults. 11.11 Advance Setup Functions for advanced users. 11.
Functions: 1. Copy – This command will copy the master disc placed in the designated Source Drive to all target discs in the Writer Drives. This process burns all information contained on the master disc to the target discs so the copies are exact duplicates of the master disc. To Start the Copy Process: 1. Power on the machine (if not already on). 2. Eject disc tray of the Source Drive and place the master disc in the designated Source Drive (usually the top).
To start the Copy & Verify process: 1. Power on the machine (if not already on). 2. Eject disc tray of the Source Drive and place the master disc in the designated Source Drive (usually the top). The “master disc” is the original of which copies are made. 3. Eject disc tray(s) of the Writer Drives and place blank disc(s) on the tray(s). Number of drives used depends on number of copies desired. It is not necessary to always use all drives. 4. Use the scroll buttons to select the command “3.
5. Verify – This command verified readability on the master disc and/or all target discs. This command is especially useful for audio CD duplication. Note: The verification process uses a Disc Readability Check to individually check the presence of data on each copy. This process does not compare the contents of duplicated discs against that of the master. It only verifies that the duplicated discs are readable. To start the verify process, please follow the instructions below: 1.
7. Set Burn Speed – This feature allows you to set the burn speed of various types of disc: CDs (data and VCDs), audio CDs, DVDs, dual-layer DVDs (DVD DL), and Blu-ray (BD-R SL, BD-R DL, BD-RE SL, and BD-RE DL). Selectable burn speeds: CD: 1, 2, 4, 8, 10, 12, 16, 20, 24, 32, 36, 40 (default), 44, 48, 52, 56, MAX. Audio CD: 1, 2, 4, 8, 10, 12, 16, 20, 24 (default), 32, 36, 40, 44, 48, 52, 56, MAX. DVD: 1, 2, 2.4, 4, 6, 8, 12, 16 (default), 18, 20, MAX. DVD DL: 1, 2 (default), 2.
or to select drive Press ENT to finish Setting 9. Track Edit – This command allows users to select tracks from multiple audio CDs and burn to target CDs. This command also closes edited audio CDs and displays the disc information. To create and copy custom compilation audio CDs from multiple master discs: 1. Power on the machine (if not already on). 2. Use the Scroll buttons to select “9. Edit Track”. Press the ENT button. 3. The display will read “[Edit Track] 1. Copy Track”. Press the ENT button. 4.
c. Once the copy process is completed, the LCD screen will display the total number of tracks on target CD(s), total time used and total time remained. d. Repeat the track selection and copy process until all desired tracks have been copied to target disc(s). Proceed with disc closing process. Note: Once disc closing process is performed, no more track(s) can be added to target CD(s). 10.
6.) Drive Info: Checks the make, model, firmware and the channel (port) of the drive(s) that are connected to the duplicator controller. Press or to select different Drives Press ENT 7.) System Info: Checks the model number, buffer memory and firmware version of the duplicator controller. Press ENT 8.) Update BIOS: Updates the BIOS (firmware) of the duplicator controller. Insert update CD and press ENT Press ENT Update completed and eject disc Re-boot system 9.
11. Setup – This command contains options to configure the duplicator system. 1.) Start-up Menu: Sets the command to be displayed first when the machine is powered up and initialized. All primary commands are available to be set for Start-up: Copy, Test, Copy & Verify, Copy & Compare, etc. Press ENT or to select function and press ENT to confirm 2.
6.) Reader Speed: Sets the reader speed for the duplicator to read the master disc(s). The speeds for CD are: 1, 2, 4, 8, 10, 12, 16, 20, 24, 32, 36, 40, 44, 48, 52, 56 (default), MAX. The speeds for DVD are: 1, 2, 2.4, 4, 6, 8, 10, 12, 16, 18, 20 (default), MAX. The read speed for BD is pre-set to MAX variable upon drive and media speed. Press ENT or to select CD Read and press ENT or to select DVD read speed and press ENT to finish. 7.
11.) Advance Setup: Functions for advanced users. (1) Power On Time: Set the amount of time the duplicator controller counts down before initializing the system. The default is 15 seconds. The time can be set from 5 to 99 seconds in 1-second increments (5,6,7….97,98,99). Press ENT or to select seconds and press ENT to confirm (2) CD Overburn: Allows the copying of CDs that have been burned over their maximum capacity. The target disc(s) must be the same capacity as the master disc.
If Disable is selected, no password will be set and the display will direct back to the Setup sub-menu. If Enable is selected, a password must be entered using the following guidelines: Use or to select the character desired. Press ENT to go to the next position. There are a total of 6 positions for the password. To enable the password, set all 6 positions. For space, press ENT without choosing a character to leave the position empty. Press ESC to cancel the process.
Note: The Source Disc may be placed in the Reader Drive or any of the Writer Drives. 3.) Image Info: Shows the image number in sequential order, the file name of the image stored on the HDD, the type of image stored, and the amount of data the image contains (in GB for Bluray, MB for DVD or time for CD). Press ENT or to select image and press ENT to display info Blu-ray disc image of 23.86G as file A004 DVD disc image of 3,875MB as file A001 CD disc image of 65 min 28 sec as file A003 4.
6.) HDD Info: Shows the amount of used and free images available on the HDD in both CD and DVD formats. Press ENT 7.) Format HDD: Deletes and formats all image(s) on the HDD, restores the HDD to factory defaults and initializes the HDD for use with the duplicator. Press ENT to confirm format Press ENT Press ENT again to confirm and start formatting 8.) Load and Copy: There are three (3) modes in this function.
(b) Synchronous: Loads the image at the same time while the duplicator is making copies from the master disc to the blank discs. As the copies being made, the image is also being created and stored in the [TEMP] directory on the HDD. Press ESC to exit Image Manager and go back to main menu Press ENT to confirm or to select “1.Copy” Press ENT Start copying to target disc(s) and loads image into HDD at the same time Ejects copies and displays HDD file in[TEMP] (c) OFF: Disables the load and copy function.
Basic Troubleshooting: Follow these simple steps for quick and proper troubleshooting. 1. Power does not turn on or unit receives no power. a. Check power cord and outlet to make sure power connections are secured. b. Check voltage switch on the back of the duplicator to make sure power supply is set for correct outlet rating. c. Test with another power cord (same as a PC power cord) to eliminate cable failure. 2. Master disc cannot be read a. Change the master disc.