® Patent Pending Model No. IMTL11994 Serial No. USER'S MANUAL Write the serial number in the space above for future reference. Serial Number Decal QUESTIONS? If you have questions, or if there are missing or damaged parts, we will guarantee complete satisfaction through direct assistance from our factory. TO AVOID UNNECESSARY DELAYS, PLEASE CALL DIRECT TO OUR TOLL-FREE CUSTOMER HOT LINE. The trained technicians on our Customer Hot Line will provide immediate assistance, free of charge to you.
TABLE OF CONTENTS IMPORTANT PRECAUTIONS . . . . . . . . . . . . . . . . . . . . . . . . . . . . . . . . . . . . . . . . . . . . . . . . . . . . . . . . . . . . . . . . .2 BEFORE YOU BEGIN . . . . . . . . . . . . . . . . . . . . . . . . . . . . . . . . . . . . . . . . . . . . . . . . . . . . . . . . . . . . . . . . . . . . . . .4 ASSEMBLY . . . . . . . . . . . . . . . . . . . . . . . . . . . . . . . . . . . . . . . . . . . . . . . . . . . . . . . . . . . . . . . . . . . . . . . . . . . . . . .
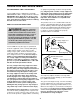
21. Never leave the treadmill unattended while it is running. Always remove the key, unplug the power cord and move the on/off switch to the off position when the treadmill is not in use. (See the drawing on page 4 for the location of the on/off switch.) 15. Never start the treadmill while you are standing on the walking belt. Always hold the handrails while using the treadmill. 16. The treadmill is capable of high speeds. Adjust the speed in small increments to avoid sudden jumps in speed. 22.
BEFORE YOU BEGIN Thank you for selecting the IMAGE® 10.2QL treadmill. The IMAGE 10.2QL treadmill combines advanced technology with innovative design to let you enjoy an effective form of cardiovascular exercise in the convenience and privacy of your home. And when you’re not exercising, the unique IMAGE 10.2QL can be folded up, requiring less than half the floor space of other treadmills. please call our Customer Service Department toll-free at 1-800-999-3756, Monday through Friday, 6 a.m. until 6 p.m.
ASSEMBLY Assembly requires two people. Set the treadmill in a cleared area and remove all packing materials. Do not dispose of the packing materials until assembly is completed. A rubber mallet may be needed for assembly. Note: The underside of the treadmill walking belt is coated with high-performance lubricant. During shipping, a small amount of lubricant may be transferred to the top of the walking belt or the shipping carton. This is a normal condition and does not affect treadmill performance.
HOW TO USE THE HEART RATE MONITOR HOW TO PUT ON THE HEART RATE MONITOR dried. If the heart rate monitor is not dried after each use, it may remain activated longer than necessary, draining the battery prematurely. The heart rate monitor consists of two components: the chest strap and the sensor unit (see the drawing below). Insert the tab on one end of the chest strap through the hole in one end of the sensor unit. Press the end of the sensor unit under the buckle on the chest strap.
OPERATION AND ADJUSTMENT THE PERFORMANT LUBETM WALKING BELT an equipment-grounding conductor and a grounding plug. Plug the power cord into a surge suppressor, and plug the surge suppressor into an appropriate outlet that is properly installed and grounded in accordance with all local codes and ordinances. Important: The treadmill is not compatible with GFCI-equipped outlets. Your treadmill features a walking belt coated with PERFORMANT LUBETM, a high-performance lubricant.
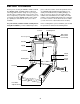
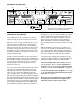
DIAGRAM OF THE CONSOLE A F B C G D H J I FEATURES OF THE CONSOLE E K L M N Note: If there is a thin sheet of clear plastic on the face of the console, remove it. In addition, you can connect the treadmill to your VCR and TV and play iFIT.com video programs (iFIT.com videocassettes are available separately). Video programs offer the same benefits as iFIT.com CD programs, but add the excitement of working out with a class and an instructor—the hottest new trend at health clubs.
DESCRIPTION OF THE CONSOLE F. Performance program profiles—These profiles show how the speed and incline of the treadmill will change during performance programs. Refer to the drawing on the opposite page to identify the features described below. G. Incline buttons—These buttons control the incline of the treadmill. The incline range is 0% to 10%. A. Pulse display—This display shows your heart rate when the heart rate monitor is worn. The heartshaped indicator will flash each time your heart beats. H.
HOW TO USE THE MANUAL MODE WARNING: To reduce the risk of serious injury, read the following precautions before operating the console. 1 See HOW TO TURN ON THE POWER at the left. • Do not stand on the walking belt when turning on the power or starting the walking belt. 2 • Always attach the clip (see part “I”on page 8) to your waistband when using the treadmill. If the key is pulled from the console, the walking belt will stop. • The heart rate monitor is not a medical device.
6 into the console. The Speed/Minutes-Mile display will show an “E” for English miles or an “M” for metric kilometers. Press the Speed ▲ button to change the unit of measurement. When the desired unit of measurement is selected, remove and then reinsert the key. Adjust the incline of the treadmill. To vary the intensity of your exercise, the incline of the treadmill can be adjusted with the Incline buttons. Each time one of the buttons is pressed, the incline will change by 0.5%.
One speed setting and one incline setting are programmed for each period. When only three seconds remain in the first period of the program, a series of tones will sound and the treadmill will automatically adjust to the speed and incline settings for the second period. HOW TO USE PERFORMANCE PROGRAMS 1 Insert the key into the console. See HOW TO TURN ON THE POWER on page 10. 2 The program will continue in this way until the Time/Segment Time display counts down to zero.
Each custom program is divided into one-minute periods. One speed setting and one incline setting can be programmed for each period. To program the desired speed and incline settings for the first period, simply adjust the speed and incline of the treadmill to the desired levels with the Speed and Incline buttons. HOW TO CREATE A CUSTOM PROGRAM 1 Insert the key into the console. See HOW TO TURN ON THE POWER on page 10. 2 Select one of the custom programs.
a series of tones will sound and the treadmill will automatically adjust to the second speed and incline settings that you programmed previously. HOW TO USE A CUSTOM PROGRAM 1 Insert the key into the console. The program will continue until the Time/Segment Time display counts down to zero. The walking belt will then slow to a stop. See HOW TO TURN ON THE POWER on page 10. 2 Select one of the custom programs.
HOW TO CONNECT THE TREADMILL TO YOUR CD PLAYER, VCR, OR COMPUTER To use iFIT.com CDs, the treadmill must be connected to your portable CD player, portable stereo, home stereo, or computer with CD player. See pages 15 and 16 for connecting instructions. To use iFIT.com videocassettes, the treadmill must be connected to your VCR. See page 17 for connecting instructions. To use iFIT.com programs directly from our internet site, the treadmill must be connected to your home computer.
HOW TO CONNECT YOUR HOME STEREO HOW TO CONNECT YOUR COMPUTER Note: If your stereo has an unused LINE OUT jack, see instruction A below. If the LINE OUT jack is being used, see instruction B. Note: If your computer has a 3.5mm LINE OUT jack, see instruction A. If your computer has only a PHONES jack, see instruction B. A. Plug one end of the audio cable into the jack on the front of the treadmill near the power cord. Plug the other end of the cable into the included adapter.
HOW TO CONNECT YOUR VCR Note: If your VCR has an unused AUDIO OUT jack, see instruction A below. If the AUDIO OUT jack is being used, see instruction B. If you have a TV with a built-in VCR, see instruction B. If your VCR is connected to your home stereo, see HOW TO CONNECT YOUR HOME STEREO on page 16. A. Plug one end of the audio cable into the jack on the front of the treadmill near the power cord. Plug the other end of the cable into the included adapter.
If the speed or incline settings are too high or too low, you can manually override the settings at any time by pressing the Speed or Incline buttons on the console. However, when the next “chirp” is heard, the speed and/or incline will change to the next settings of the CD or video program. • Adjust the volume of your CD player or VCR. If the volume is too high or too low, the console may not detect the program signals.
7 HOW TO USE PROGRAMS DIRECTLY FROM OUR INTERNET SITE When the on-screen countdown ends, the program will begin and the walking belt will begin to move. Hold the handrails, step onto the walking belt, and begin walking. Our Web site at www.iFIT.com allows you to access basic programs, audio programs, and video programs directly from the internet.
THE INFORMATION MODE/DEMO MODE OPTIONAL HAND WEIGHTS The console features an information mode that keeps track of the total number of miles that the walking belt has moved and the total number of hours that the treadmill has been operated. The information mode also allows you to switch the console from miles per hour to kilometers per hour. In addition, the information mode allows you to turn on and turn off the demo mode. Optional hand weights let you include upperbody exercise in your workouts.
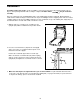
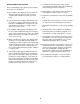
HOW TO FOLD AND MOVE THE TREADMILL HOW TO FOLD THE TREADMILL FOR STORAGE 1 Before folding the treadmill, unplug the power cord. CAUTION: You must be able to safely lift 45 pounds (20 kg) in order to raise, lower, or move the treadmill. 1. Hold the treadmill with your hands in the locations shown at the right. To decrease the possibility of injury, bend your legs and keep your back straight. As you raise the treadmill, make sure to lift with your legs rather than your back.
TROUBLE-SHOOTING Most treadmill problems can be solved by following the steps below. Find the symptom that applies, and follow the steps listed. If further assistance is needed, please call our Customer Service Department tollfree at 1-800-999-3756, Monday through Friday, 6 a.m. until 6 p.m. Mountain Time (excluding holidays). PROBLEM: The power does not turn on SOLUTION: a.
PROBLEM: The walking belt is off-center or slips when walked on SOLUTION: a. If the walking belt is off-center, first remove the key and UNPLUG THE POWER CORD. If the walking belt has shifted to the left, use the allen wrench to turn the left rear roller bolt clockwise 1/2 of a turn; if the walking belt has shifted to the right, turn the left rear roller bolt counterclockwise 1/2 of a turn. Be careful not to overtighten the walking belt.
PROBLEM: The heart rate monitor does not function properly SOLUTION: a. If the heart rate monitor does not function properly, see HEART RATE MONITOR TROUBLESHOOTING on page 6. b. If the heart rate monitor still does not function properly, the battery should be changed. To replace the battery, locate the battery cover on the back of the sensor unit. Insert a coin into the slot in the cover and turn the cover counterclockwise to the “open” position. Remove the cover.
CONDITIONING GUIDELINES Burning Fat WARNING: Before beginning any exercise program, consult your physician. This is especially important for individuals over the age of 35 or individuals with preexisting health problems. The heart rate monitor is not a medical device. Various factors may affect the accuracy of heart rate readings. The heart rate monitor is intended only as an exercise aid in determining heart rate trends in general. The following guidelines will help you to plan your exercise program.
PART LIST—Model No. IMTL11994 R0102A Note: To identify the parts listed below, refer to the EXPLODED DRAWING attached in the center of this manual. Key No. Qty. 1 2 3 4 5 6 7 8 9 10 11 12 13 14 15 16 17 18 19 20 21 22 23 24 25 26 27 28 29 30 31 32 33 34 35 36 37 38 39 40 41 42 43 44 45 46 47 48 49 50 2 1 4 4 1 1 4 1 2 2 1 1 2 2 2 1 1 1 4 4 1 1 1 1 1 22 4 1 1 4 1 4 1 4 1 1 1 1 1 18 1 2 4 13 1 1 1 2 4 4 Description Key No. Qty.
Key No. Qty. 101 102 103 104 105 106 107 108 109 110 111 # # 1 1 1 1 1 1 1 2 1 1 2 1 1 Description Circuit Breaker Power Cord Power Cord Grommet Warning Decal Chest Pulse Sensor Jack 10’ iFIT.com Audio Cable Foam Grip Screw Audio Wire Nut Battery Cover Rear Roller Star Washer 14” White Wire, 2 F 4” White Wire, M/F Key No. Qty.
LIMITED WARRANTY WHAT IS COVERED—The entire IMAGE® 10.2QL (“Product”) is warranted to be free of all defects in material and workmanship. WHO IS COVERED—The original purchaser or any person receiving the Product as a gift from the original purchaser. HOW LONG IS IT COVERED—ICON Health & Fitness, Inc. (“ICON”), warrants the hood, covers, belly pan, and decals for six months after the date of purchase. The motor is covered for one year after the date of purchase.
53 111 40 52 53 54 56 111 48 52 40 55 44 57 90 49 50 44 84 40 4 5 45 58 40 18 47 1 40 48 44 6 49 50 4 7 44 9 8 7 10 44 21 1 49 50 11 12 2 14 15 22 13 4 17 44 27 26 20 43 74 89 3 16 44 32 42 40 26 18 23 40 10 49 50 4 25 9 74 3 13 14 29 88* 24 40 30 28 20 31 27 26 15 33 19 26 26 40 27 102 39 99 41 38 27 26 101 100 103 34 26 37 109 40 40 46 36 35 99 EXPLODED DRAWING—Model No.
59 61 97 96 66** 95 94 108 62 51 105 87 60 63 64 30 67 93 40 68 98 73 72 71 31 91 70 69 99 65 40 104 99 13 78 99 30 76 63 77 99 87 85 108 73 86 79 99 30 98 13 76 80 61 78 77 113 99 59 81 60 40 113 106 40 92 110 83 107 40 82 EXPLODED DRAWING—Model No.