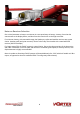
50 Mini Getting Started Guide International edition Rev 1.0 - Dec 2016 Every Vortex 150 Mini is flight tested before leaving the factory.
WARNING Congratulations on your purchase of one of the hobby’s first ARF pure-bred racing quadcopters. A product designed by FPV Racers, for FPV Racers. Do not expect it to fly like a DJI Phantom™ . It does not have a return-to-home feature, no GPS, and it does not have stabilization features that will allow your little brother to fly.
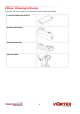
4 Steps: Unboxing to Racing To get your ARF Vortex ready to race, follow the simple 4-step process below.
1) Install Compatible R/C Receiver The Vortex 150 Mini is shipped with three receiver interface cables, supporting 4 commonly used interfaces. a) 3-Pin 0.1” Servo Cable, for S-Bus, and CPPM (5V) b) 5-pin Picoblade for FrSky XSR receivers (5V) c) 3-pin JST-ZH for Spektrum DSMX receivers (3V) Receivers may be mounted externally on the tail-end of the quad, or internally. Internally is definitely the preferred solution but does require a suitably small receiver.
Notes on Receiver Selection One critical parameter to keep to a minimum in a race quad setup is latency. Latency from what the camera sees to the display device, and also from the control stick to the flight controller. For minimum latency, with reasonable range, the Spektrum™ radios and satellite receivers are a great choice. Another good (and quite common) choice is the FrSky Taranis radio with a matched S-Bus receiver (X4R for example). For longer-range FPV, the EzUHF system is a good choice.
Receiver Auto-Detection A unique feature of the Vortex family of quadcopters is that the receiver type is auto-detected by the OSD when running the wizard. With the Vortex 150 Pro, it is no longer necessary to manually specify the receiver type with the ImmersionRC Tools before running the wizard. R/C Transmitter Configuration The advanced wizard used in the Vortex 150 Mini is cable of detecting most transmitter configurations. Channel ordering, stick range, center position, etc.
‘C’ Rating Battery ‘C’ rating is a particular problem for high-performance, lightweight quads. Pick the highest C rated pack available. For a 250 quad, a 65C 1300mAh pack can be run at 85A continuously. A 150 quad with a 45C 850mAh pack can manage 38A, which is fairly easy to exceed in high-power manoeuvres. NOTE: Ensure that the battery is securely mounted on the anti-slip pad. The battery should not be able to move around in flight.
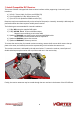
3) Setup the Video Link To avoid the traditional ‘dip-switch chaos’ at race events, the Vortex does not use a DIP switch to define Video Tx channels. Instead, the OSD is responsible for setting the channel, and band. The Vortex ships with a default Tx frequency of 5740MHz, which corresponds to ImmersionRC/FatShark frequencies, Channel 1. If you are running ImmersionRC receivers, or a FatShark headset using the standard 5.8GHz module, just select Channel 1, and the wizard image should be shown.
4) Run the Wizard In the world of R/C, there is little standardization between equipment manufacturers as far as control stick to channel mapping. There is also little agreement between users as to which of the 4 control modes should be used. Since in the Vortex, both the OSD, and the Flight Controller need to know the channel mappings, a ‘Tx Setup Wizard’ is included to greatly simplify the process.
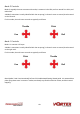
Mode 2 Controls Mode 2, arguably the most common stick mode, is common in the USA, and is a natural fit to helis, and multirotors. A Mode 2 transmitter is easily identified with the un-sprung (i.e. doesn’t return to center) throttle control on the left stick. For this mode, the multi-rotor controls are typically as follows: Throttle Pitch Yaw Roll Mode 1 Controls Mode 1 is common in Europe. A Mode 1 transmitter is easily identified with the un-sprung (i.e.
Following the Wizard The wizard is used primarily to let the Vortex learn the flight channel order, and R/C Tx mode (1, 2, 3, 4). ‘Left’ refers to moving the stick left, and ‘Back’ refers to moving the stick back towards you. Follow the prompts, ensuring that the correct stick is moved each time. As each control is recognized, it’s name will appear to the left of the servo bar.
NOTE: To restart the wizard at anytime, power up the quad, press and hold the button on the led board until vortex beeps 2 times (first beep after ~3 seconds, second beep after ~5 seconds). Alternatively you can also enter tx Wizard via OSD menu Once the wizard is finished, various Cleanflight settings will be configured, including enabling oneshot, motor_stop, and failsafe. Another setting which is automatically made is the assignment of CH5 to the flight mode, Acro, Horiz, and Angle.
All Done, Time To Fly At this point in the Getting Started manual, the Vortex Mini should be ready for its maiden flight. The Wizard has setup the flight controller with our default Pro-Tune, generated by one of our expert team pilots. PIDs and gains are unlikely to require major changes to achieve precise flight.
Specifications Flight Controller IMU Invensense MPU6000, 3 axis Gyro, 3 axis Accelerometer (SPI) Altimeter N/A CPU STM32F303 32-bit ARM processor Firmware Cleanflight/Betaflight compatible (with API version matching that of the OSD) OSD CPU STM32F373 32-bit ARM processor Resolution 440H x 280V Style White, with black surround around all pixels Output Programmable Black/White levels Video Tx Features Transmitter Module Custom Tramp HV, integrated on FC/OSD board (Synergy) Channels 40 Init
Type ImmersionRC EzESC 16A Rating 16A continuous, 20A peak Features OneShot125, Multishot, and Motor Braking Processor 32-bit ARM running custom ImmersionRC ESC Firmware R/C Receiver Channels Required Absolute minimum four. Five recommended to support mode switch. Interfaces 3.3v-5v PPM Sum, SBUS, Spektrum, XBus, SumD, SumH Receiver Power +5V or +3.3V @ 200mA max.
Support First line of support is handled by the reseller. If you encounter any problems with your ImmersionRC product please contact them first. For Warranty, and non-Warranty repairs, email repairs@immersionrc.com . We have repair centers in the UK, US, and Australia. Peer support is available in several places: https://www.facebook.com/groups/ImmersionrcVortex/ http://fpvlab.com/forums/forumdisplay.php?22-ImmersionRC We actively monitor these groups/forums and provide support here.
Social Networks Like Us We would like thank you for purchasing this ImmersionRC product. Like ImmersionRC’s Facebook page and be kept up-to-date with news, product releases, firmware updates, tips and tricks, and other information relevant to the FPV hobbyist. http://www.facebook.com/ImmersionRC You can also follow us on Google Plus google.com/+immersionrc We have even been known to Tweet on occasion https://twitter.