Quick Start Guide Version 1.0.
Contents Quick Start Guide ................................................................................................................... 1 Kurzanleitung ......................................................................................................................... 5 Guía de inicio rápido .............................................................................................................. 9 Guide de démarrage rapide ...................................................................
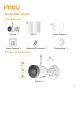
Quick Start Guide 1 Packing List Camera *1 Screw Package *1 QSG *1 Waterproof Connector *1 Power Adapter *1 Position Map *1 2 Camera Introduction Figure 2-1 1
Figure 2-2 Note Press and hold the Reset button for 10 s to reset the camera. The pattern of the LED indicator is included in the following table.
3 Operation With Imou App Step 1 Scan the following QR code or search “Imou” in Google Play or App Store to download and install Imou App. Step 2 Run Imou App, and then register an account for first use. Step 3 Connect the camera to power source with the power adapter. Step 4 Wait for booting to be finished, and then the camera indicator flashes with green light. Step 5 Connect your smart phone to your Wi-Fi network, and make sure your smartphone is connected to Wi-Fi network with 2.
4 Installing Camera Note: Make sure the mounting surface is strong enough to hold at least three times of the device weight. Figure 4-1 Step 1 Drill screw holes on the mounting surface as the positioning map shows, and then put in the expansion bolts. Step 2 Attach the camera pedestal to the mounting surface with the self-tapping screws. Step 3 Power up the camera, and then adjust the lens to the ideal angle.
Kurzanleitung 1 Lieferumfang 1 x Gerät 1 x Kurzanleitung 1 x Befestigungsmaterial 1 x Wasserdichter Stecker 1 x Netzteil 1 x Montageschablone 2 Bedienelemente und Funktionen der Kamera Antenne Integriertes Mikrofon Objektiv LED Anzeige Abbildung 2-1 5
Rücksetztaste microSD-Kartensteckplatz Abbildung 2-2 Hinweis Halten Sie die Rücksetztaste für 10 Sekunden gedrückt, um die Kamera zurückzusetzen. Der LED-Status ist in der nachfolgenden Tabelle dargestellt.
3 Betrieb mit Imou-App Schritt 1: Scannen Sie den nachfolgenden QR-Code oder suchen Sie „Imou“ in Google Play oder im App Store, um die Imou-App herunterzuladen und zu installieren. Schritt 2: Starten Sie die Imou-App und erstellen Sie ein Konto für die erstmalige Nutzung. Schritt 3: Schließen Sie die Kamera über das Netzteil an der Stromquelle an. Schritt 4: Warten Sie, bis die Kamera hochgefahren ist, die Kameraanzeige blinkt grün.
- Wenn das WLAN-Netzwerk sich geändert hat oder der Anzeigestatus nicht korrekt ist, setzen Sie die Kamera zurück und führen Sie Schritt 5 aus, um sie erneut hinzuzufügen. 4 Kamerainstallieren Hinweis: Vergewissern Sie sich, dass die Montagefläche stark genug ist, um mindestens das Dreifache des Gerätegewichts zu halten.
Guía de inicio rápido 1 Contenido 1 cámara 1 guía de inicio rápido 1 bolsa con tornillos 1 conector impermeable 1 adaptador 1 plantilla de instalación 2 Presentación de la cámara Antena Micrófono incorporado Lente Indicador Figura 2-1 9
Botón de reinicio Ranura de la tarjeta microSD Figura 2-2 Nota Mantenga pulsado el botón Reset durante 10 s para restablecer la cámara. El comportamiento del indicador led se incluye en la tabla siguiente.
3 Funcionamiento con la aplicación Imou Paso 1: Escanee el siguiente código de respuesta rápida (QR) o busque «Imou» en Google Play o en la App Store para descargar e instalar la aplicación Imou. Paso 2: Ejecute la aplicación Imou y registre una cuenta si es su primer uso. Paso 3: Conecte la cámara a la fuente de alimentación mediante el adaptador de corriente. Paso 4: Espere a que finalice el arranque, momento en el cual la luz verde del indicador de la cámara comienza a parpadear.
4 Instalación de la cámara Nota: Asegúrese de que la superficie de montaje sea lo suficientemente sólida para soportar al menos 3 veces el peso del dispositivo. Tornillo autorroscante Cámara Perno de expansión Superficie de montaje Plantilla de posicionamiento Figura 4-1 Paso 1: Taladre los agujeros para los tornillos en la superficie de montaje según lo indicado en la plantilla de posicionamiento. Una vez perforados, introduzca los pernos de expansión.
Guide de démarrage rapide 1 Contenu de l’emballage Appareil × 1 Guide de démarrage rapide × 1 Jeu de vis × 1 Connecteur étanche × 1 Adaptateur d’alimentation × 1 Patron d’installation × 1 2 Présentation de la caméra Antenne Microphone intégré Objectif Indicateur lumineux Figure 2-1 13
Bouton de mise à zéro Emplacement de la Carte microSD Figure 2-2 Remarque Maintenez enfoncé le bouton de mise à zéro pendant 10 s pour réinitialiser la caméra. Les variantes des indicateurs lumineux sont présentées dans le tableau cidessous.
3 Fonctionnement avec l’application Imou Étape 1 : scannez le code QR figurant sur l’unité ou recherchez « Imou » dans Google Play ou App Store, téléchargez et installez l’application. Étape 2 : exécutez l’application Imou et inscrivez-vous pour la toute première utilisation. Étape 3 : Branchez la caméra à l’aide de l’adaptateur d’alimentation. Étape 4 : patientez jusqu’à la fin du redémarrage ; l’indicateur lumineux de la caméra clignote en vert.
4 Installation de la caméra Remarque : Assurez-vous que la surface de montage est assez solide pour supporter le triple du poids de l’appareil. Vis autotaraudeuse Cheville à expansion Surface de montage Caméra Patron d‘ installation Figure 4-1 Étape 1 : perforez les trous de vissage sur la surface de montage suivant le patron d’installation et fixez les chevilles à expansion. Étape 2 : fixez la Support sur la surface de montage à l’aide des vis autotaraudeuses. Étape 3 : Puis mettez-la sous-tension.
Snelstarthandleiding 1 Paklijst Apparaat *1 Snelstartgids *1 Schroevenpakket *1 Voedingsadapter *1 Waterdichte connector *1 Positioneringskaart t.b.v.
Reset Sleuf voor micro-SD-kaart Afbeelding 2-2 Opmerking Houd de toets Reset gedurende 10 seconden ingedrukt om de camera te herstellen. Het patroon van het led-indicatielampje is in de volgende tabel opgenomen.
3 Bediening met de Imou-app Stap 1: Scan de volgende QR code of zoek naar "Imou" in Google Play of de App Store om de Imou-app te downloaden en installeren. Stap 2: Open de Imou-app en registreer dan voor het eerste gebruik een account. Stap 3: Sluit de camera met de lichtnetadapter aan op de stroombron. Stap 4: Wacht totdat het opstarten is voltooid, waarna het indicatielampje van de camera groen knippert.
- Als het Wi-Fi-netwerk wijzigt of er gaat iets fout met de status van het indicatielampje, herstel dan de camera en voer stap 5 uit om het opnieuw toe te voegen. 4 Het installeren van de camera Opmerking: Zorg ervoor dat het montageoppervlak sterk genoeg is om minstens drie keer het gewicht van het apparaat te kunnen dragen.
Guida introduttiva 1 Contenuto della confezione 1 Dispositivo 1 Kit di viti 1 Guida introduttiva 1 Connettore impermeabile 1 Adattatore 1 Dima adesiva 2 Introduzione alla telecamera Antenna Microfono integrato Obiettivo Indicatore LED Figura 2-1 21
Pulsante ripristino Slot per scheda Micro SD Figura 2-2 Nota Premere e tenere premuto il pulsante Reset per 10 secondi per reimpostare la telecamera.
3 Funzionamento con l'app Imou Fase 1: Effettuare la scansione del seguente codice QR oppure ricercare "Imou" in Google Play o App Store per scaricare e installare l'app Imou. Fase 2: Eseguire l'app Imou, quindi registrare un account per il primo utilizzo. Fase 3: Collegare la telecamera alla sorgente di alimentazione mediante l'adattatore di alimentazione. Fase 4: Attendere che l'avvio sia terminato, quindi l'indicatore della telecamera lampeggerà con spia verde.
- Se la rete Wi-Fi è cambiata oppure lo stato dell'indicatore segnala un errore, reimpostare la telecamera, quindi eseguire il passaggio 5 per aggiungerla nuovamente. 4 Installazione della telecamera Nota: Accertarsi che la superficie di montaggio sia abbastanza robusta da sostenere almeno tre volte il peso del dispositivo.
Guia de Início Rápido 1 Lista da embalagem Dispositivo × 1 QSG × 1 Embalagem de parafusos × 1 Conector à prova de água × 1 Adaptador de corrente × 1 Mapa de posicionamento × 1 2 Introdução à câmara Antena Microfone incorporado Objetiva Indicador LED Figura 2-1 25
Botão Reset Ranhura para cartão micro SD Figura 2-2 Nota Prima sem soltar o botão Reset durante 10 segundos para repor as definições da câmara. O padrão do indicador LED está incluído na tabela a seguir.
3 Funcionamento com a aplicação Imou Passo 1: Leia o seguinte código QR ou procure por “Imou” no Google Play ou na App Store para transferir e instalar a aplicação Imou. Passo 2: Execute a aplicação Imou e, em seguida, registe uma conta para a primeira utilização. Passo 3: Ligue a câmara à fonte de alimentação com o adaptador de corrente. Passo 4: Aguarde até terminar de arrancar; em seguida, o indicador da câmara piscará a verde.
4 Instalar a câmara Nota: Certifique-se de que a superfície de montagem é suficientemente forte para suportar, pelo menos, três vezes o peso do dispositivo. Parafuso perfurante Câmara Parafuso de expansão Superfície de montagem Mapa de posicionamento Figura 4-1 Passo 1: Faça furos para os parafusos na superfície de montagem, tal como mostra a Mapa de posicionamento e, em seguida, coloque os parafusos de expansão. Passo 2: Fixe a Suporte à superfície de montagem com os parafusos perfurantes.
About the Guide - This quick start guide is for reference only. Minor difference might be found in user interface. - All the designs and software here are subject to change without prior written notice. - All trademarks and registered trademarks mentioned are the properties of their respective owners. - Please visit our website or contact your local service engineer for more information. - If there is any uncertainty or controversy, please refer to our final explanation.