433 MHz 16-Channel Transmitter & Receiver Set 433MHz PT-AC16 and PT-AC16R PowerTrigger for AC Studio Flashes INSTRUCTIONS 1
Table of Contents Introduction............................................................................................3 Key Features.......................................................................................4-5 Overview.............................................................................................6-7 Precautions............................................................................................8 Powering the Transmitter .................................................
Introduction Thank you for choosing Impact. Congratulations on the purchase of the Impact PowerTrigger PT-AC16 for AC Studio Flashes. The AC trigger set expands your photographic options with an easy to use wireless transmitter and receiver system for controlling your studio flashes. It enables you to trigger your flash(es) from up to 75 feet (22.8 meters) away, drastically reducing the risk of overbearing cable clutter.
Key Features • AC Receiver / AC Power: The AC-powered receiver does not require the use of batteries. • 433 MHz radio signal: The powerful radio signal allows you to trigger your studio flash without requiring line of sight. • Flash sync speed of up to 1/200s: Take advantage of sync speeds that match the rating of your camera up to 1/200 of a second (compatible cameras only). • Wireless: Cable-free triggering allows you to activate a studio flash from up to 75 feet (22.
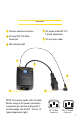
Contents Include PT-AC16 - PowerTrigger Set PT-AC16R - PowerTrigger Receiver Transmitter Receiver Receiver 3.5 mm to 1/4” monoplug adapter 2.5 mm sub-mini to PC cable Instruction manual 3.
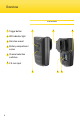
Overview Transmitter 1 Trigger button 2 LED indicator light 3 Hot-shoe mount 4 Battery compartment screw 5 Channel selection switches 6 2.
Receiver 1 Channel selection switches 4 2 AC input IEC C14 Male Connector AC output cable IEC C13 Female Connection 5 3.5 mm sync cable 3 LED indicator light 1 3 5 2 NOTE: This device works with all studio flashes using an AC power connection incorporating an electrical plug with 3 vertical prongs, like the IEC -13 and -14 types (diagramed, right).
Precautions 8 • Please read and follow these instructions and keep this manual in a safe place. • There are no user-serviceable parts inside the devices. Do not attempt to disassemble or perform any unauthorized modification. • Do not operate the Impact PowerTrigger transmitter or receiver in the presence of flammable gas or vapors. • Do not handle with wet hands or immerse in or expose to water or rain. Failure to observe this precaution could result in fire or electric shock.
Powering the Transmitter The transmitter uses a long-lasting 12v 23A alkaline battery. The included battery is user-replaceable and can last up to two years. To change the battery, unscrew the battery compartment screw on the back of the transmitter using a Phillips-head screwdriver. Remove the old battery and replace it with a fresh unit. Make sure to orient with the correct polarity when installing the new battery. Close the compartment and tighten the screw on the back of the transmitter.
Powering and Connecting the Receiver The PowerTrigger receiver offers the ease and convenience of a global voltage (100-230V) connection. It utilizes the power from a host studio flash lighting unit to power itself, sparing you the hassle of replaceable batteries. Please use the following instructions to connect your receiver to your studio flash. 1.
Selecting the Channel The PowerTrigger transmitter and receiver channels can be set using the on-body channel selector switches. There are 16 individual channels available. Reference the following chart to choose your channel. Synchronize the Transmitter and Receiver by setting both to the same channel.
Connecting the Transmitter to Your Camera The Impact PowerTrigger transmitter can be connected to your camera in two ways: hot shoe and wired connection. On- Camera Hot Shoe Triggering 1. To connect the transmitter to your camera’s hot shoe, slide the transmitter’s hot-shoe foot into the camera’s hot-shoe mount. 2. Secure the transmitter by tightening the foot-locking ring. 3. Synchronize the channels on the transmitter and receiving device(s). 4.
Wired Camera Triggering 1. To connect your transmitter to your camera through a wired connection, plug the included sync cable into the camera and transmitter by inserting the 2.5 mm end into the PowerTrigger transmitter’s input port and the cable’s other end into your camera’s PC port. 2. Synchronize the channels on the transmitter and receiving device(s). 3. Push the on-camera shutter release button or the transmitter’s Test button to fire the flash in sync with the shutter release.
Specifications 14 Frequency: 433 MHz Number of channels: 16 Transmitter connection: 2.5 mm sub-mini input sync port Receiver Connections: AC jack - male and female connections / 3.5mm sync cable Operating range: Maximum 75‘ (22.8 m) Sync speed: 1/200s Transmitter dimensions: 1.2” × 1.6” × 2.8” (3.1 × 3.9 × 7.2 cm) Receiver dimensions: 1.3” × 2.2” × 2.8” (3.4 × 5.7 × 7.1 cm) Transmitter weight: 1.3 oz. (37 g) Receiver weight: 3.9 oz.
Troubleshooting • Check that the channels on all communicating devices are identical. • If your first choice of channel doesn’t work, try a different channel until you find one that works. • Ensure that all cables are installed correctly. • Make sure that the power source for each device is properly installed and carrying a sufficient charge. Weak batteries can reduce the distance over which a transmission works.
One-Year Limited Warranty This IMPACT product is warranted to the original purchaser to be free from defects in materials and workmanship under normal consumer use for a period of one (1) year from the original purchase date or thirty (30) days after replacement, whichever occurs later.