FRC-24 Ready Cool Fluorescent Light INSTRUCTIONS
Precautions ⚠⚡ • Handle fluorescent bulbs with care. See Note below. • Dispose of fluorescent bulbs properly. • Handle the unit with care. • Do not stare at the lights when they are powered on. • Clean the unit with a soft, dry cloth. • Please read and follow these instructions, and keep this manual in a safe place. • Keep this unit away from water and all flammable gases or liquids. • Make sure the unit is powered off when plugging it into a power source. • Keep this unit away from children.
Introduction Thank you for choosing Impact. Thank you for choosing the Impact FRC-24 220 W Ready Cool Fluorescent Light. This lightweight daylight-balanced fluorescent lighting fixture is an inexpensive way to produce soft, professional lighting in the studio or on location. Fluorescent bulbs deliver diffused, flattering light. Fluorescents are also cool to the touch, so they’re ideal for photographing anything that’s affected by heat, like food or people.
Features Contents Include • Cool-running daylight-balanced fluorescent lights • FRC-24 Ready Cool Fluorescent Light Fixture • Flicker-free lighting • Four 55 W 4-pin twin-tube daylight fluorescent bulbs • Lightweight fixture • AC power cord • Built-in barn doors with hammered silver reflective surface • Flexible light stand adapter • Air-induction cooling • 2 Spare fuses • 2-bulb/4-bulb switching • Soft padded carrying case • Built-in fuse circuit protection • User manual • Padded carrying cas
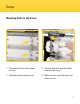
Setup Mounting bulbs in the fixture 1. Disconnect fixture from power source 3. Position bulb with printed side of base end facing up 2. Remove plastic retaining clip 4.
5. Carefully slide bulb into base until the clip locks the bulb into place 7. Replace plastic retaining clip 8. Repeat procedure for each bulb 6. Be sure bulb is securely locked into base 6 9. Before you turn the Ready Cool fixture on for the first time, be sure that the fuse holder on the back of the unit is turned clockwise until tight. If it’s loose, the lights will not turn on.
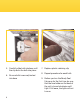
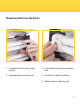
Removing bulbs from the fixture 1. Disconnect fixture from power source 3. Push metal clip on base to release bulb 2. Remove plastic retaining clip 4. Carefully pull bulb out of base 5. Replace plastic retaining clip.
One-Year Limited Warranty This Impact product is warranted to the original purchaser to be free from defects in materials and workmanship under normal consumer use for a period of one (1) year from the original purchase date or thirty (30) days after replacement, whichever occurs later.