VC-500WL3KN Digital Monolight INSTRUCTIONS
Introduction Thank you for choosing the Impact VC-500WL3KN Digital Monolight Kit. This professional-grade studio lighting unit has a userreplaceable 250 W halogen modeling light, 500 Ws flash tube, and a lightning-fast 1.5-second recycle time. The monolight is constructed with a durable housing, intelligent adaptive thermal control, and CMOS chip circuitry. The powerful Impact Digital Monolight has an integrated 2.4 GHz, 16-channel wireless radio receiver.
Features • • • • • • • • Fast recycle time and flash duration Integrated 2.
Precautions 4 • DANGER: high-voltage parts inside. • There are no serviceable parts inside the unit. Only qualified service engineers should access the inside of the casing. • If the flash tube or modeling light becomes cracked or damaged in any way, replace immediately. • Keep this product away from water and any flammable gases or liquids. • Use only the correct, recommended voltage. • Avoid rapid, high-power flashing.
Overview Top: 6. Optical sensor Front Side: 1. Monolight 2. Mount release 3. Modeling lamp 4. Reflector 5.
Overview Back: 1. LCD screen 2. Power input jack 3. Fuse bay 4. 1/4" (6.35 mm) sync port 5. Power switch 6. Output adjustment dial 7. Test button 8. Audio button 9. Up and down buttons 10. 11. 12. 13. 14. 15. 16. 17.
Remote Guide (Kit Only) Top: 1. 2. 3. 4. Left Side: 6. Battery compartment Up button Down button Test button Group indicators Bottom: 7. Channel DIP switches 8. Hot-shoe mount 9. 3.5 mm sync port Right Side: 5.
Overview (continued) Menus Mode 1 Optical slave menu (0–7) Channel selector (1–16) Mode 2 Time frame 8 Block time Group selector (A–D)
Preparing for Use The Impact Digital Monolight includes a preinstalled flash tube and a modeling lamp that’s packed separately in the box. Both lights are user replaceable. Be careful not to touch the flash tube with your bare hands, since this could cause damage to it. Use cotton gloves or a soft, dry cloth when touching or handling the flash tube. The monolight’s modeling lamp is a halogen bulb within a glass sleeve. You can touch this glass without cotton gloves.
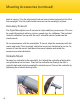
Mounting Accessories (continued) knob to secure. Turn the adjustment knob counter-clockwise to adjust the tilt of the monolight. Turn the knob clockwise to secure the monolight in place. Accessory S-mount The Digital Monolights have S-mounts for light-modifying accessories. This can be used with optional add-ons such as speed rings for softboxes. The included umbrella reflectors line up with the units’ umbrella mounts located on the stand mounts.
Connecting Your Camera to the Monolight The Impact Digital Monolight has two triggering options out of the box—sync cord and wireless. Sync Cord The back of your monolight has a 1/4" (6.35 mm) sync input, which is used for a wired connection between your camera and the flash unit. Use the following instructions to connect your two devices: 1. Insert the included sync cable’s 1/4" end into the monolight’s sync cable port. 2. Insert the PC connector end into your camera’s PC socket.
Powering the Monolight The Impact VC-500WLN Monolight is designed to operate with a 100–130 V, 50/60 Hz AC power current. Before powering your monolight, first plug the AC cable into the flash’s AC input, and then plug it into the wall socket. Press the power switch to turn the unit on. The LED will show the current flash power setting. Note: The monolight saves all of the previous flash and modeling light settings. All of these settings will be active when powering on.
Flash Settings Setting the Monolight’s Power Output The Impact Digital Monolight’s flashtube has a 6-stop power range, represented by a 1–6 (f-stop) numbered scale on the LED screen. The adjustment knob changes the monolight output value by 0.1 f-stop increments per detent. To increase or decrease the power output of the monolight, turn the adjustment dial on the back of the flash unit. This will adjust both the monolight and modeling lamp (unless the modeling lamp is set to independent mode on or off).
Setting the Modeling Light Power Output The VC-500WLN Monolight has a 250 W, 60 Hz user-replaceable modeling light bulb. The modeling light’s power output is represented by a 1–6 numbered scale, with ten decimal places between them, on the LED screen. (220v 50Hz kit will come with a 220v modeling lamp) This monolight has built-in soft-start circuitry, which ensures a long modeling lamp life.
Proportional: When the modeling light is activated, the default setting is proportional, as indicated by the indicator above the button. As you adjust the monolight’s power output via the adjustment dial, the modeling light will increase or decrease proportionally. This gives you the general idea where highlights and shadows will fall in relation to the flash power. Independent: To change to independent mode, press the adjustment dial a second time. The indicator will appear over the button.
Slave and Preflash Settings The Impact Digital Monolight has seven optical slave/preflash modes. Activate the slave mode by pressing the slave button once. The slave indicator light will appear over the Slave button. Press it again to turn it off. To adjust the preflash settings, press and hold the Slave button for four seconds. Use the and buttons to toggle between preflash settings. C0: Using your master flash, release a test exposure.
Special Functions (Transmitter Only) The Impact Digital Monolight kit includes a wireless radio transmitter for remote triggering. Setting Channels on the Monolight The Impact Digital Monolight has an integrated 2.4 GHz 16-channel radio receiver. Set your devices to the same channel to trigger them all at the same time. This also aids in avoiding radio interference from other devices in the area. To set the channel, press and hold the Slave button for four seconds.
Remote Instructions The Impact Digital Monolight kit comes with a 2.4 GHz transmitter that enables the user to control and trigger the studio flash remotely. Mount the transmitter onto your camera’s hot shoe or connect it using the included 3.5 mm to PC sync cord. To use the remote with the Digital Monolight, use the following features: Flashtube Power Output Press the or button on the remote to adjust the power output of the flashtube. Each push of the button will adjust the output in 0.1 increments.
Channels This studio flash has a 16-channel radio receiver, which can be triggered using the included transmitter. To adjust the channel settings on the remote, first remove the battery compartment door. Set the device to your required channel using the chart below as a guide. Note: White represents the DIP switch button. Note: The channel setting on the monolight and the transmitter must match in order to wirelessly trigger the flash, adjust flash power, and turn on/off the modeling lamp.
Replacing the Battery (CR2032) To install a battery into the wireless trigger, first remove the battery compartment door. Remove the spent battery by holding back the clasp and pulling the battery out. Insert the new battery under the clasp, using the correct orientation, and snap the other side into place. Reinstall the battery compartment door. Preflash Variation Settings The Impact Digital Monolight is compatible with nearly all master flash slave units.
Note: The default setting of this function is t2, which means the flash will be triggered after 2 seconds of preflashes. When using multiple speedlites with different preflash frequencies, this mode will group all the flashes as one before firing. To exit the Time Frame function menu, press and hold the slave button for approximately 4 seconds until the flash power setting appears on the screen, or slightly move the adjustment dial.
Other Functions and Protective Features Audio Button When the LED indicator over the audio button is on, the monolight will emit a beep to indicate various alerts and functions. To turn this function off, press the audio button once. The LED indicator will turn off. Press the audio button again to reactivate the function. Note: When the audio function is disabled, the modeling light will acts as a recycle indictor.
Installation and Replacement Guide The Modeling Light The Impact VC-500WLN Monolight comes with a 250 W, 60 Hz halogen modeling lamp bulb. (220v 50Hz kit will come with a 220v modeling lamp) To remove an old bulb and install a replacement bulb, follow these steps: 1. Ensure the monolight is powered off and unplugged. 2. Using a cotton glove or soft, dry cloth, carefully unscrew the modeling light bulb. 3. With the cotton glove or soft, dry cloth, pick up the replacement tube. 4.
Installation and Replacement Guide (continued) The Flash Tube The Impact Digital Monolight’s flash tube is user-replaceable. To replace the flash tube, follow these steps: 24 1. Discharge the flash unit by pressing the test button. 2. Power off the monolight and unplug the power cable from the flash unit and power source. 3. After 30 minutes, remove the modeling lamp and any other accessory connected to the unit. 4.
Replacing the Fuse The Impact Digital Monolight comes with two fuses: one installed and one spare. Both are located within the fuse bay. To remove the fuse housing from the fuse bay and replace the fuse, use the following instructions: 1. Ensure the monolight is powered off and unplugged. 2. Using a slotted screwdriver, lift the fuse housing via the nook found on the flat side of the AC jack. 3. The fuse located within the housing is the one the monolight is using when it is powered on.
Specifications 26 Power Output 500 w/s Guide Number 78 Output Control Range Full to 1/32 in 1/10 increments Recycle Time (110~120 V 60 Hz) 0.2 to 1.5 sec. Flash Duration 1/800 to 1/1200 sec. Flash Ready Indicator Visible or audible confirmation Power Range 6 stops Modeling Lamp E26/27, 250 W Max SSC (Soft Start Circuitry) Modeling Lamp Control Proportional, Independent, Off Triggering Method 16-channel built-in 2.4 GHz wireless with included 16-channel 2.
Specifications Slave Settings Red-eye reduction, synchronous Integrated Receiver Frequency 2.4 GHz Channels 16 Cooling Fan Yes Touch Pad Controls Yes Auto Power Dump Yes Adapter Thermal Control Yes Housing Material Aluminum casting with textured coating Mount Type S–mount, umbrella mount Power Source 100V - 130V 50/60Hz Circuit Protection 12.5 A Length of Included AC Cord 13′ (4 m) Weight 5.2 lb. (2.35 kg) Dimensions (with protective cap) (L × H × W) 16.
One-Year Limited Warranty This Impact product is warranted to the original purchaser to be free from defects in materials and workmanship under normal consumer use for a period of one (1) year from the original purchase date or thirty (30) days after replacement, whichever occurs later.