Portable Air Conditioner - User Manual Model: IPAC14-LS www.impecca.com 1 v. 1.
WARNING: To avoid permanent damage to unit: Ensure it is in the upright position for a MINIMUM of 6 hours and a RECOMMENDED time of 24 hours before powering on the first time. ADVERTENCIA: Para evitar daños permanentes a la unidad: Asegúrese de que está en la posición vertical durante un mínimo de 6 horas y un tiempo recomendado de 24 horas antes de encender la primera vez. Spanish and French versions of this manual are available for download from www.impecca.
TABLE OF CONTENTS Important Safety Notices 4-5 Introduction 6 Getting to Know Your Air Conditioner 7 What’s in the box and accessories 8 Installation Instructions 9 Water Drainage 10 Exhaust Hose and Window Filler Kit Installation 10-11 Operating Instructions 12 Unit Error Codes 17 Care & Maintenance 18 Troubleshooting 19 Customer Support 19 iii
READ THESE NOTICES CAREFULLY—THEY ARE IMPORTANT! WARNING Plug in power plug completely. • Otherwise, it may cause electric shock or fire due to potential short circuit. Do not modify power cord length. • It may cause electric shock or fire. Always ensure effective grounding/earthing. • Incorrect or missing grounding may lead to electric shock. Unplug the unit if it emits strange sounds, smells or smoke. • Unit may need repair.
CAUTION Stop operation and remove window filler panels from window during severe storm or hurricane. • Operation during a severe storm may allow a significant amount of water to enter the indoors. Do not place obstacles around air-intake vents or inside cool air outlet. • It may cause failure of appliance. Hold the plug by the head of the power plug when unplugging unit. • Pulling from the wire can cause wire to fray leading to electric shock or fire.
INTRODUCTION Thank you for purchasing this quality Impecca portable air conditioner unit. To ensure the longest life and highest energy efficiency of your unit, please carefully follow these operating instructions. Keep these instructions in a safe place and consult them as needed.
OPERATING CONDITIONS • The air conditioner should only be operated within the temperature range of 62°F to 95°F (16°C to 35°C). • The appliance is for indoor use only. • The appliance must be positioned so that the plug is accessible. • A perimeter of 12′′(30cm) around the air conditioner should be free of all objects. • Do not operate the air conditioner in a humid environment. • Please keep air inlet and air outlet clean and free of obstacles.
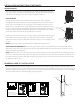
WHAT’S IN THE BOX: Please verify your box for the following items. Note that some models may not include all items. C D 1. Air Conditioning Unit 2. Remote controller (may differ from photo) 3. User’s Guide 4. Installation kit (see details below) B INSTALLATION ACCESSORY KIT ITEMS: Illustrations may vary slightly from actual appearance of product.
INSTALLATION INSTRUCTIONS Carefully review all of these instructions BEFORE proceeding to install and operate your air conditioner unit. Failure to do so may cause damage, injury, or bodily harm including permanent disability and/or death. LOCATION: • The air conditioner should be placed on a firm, level surface to minimize noise and vibration. For safe and secure positioning, place the unit on a smooth, level floor strong enough to support the unit.
INSTALLATION INSTRUCTIONS (CONTINUED): WATER DRAINAGE Certain functions of your air conditioning unit create condensation and the unit may need to evacuate accumulated water. Please carefully follow these instructions according to your operating and usage conditions.
INSTALLATION INSTRUCTIONS (CONTINUED): INSTALLATION IN A DOUBLE-HUNG SASH WINDOW: 1. Cut one adhesive foam seal to the proper length and attach it to the window stool. (Figure J) 2. Attach the window filler panel kit to the window stool. Adjust the length of the window slider kit according to the width of window, shorten the adjustable window kit if the width of window is less than 26 ½ inches. Open the window sash and place the window slider kit on the window stool. (Figure K) 3.
OPERATING INSTRUCTIONS CONTROL PANEL AND REMOTE OVERVIEW The following diagram and legend shows the functions of both the unit’s control panel and the remote controller. Some functions are only available on select models.
REMOTE CONTROLLER LCD: MODE display Displays the current selected mode. Including AUTO, COOL, DRY, HEAT* and FAN. Transmission Indicator This transmission indicator will show when remote controller transmits signals to the indoor unit. Temp./Timer display The temperature setting from 62°F - 88°F (17°C - 30°C), or timer setting (0-24h) will be displayed. If FAN mode is selected, there will be no display. ON/OFF display This indicator will be displayed when the unit is operating.
OPERATING INSTRUCTIONS (CONTINUED): GENERAL NOTES: Instructions are for both the remote controller and the unit control panel itself. When using the remote controller, it is possible and even recommended to select the operating mode before you press ON/OFF to start the unit. On the unit’s control panel this is not possible and you must begin with the unit on. DEHUMIDIFIER MODE OPERATION: Ensure the unit is plugged in and power is available. 1. Press the MODE button to select DRY mode. 2.
OPERATING INSTRUCTIONS (CONTINUED): AUTO OFF INSTRUCTIONS: 1. Press the TIMER OFF button. The remote controller shows TIMER OFF, the last Auto-off setting time and the signal “h” will be shown on the LCD display area. Now it is ready to reset the Auto-off time to START the operation. 2. Push the TIMER OFF button again to set desired Auto-off time. Each time you press the button, the time increases in 30 minutes increments, up to 10 hours, then at 1 hour increments up to 24 hours. 3.
OPERATING INSTRUCTIONS (CONTINUED): ADDITIONAL UNIT FEATURES Auto Restart • If the unit shuts off unexpectedly due to a power outage, it will restart with the previous function setting automatically when the power resumes. • If you need full timer functionally you can hook up a properly-rated heavy duty timer to the unit to control on and off cycles.
BASIC UNIT ERROR CODES: Use the following guidelines to understand and troubleshoot common error codes. E1: Room temperature sensor error. E2: Evaporator temperature sensor error E3: Condenser temperature sensor error E4: Display panel communication error • For all of the above errors, unplug the unit and plug it back in. P1: Bottom condensation tray is full • Connect the drain hose and drain the collected water away.
CARE & MAINTENANCE: IMPORTANT: 1) Be sure to unplug the unit before cleaning or servicing. 2) Do not use gasoline, thinner or other chemicals to clean the unit. 3) Do not wash the unit directly under a tap or using a hose. It may cause electrical danger. 4) If the power cord is damaged, it should be repaired by manufacturer or its agency. AIR FILTER CLEANING: Clean the air filter at least once every two weeks to prevent inferior fan operation because of dust.
TROUBLESHOOTING TIPS: Problem Possible Causes Remedies P1 appears in the display window Drain the water in the bottom tray Room temperature is lower than the set temperature (cool mode) Reset the temperature The windows or doors in the room are not closed Make sure all the windows and doors are closed There are heat sources inside the room Remove the heat sources if possible Exhaust air duct is not connected or blocked Connect the duct and make sure it can function properly Temperature setting
© 2016 Impecca, a division of LT Inc.