
User's Guide


16
18
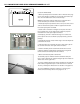
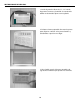
Wall Sleeve Brands:
#7 Whirlpool ( 23 Deep)
1. Remove existing rear grille as shown on Page
11 of this manual and replace with provided
louvered rear panel. Install as shown here.
NOTE: You may need to drill holes in flange of
existing sleeve to match new rear grille.
2. Place (2) 1 x1 x14 seals against each side.
3. Gently slide unit in and check if amount extend-
ing from the sleeve is sufficient once the trim
frame is attached.
4. If position is Ok, remove unit and proceed to
the next step. If not go to step 9.
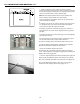
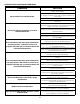
5. Attach (1)1 x1 x25 long seal in the center
at the top of the sleeve. Remove the backing
paper and press into position.
6. Attach (2) 1 x1 x14 seals to the left and
right sides of the sleeve.
7. Cut (2) 1 x x25 long seals to 14 long
and attach to the vertical sections of the grille as
shown.
8. Attach the tapered spacer blocks to the floor of
the sleeve. Now go to step 15.
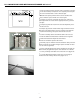
Use these next steps if the unit requires extra
extension into the room.
9. Attach 1 x x14 long seal over the solid
vertical portion of the rear grille.
10. Attach (2) 4 x3 x1 foam blocks with the
slot overlapping the seal above.
11. Install the divider into the slots of the foam
blocks. You may need to trim the length to size.
12. Repeat steps 9-11 for the other vertical shown
portion of the grille as shown in the picture.
13. Attach (2) 1 x1 x14 seals along the sides
of the sleeve again making sure all seals are
flush.
14.Cut the 1 x1 x25 seal to fit the top of the
sleeve. The pieces must be fitted flush to the
edge of the divider.
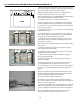
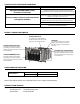
15. Center unit and gently slide unit into sleeve.
16. Before sliding all-the-way back, remove 1st
screw from front on left side of unit.
17. Remove the plastic washer from the screw.
18. Screw and attach the other end of the ground
wire to the unit as shown in picture. Make sure
that the toothed washer is against the cabinet.
19.Slide the unit completely to the rear to ensure
a good seal, making sure the ground wire does
not become tangled.
20.Seal & Frame the unit as described on page 22.
21. If you have difficulty with mounting the grill to
the sleeve, follow the instructions for direct
mounting on Page 21.
Because of the increased unit depth, first try
dry fitting using the method described below:
1
/
2
1
/
2
1
/
2
3
/
8
3
/
4
3
/
4
3
/
4
3
/
4
1
/
2
6
5
12
9
11
13
10
14
1
/
2
7
4
4
4
4
3
8
3
8
4
4
7
N° 7: SOPORTES DE PARED WHIRLPOOL 23
”
1. Retire la parrilla posterior existente como se muestra en la pági-
na 9 de este manual y reemplácela con la rejilla de persianas que
vino con su unidad. Instale como se muestra aquí.
NOTA: Tal vez requiera perforar oricios en los rebordes de la
carcasa existente para coincidir con la nueva rejilla.
Dado a un tamaño mayor en la profundidad de la unidad, primero
pruebe el ajuste utilizando el siguiente método:
2. Coloque (2) sellos de 1”x 1 ½”x14” uno al lado del otro.
3. Deslice la unidad y revise si la cantidad que se extiende de la
carcasa es suciente una vez que se coloque el marco ajustable.
4. Si la posición es correcta, retire la unidad y siga con el siguiente
paso. Si no, vaya al paso 9.
5. Coloque (1) junta de 1”x3/8”x25” de largo en el centro en la
parte superior de la carcasa. Retire el papel protector y presione
para jar.
6. Coloque (2) juntas de 1”x3/8”x14” a los lados izquierdo y dere-
cho de la carcasa
7. Corte (2) juntas de 1”x3/8”x25” de largo a 14” de largo y je en
las secciones verticales de la rejilla como se muestra.
8. Coloque la parte cónica de los bloques espaciadores al piso de
la carcasa. Ahora vaya al paso 15.
Utilice estos pasos si la unidad requiere de una extensión adicion-
al de espacio.
9. Coloque una junta de 1”x3/4”x14” de largo sobre la porción
vertical sólida de la rejilla del fondo.
10. Coloque (2) bloques de esponja 4 ¾”x3 ¾”x1 ¾” con la ranura
sobrepuesta en el sello de encima.
11. Instale el divisor en las ranuras de los bloques de esponja.
12. Repita los pasos 9 al 11 para la otra porción vertical que se
muestra en la imagen.
13. Coloque (2) juntas de 1”x1 ½”x14” a los lados de la carcasa
asegurándose de que todos los sellos estén al ras.
14. Corte el sello de 1”x1 ½” x 25” para que ajuste la parte superior
de la carcasa. Las juntas deben quedar al ras de la esquina del
divisor.
15. Centre la unidad y deslice suavemente dentro de la carcasa.
16. Antes de deslizar la unidad hasta el fondo retire el segundo
tronillo al frente del lado izquierdo de la unidad.
17. Retire la arandela de plástico del tornillo.
18. Atornille y je a la unidad el extremo suelto del cable para
tierra como se muestra en l la gura. Asegure que la arandela con
dientes este contra el gabinete.
19. Deslice completamente hasta atrás la unidad para asegurar un
buen sellado, asegurándose que el cable de tierra no se enrede.
20. Selle y enmarque la unidad como se describe en la página 20.
21. Si tiene dicultad al montar la rejilla en la carcasa siga las
instrucciones de montaje directo en la página no. 19.