3.8 CU. FT. Refrigerator - User Manual Refrigerador de 13.8 Pies Cúbicos - Manual de usuario Réfrigérateur de 13.8 Pieds Cubes - Manuel de l’utilisateur Model: RA-2138 www.impecca.com v 2.
TABLE OF CONTENTS ENGLISH ESPAÑOL Important Safety Instructions.......................................................................................................................................................................................... 3 Getting Started.................................................................................................................................................................................................................... 4 Installing Your Appliance...
IMPORTANT SAFETY INSTRUCTIONS BEFORE DISCARDING YOUR OLD REFRIGERATOR: Your old refrigerator may have a cooling system that used CFCs (chlorofluoocarbons) or HCFCs (hydrochlorofluoocarbons). CFCs and HCFCs are believed to harm stratospheric ozone if released to the atmosphere. If you are throwing away your old refrigerator, make sure the refrigerant is removed for proper disposal by a qualified technician.
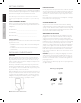
GETTING STARTED LEVELING THE UNIT It is very important to keep the unit level, so that the door will close properly and prevent problems that will cause effective cooling to fail. To level the unit, turn the two adjustable feet clockwise or counterclockwise to respectively raise or lower the corner. Thank you for purchasing this Impecca 13.8 Cubic Foot Refrigerator. Please follow these operating instructions carefully. Keep these instructions in a safe place and consult them as needed.
It is advised that you determine if you need to reverse the door swing and complete this procedure prior to installing and turning on your refrigerator. Note: These instructions are for changing the hinges from the right side to the left side. If you wish to change the hinges back to the right side, follow these same instructions and reverse all references to left and right. CAUTION: To avoid injury to yourself and/or property, we recommend someone assist you during the door reversal process.
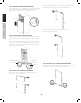
STEP 2 REMOVE THE REFRIGERATOR DOOR Remove the hole plug from the top left of the refrigerator door and insert it in the top right side of the refrigerator door. Unscrew the three screws holding the center hinge with a Phillip’s screwdriver. Remove the hinge and save the screws and hinge. Raise the refrigerator door upward, as shown. ENGLISH Center Hinge ESPAÑOL FRANÇAIS Insert the plastic hole plugs into the left sides of the freezer and refrigerator doors.
STEP 7 REMOVING DOOR HANDLES Attach the left upper door self-locking block and the left dooropen stopper to the left side of the freezer door. ENGLISH Remove the screw caps on the door handles. Use an Allen wrench to remove the four Allen-screws securing the handles to the left side of the freezer and refrigerator doors. Remove the handles. Upper door self-locking block ESPAÑOL Left door-open stopper Remove the right upper door self-locking block and the right door-open stopper.
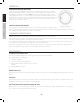
OPERATION TEMPERATURE CONTROL OPERATION ENGLISH The temperature in the refrigerator compartment is controlled by the temperature controller installed on the fridge air column. Turn the thermostat knob to regulate the temperature inside the refrigerator. The marks on the knob do not represent the temperature in degrees, but the temperature grades from “1” to “7”. The first grade corresponds to the highest temperature and the 7th grade corresponds to the lowest temperature the refrigerator can produce.
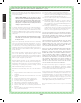
TROUBLESHOOTING The following simple issues can be handled by the user. Please contact customer support if the issues are not resolved. • Check to be sure the unit is plugged into a working electrical outlet; • Check the outlet to ensure proper voltage; • Check to see if the power circuit has been tripped. Odor • Odorous foods should be wrapped well; • Check for rotten food; • Clean the interior surfaces.
ONE-YEAR LIMITED APPLIANCE WARRANTY (US) ENGLISH Impecca™ warrants this product against defects in material and workmanship to the original purchaser as specified below. ESPAÑOL PARTS AND LABOR– if the product is determined to have a manufacturing defect, within a period of one year from the date of the original purchase, Impecca™, at its own discretion, will repair or replace the product parts at no charge to you in the U.S.A.
ESPAÑOL FRANÇAIS Instrucciones Importantes De Seguridad ���������������������������������������������������������������������������������������������������������������������������������������������������������������������������12 Comenzando.............................................................................................................................................................................................................................13 Instalando Su Electrodoméstico.................
INSTRUCCIONES IMPORTANTES DE SEGURIDAD GUARDE ESTAS INSTRUCCIONES. PUEDE LLEGAR A NECESITARLAS EN EL FUTURO. ENGLISH ESPAÑOL FRANÇAIS 1. Este refrigerador debe instalarse y ubicarse de acuerdo con las instrucciones de instalación antes de ser utilizado. 2. No permita que los niños trepen, se paren o se cuelguen de los entrepaños del refrigerador, pueden dañar el refrigerador y resultar lesionados severamente. 3.
COMENZANDO Nota: Si la unidad no está nivelada, la puerta y el sello magnético no funcionarán adecuadamente. NUMERO DE SERIE Y MODELO Limpie la parte interior de la unidad con una solución ligera de bicarbonato y agua. Luego enjuague con agua tibia utilizando una esponja o trapo húmedo. Lave los entrepaños y cajones con agua jabonosa tibia y seque completamente antes de colocarlos dentro de la unidad. Limpie la parte externa de la unidad con un trapo húmedo.
DIAGRAMA DE LA UNIDAD ENGLISH ESPAÑOL FRANÇAIS 1. 2. 3. 4. 5. 6. 7. 8. 9. 10. 11. 12. 13. 14. 15. 16. 17. de la manija y atornille hasta que estén bien apretados. Instale las tapas de los tornillos como se muestra en la figura anterior.
PASO 2: RETIRE LA PUERTA DEL COMPARTIMIENTO DE ENFRIAMIENTO Retire la tapa del orificio del lado de la puerta del refrigerador e insértela del lado derecho. ENGLISH Con un destornillador Phillips desatornille los tres tornillos que sostienen la bisagra central. Retire la bisagra y guarde los tornillos y bisagra. Levante hacia arriba la puerta del compartimento, como se muestra. Inserte los casquillos de plástico en el lado izquierdo de las puertas del congelador y compartimento de enfriamiento.
Fije el bloque izquierdo del seguro automático de la puerta superior y el tope izquierdo de puerta abierta a la parte izquierda de la puerta del congelador. PASO 7: RETIRANDO LAS MANIJAS DE LAS PUERTAS ENGLISH Retire las tapas de los tornillos de las manijas de las puertas. Utilice una llave Allen para retirar los cuatro tornillos Allen que aseguran las manijas al lado derecho de las puertas del congelador y del compartimento de enfriamiento. Retire las manijas.
OPERACIÓN La temperatura en el congelador es controlada por el control de temperatura instalado en la pared posterior del compartimento del congelador. Deslice el elemento regulador para regular la temperatura dentro del congelador. Deslice el elemento regulador de la posición “MIN” a la posición “MAX” para que la temperatura se incremente continuamente. LIMPIANDO SU ELECTRODOMESTICO Retire todos los entrepaños del compartimento de ensaladas.
SOLUCIÓN DE PROBLEMAS Los siguientes problemas sencillos pueden ser manejados por el usuario. Entre en contacto con soporte al cliente, si estos problemas no se resuelven.
Para obtener el servicio de garantía de un distribuidor autorizado de Impecca™ envíenos un correo electrónico a: service@impecca.com para obtener un número de Autorización de Reparación y Mantenimiento (RAM) y recibir las instrucciones de cómo se llevará a cabo el procedimiento de reparación o reemplazo. Cualquier material de vidrio incluido en el electrodoméstico estará cubierto por un periodo de sesenta (60) días a partir de la fecha de compra.
TABLE DES MATIÈRES ENGLISH ESPAÑOL FRANÇAIS Consignes De Sécurité Importantes ������������������������������������������������������������������������������������������������������������������������������������������������������������������������������������21 Démarrage.................................................................................................................................................................................................................................
CONSIGNES DE SÉCURITÉ IMPORTANTES 4. 5. 6. 7. 8. 9. 10. 11. 12. 13. 14. 15. 16. 17. AVANT DE JETER VOTRE ANCIEN RÉFRIGÉRATEUR : Votre ancien réfrigérateur pourrait être équipé d’un système qui utilisait des CFC (chlorofluocarbone) ou des HCFC (hydrochlorofluocarbone). Les CFC et HCFC sont soupçonnés de nuire à l’ozone stratosphérique si relâché dans l’atmosphère. Si vous vous débarrassez de votre ancien réfrigérateur, assurez-vous que le réfrigérant et proprement retiré par un technicien qualifié.
DÉMARRAGE ENGLISH Merci pour votre achat de ce réfrigérateur Impecca de 13.8 pieds cubes. Veuillez suivre ces instructions d’opération attentivement. Gardez ces instructions dans un endroit sécure afin de les consulter lorsque requis. Note: Les images à l’intérieur de ce manuel y sont à titre indicatif uniquement; l’apparence physique et les options sur votre modèle peuvent varier.
SCHÉMA DE L’APPAREIL Note : Ces instructions sont pour changer les charnières de la droite vers le côté gauche de l’appareil. Si vous désirez remettre les charnières à droite, suivez ces mêmes instructions et inversez toutes les références de la gauche vers la droite. AVERTISSEMENT: Afin d’éviter de vous blesser ou de causer des dommages à la propriété, nous recommandons que vous obteniez de l’aide pour l’exécution de cette tâche. • Assurez-vous que l’appareil est débranché et vide.
ÉTAPE 2: RETRAIT DE LA PORTE DU RÉFRIGÉRATEUR gérateur et insérez-le du côté droit de la porte. Dévissez les trois vis qui tiennent la charnière centrale avec un tournevis Phillips. Retirez la charnière et mettez de côté les vis et la charnière. Soulevez la porte du réfrigérateur vers le haut, tel qu’illustré. ENGLISH Charnière centrale ESPAÑOL Insérez la bague de plastique du côté gauche des portes du congélateur et du réfrigérateur.
ÉTAPE 7: RETIRER LES POIGNÉES DE PORTE Retirez les couvercles de vis sur les poignées de porte. Utilisez une clé Allen pour retirer les quatre vis Allen qui retiennent les poignées du côté gauche du congélateur et du réfrigérateur. Retirez les poignées. Porte supérieure bloc autobloquant ENGLISH Bloc porte de gauche ESPAÑOL Retirez le bloc autobloquant du coin supérieur droit et le bloc porte de droite. Gardez-les dans un endroit certain si jamais vous devez inverser de nouveau la position de la porte.
UTILISATION CONTROLE DE LA TEMPERATURE ENGLISH La température dans le compartiment réfrigérateur est contrôlée par le régulateur de température installé sur la colonne d’air du réfrigérateur. Tournez le bouton du thermostat pour régler la température à l’intérieur du réfrigérateur. Les marques sur le bouton ne représentent pas la température en degrés, mais les notes de température de «1» à «7».
DÉPANNAGE Les questions simples suivantes peuvent être traitées par l’utilisateur. S’il vous plaît contacter le support client si les problèmes ne sont pas résolus . Odeur Fonctionnement en continue du compresseur La lumière interne ne fonctionne pas L'appareil n’est pas assez froid Des bruits forts • Les aliments odorants devraient être bien emballés; • Vérifiez les aliments pourris; • Nettoyez les surfaces intérieures.
GARANTIE LIMITÉE D’UN AN Impecca™ garantie auprès de l’acheteur original cet appareil contre toutes défectuosités liées au matériel et à la fabrication tel que spécifié ci-dessous. ENGLISH ESPAÑOL PIÈCES ET MAIN D’ŒUVRE- S’il est déterminé que l’appareil a un problème lié à la fabrication, à l’intérieur d’une période d’un an de la date d’achat originale, Impecca™, à sa discrétion, pourra remplacer ou réparer les pièces de l’appareil sans frais pour vous aux États-Unis.