UKW-/DAB+ UHRENRADIO Bedienungsanleitung
Vorwort: Vielen Dank, dass Sie sich für unser DAB+ Radio/UKW Sender IMPERIAL DABMAN 70 entschieden haben. Wenn Sie das Radio zum ersten Mal verwenden, lesen Sie bitte diese Anweisungen sorgfältig durch, und bewahren Sie diese für zukünftige Gelegenheiten zum Nachschlagen auf. Wenn Sie die Anweisungen befolgen, können Sie optimal die volle Funktionsvielfalt des DAB+ Radios/UKW Senders IMPERIAL DABMAN 70 genießen.
Inhalt: Eigenschaften 3 Übersicht 4 Einführung 6 Uhr und Kalender einstellen 7 Wecker einstellen 8 Mit Radio wecken lassen 9 Dimmer 10 Höchst-und Tiefstwerte für Temperatur 10 Wettervorhersage 11 Das Menü Uhr 12 Radio DAB+ Empfang 12 Informationen zum Sender 14 Werkseinstellungen wiederherstellen 14 Das Menü DAB+ 14 RADIO - UKW-EMPFANG 16 Automatische Sendersuche 16 Das Menü FM (UKW) 17 Sender speichern – DAB+ und FM (UKW) 17 Timer bei DAB-/UK
1.
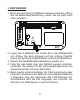
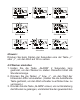
2. ÜBERSICHT 1. LCD-Anzeige 12. Taste INFO / > 2. Lautsprecher 13. Taste OK/MENU 3. Lautstärkeregler 14. DIMMER-Schieberegler 4. Senderauswahl 15. Taste TIME (Uhr) 5. Taste SLEEP (Ausschalt- 16. Taste ALARM (Wecker) Timer) 6. Power-Taste (Ein/Aus) 17. Taste MAX/MIN 7. DAB+/FMSchiebeschalter (DAB+/ UKW-Empfang) 18. Taste RESET (Zurücksetzen) 8. Schiebeschalter BEEP/ OFF/AUTO 19. Stromeingangsbuchse 20. Kopfhörerbuchse 9. Taste SNOOZE/ LIGHT 21. Temperatursensor (Nachweckfunktion/Licht) 10.
3 4 1 2 7 8 9 10 11 12 6 5 13 23 22 21 14 15 16 17 18 19 20 5
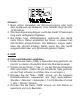
3. EINFÜHRUNG 1. Wenn Sie das Gerät mit Batterien speisen möchten, öffnen Sie die Batteriefachabdeckung, indem Sie sie sanft nach oben schieben. 2. Legen Sie 4 Batterien der Größe AA in das Batteriefach ein. Achten Sie beim Einlegen auf die richtige Polarität (siehe die Symbole im Batteriefach und auf den Batterien). 3. Setzen Sie die Batteriefachabdeckung wieder ein. 4.
Hinweis: 1. Beim ersten Herstellen der Stromversorgung oder nach dem Austausch der Batterien ohne Netzteil zeigt die Uhr 12:00 AM an. 2. Wird kein Signal empfangen, sucht das Gerät 10 Sekunden lang nach verfügbaren Signalen. 3. Bei DAB+ bzw. UKW-Empfang verbraucht das Gerät mehr Strom. Daher empfehlen wir Ihnen, in diesem Fall das Netzteil anzuschließen. Die Batterien sorgen dafür, dass die Uhrzeit erhalten bleibt, wenn Sie das Gerät ausgeschaltet oder vom Stromnetz getrennt haben. 4. UHR 4.
Normaler Modus Stunden stellen Datum stellen Monat stellen Minuten stellen Sekunden stellen Jahr stellen Uhrzeitformat einstellen Hinweis: Drücken Sie beim Stellen der Sekunden eine der Taste „<“ oder „>“, um den Wert auf 00 zu setzen. 4.2 Wecker einstellen 1. Halten Sie die Taste „ALARM“ 2 Sekunden lang gedrückt, um den Wecker zu stellen. Daraufhin blinkt die Stundenanzeige. 2. Drücken Sie die Tasten „<“ bzw. „>“, um den Wert der blinkenden Ziffer einzustellen.
Wert mithilfe der Tasten „<“ und „>“ ein. 4. Drücken Sie die Taste „ALARM“ erneut, um die Einstellungen zu speichern und das Menü zu verlassen. Normaler Modus Stunden stellen Minuten stellen Hinweis: Drücken Sie im normalen Modus die Taste „ALARM“, um die Weckzeit eine Minute lang einzublenden. 4.3 Wecker und Nachweckfunktion 1. Bewegen Sie den Schiebeschalter „BEEP/OFF/AUTO“ in die Position BEEP. 2. Stellen Sie den Wecker wie oben beschrieben. 3. Zur eingestellten Weckzeit ertönt der Weckruf.
5. MIT RADIO WECKEN LASSEN 1. Bewegen Sie den Schiebeschalter „BEEP/OFF/AUTO“ in die Position AUTO. Schieben Sie den Schalter „DAB+/FM“ in die Position DAB+ oder FM (UKW). 2. Stellen Sie den Wecker wie oben beschrieben. 3. Zur eingestellten Weckzeit schaltet sich der gewählte Radiosender ein. 4. Drücken Sie die Taste „POWER“, um das Radio auszuschalten. Daraufhin schaltet sich das Radio am nächsten Tag zur selben Zeit wieder ein. 6.
Normaler Modus Max. Temperatur Min. Temperatur Hinweis: Wenn Sie das Gerät zurücksetzen oder die Stromversorgung unterbrochen wird, werden alle gespeicherten Werte zurückgesetzt. 8. WETTERVORHERSAGE Das eingebaute Barometer erkennt die Veränderungen des Luftdrucks. Aus den aufgezeichneten Daten errechnet das Gerät eine Wettervorhersage für die nächsten 12 bis 24 Stunden. Sonnig Leicht bewölkt Bewölkt Regnerisch Hinweis: 1. Die Genauigkeit der Luftdruck-basierenden Vorhersage liegt bei ca.
9. DAS MENÜ „CLOCK“ (UHR) 1. Drücken Sie die Taste „OK/MENU“, oder drücken Sie die Auswahltaste „CH“, um das Hauptmenü zu öffnen. 2. Drehen Sie die Auswahltaste „CH“, und wählen Sie die Option „Language“ (Sprache) oder „Auto Update Time“ (Uhr automatisch synchronisieren). Drücken Sie „OK“ oder „CH“ zur Bestätigung der Auswahl und zum Öffnen des zugehörigen Untermenüs. Hinweis: 1. Es stehen fünf Sprachen zur Auswahl (Englisch / Deutsch / Französisch /Niederländisch / Italienisch).
3. Bei der ersten Inbetriebnahme wird eine automatische Sendersuche durchgeführt, die gefundenen Sender werden anschließend gespeichert. 4. Drehen Sie die Auswahltaste „CH“, um den gewünschten Sender auszuwählen, und drücken Sie die Taste „OK/ MENU“ oder die Auswahltaste „CH“ zur Bestätigung. 5. Drehen Sie den Regler „VOL“, um die Lautstärke auf den gewünschten Pegel einzustellen. 6. Drücken Sie die Taste „VOL“, um die Tonausgabe stummzuschalten.
10,2 Informationen zum Sender Drücken Sie während des Empfangs eines DAB+ Senders mehrmals die Taste „INFO“, um Detailinformationen zum gegenwärtig eingestellten Sender anzuzeigen. Aktueller Sender Frequenz Datenrate Signalqualität Audioformat Art der Sendung 10.3 Werkseinstellungen wiederherstellen 1. Halten Sie die Taste „SCAN“ 2 Sekunden lang gedrückt, um alle gespeicherten Einträge (gespeicherte Sender und Senderspeicher) für UKW und DAB zurückzusetzen.
DRC-Wert (DAB) > Manual tune (Manuelle Senderwahl) (DAB) > EQ (Radio) > Station Order (Senderreihenfolge) (DAB) > Auto Update Time (Uhr synchronisieren) > Scrolling Speed (Rollgeschwindigkeit) (Radio) > Back (Zurück). 3. Wählen Sie die gewünschte Menüoption aus, drücken Sie die Taste „OK/MENU“, um den gewünschten Wert auszuwählen und anschließend die Taste „OK“ zur Bestätigung.
11. RADIO - UKW-EMPFANG 11.1 Einschalten - UKW-Empfang 1. Ziehen Sie die Teleskopantenne vorsichtig aus, und schieben Sie den Schalter „DAB+/FM“ in die Position FM (UKW). 2. Drücken Sie die Taste „POWER“, um das Radio einzuschalten. 3. Wenn Sie das Radio zum ersten Mal in Betrieb nehmen, ist die Frequenz auf 87,5 MHz eingestellt. Sie können den gewünschten Sender manuell einstellen, indem Sie den Regler „CH“ drehen. 4. Drehen Sie den Regler „VOL“, um die Lautstärke auf den gewünschten Pegel einzustellen. 5.
11.3 Das Menü FM (UKW) 1. Drücken Sie die Taste „OK/MENU“, oder drücken Sie die Auswahltaste „CH“, um das Hauptmenü zu öffnen. 2. Drehen Sie die Auswahltaste „CH“, um die weiteren Funktionen sequenziell wie folgt auszuwählen: Language (Sprache) > EQ (Radio) > Auto Update Time (Uhr synchronisieren) > Scrolling Speed (Rollgeschwindigkeit) (Radio) > Back (Zurück). 3.
13. AUSSCHALT-TIMER BEI DAB-/UKW-EMPFANG PROGRAMMIEREN 1. Wenn Sie einen Radiosender empfangen (DAB/FM), drücken Sie die Taste „SLEEP“, um den Ausschalt-Timer zu aktivieren. Daraufhin blinken die Ziffern „00“. 2. Drücken Sie die Taste „SLEEP“ erneut, um die Wartezeit zum Ausschalten einzustellen. Mit jedem Tastendruck ändert sich die Zeit wie folgt: 15 > 30 > 60 > 90 > 00 Minuten. 3. Zur eingestellten Zeit schaltet sich das Radio automatisch aus. 14.
- Werfen Sie die Batterien niemals ins offene Feuer, und versuchen Sie auch nicht, sie wieder aufzuladen, da sie sonst explodieren können. - Lagern Sie Batterien von Metallgegenständen entfernt, da die Berührung zu Kurzschlüssen führen kann. - Setzen Sie Batterien keinen extremen Temperaturen oder Feuchtigkeit aus, und halten Sie sie von direkter Sonneneinstrahlung fern. - Bewahren Sie Batterien für Kleinkinder unerreichbar auf. Es besteht Erstickungsgefahr! 16.