
Installation Instructions

Imperial Cal. Products, Inc.
Installation Instructions For
Model RC-12, RC-15 & RC-18
Recycling Cabinet
1. First, measure the top to bottom
dimension of your cabinet opening and the side to side
dimension.
2. Remove Gray tape from back of slides.
3. Turn Bottom Unit (B) over and install bumpons to the bottom. (Use either 3/16” or 3/8”
bumpons depending on the top to bottom dimensions of your cabinet).
4. Place Bottom Unit (B) into cabinet opening and line up kick panel on the RC-12 or RC-15
with the cabinet kick panels, pull the drawer on Bottom Unit (B) to full length.
5. Install the six (6) 5/8” screws
to the sides of the cabinet (C). If cabinet measures over 12”
or 15” inside use spacers on each side of the cabinet to fill in the space. That should center
your Recycling Cabinet and insure proper installation.
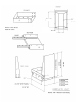
6. Take front panel (F) and insert into drawer (A). Make sure bottom angle on front panel
goes under drawer bottom for support. (D) Line up eight (8) holes (4 on each side).
Make sure screw caps are on the inside of the drawer. Use eight (8) small screws, eight (8)
star washers and eight (8) cap nuts. Tighten up firmly.
7. For Recycling Cabinets with WF (Wood Front Ready), install your front panel (F) using the
eight (8) screw holes in the front drawer.
NOTE: Recycling Cabinet must be attached securely to inside of cabinet as directed above.
Unit is not to be mounted directly to floor. Improper installation will VOID warranty.
WARRANTY: 1 Year Parts only.
SEE DRAWING ON REVERSE SIDE
Imperial Cal. Products, Inc.
425 Apollo St.
Brea, CA 92821
714-990-9100 ~ 714-990-3350 FAX
www.imperialhoods.com
REV. 12/16