NOTE: Please read all instructions carefully before using this product Table of Contents Safety Notice MARCY Hardware Identifier PL-2009 RECUMBENT BIKE Assembly Instruction Exploded Diagram Parts List Warranty Ordering Parts Model PL-2009 Retain This Manual for Reference May 11, 2001 IMPEX INC. OWNER'S MANUAL 14777 Don Julian Rd., City of Industry, CA 91746 Tel: (800) 999-8899 Fax (626) 961-9966 www.impex-fitness.com info@impex-fitness.
TABLE OF CONTENTS BEFORE YOU BEGIN....................................................................................................... IMPORTANT SAFETY NOTICE........................................................................................ HARDWARE IDENTIFIER................................................................................................ ASSEMBLY INSTRUCTIONS........................................................................................... EXPLODED DIAGRAM.................
IMPORTANT SAFETY NOTICE PRECAUTIONS This exercise machine is built for optimum safety. However, certain precautions apply whenever you operate a piece of exercise equipment. Be sure to read the entire manual before you assemble or operate your machine. In particular, note the following safety precautions: 1. Keep children and pets away from the machine at all times. DO NOT leave children unattended in the same room with the machine. 2. Only one person at a time should use the machine. 3.
3
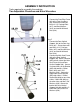
ASSEMBLY INSTRUCTION Tools required to assembly the machine: Two Adjustable Wrenches and Allen Wrenches. STEP 1 • Connect the Front Bike Frame (#1) to the Front Leg Base (#2). Secure them with two M10 x 3 1/8” Carriage Bolts (#17), two Bent Washers (#19), and two M10 Aircraft Nuts (#18). Step 2 • Connect the Rear Vertical Support (#8) to the Rear Leg Base (#3). Secure them with two M10 x 3 1/8” Carriage Bolts (#17), two Bent Washers (#19), and two M10 Aircraft Nuts (#18).
Step 3 • Thread Seat Adjustment Handle (#29) into seat adjustment notch. • Place Seat Support (#5) onto top of Main Seat Frame (#4). Insert two M6 x 2 3/8” Allen Hollow Socket Bolts (#22), and two ∅ 5/8” Washers (#24) on one side. Secure them with two M6 x ½” Allen Bolts, two ∅ 5/8” Washers (#24) on the other side. Step 4 • 5 Insert Main Seat Frame (#4) into Front Bike Frame (#1). Attach a U-shaped Bracket (#20) from underneath. Align all the holes.
Step 5 • Attach the Right Seat Handle (#6) and Left Seat Handle (#7) to the Seat Support (#5). Align the holes and secure them with two M6 x 2 3/8” Allen Hollow Socket Bolts (#22) and ∅ 5/8” Washers (#24) on one side, two M6 x ½” Allen Bolts (#26) and two ∅ 5/8” Washers (#24) on the opposite side. Step 6 • • • • 6 Slide the Plastic Sleeve (#16) onto Front Vertical Post (#12). Insert Front Vertical Post (#12) into Front Bike Frame (#1).
Step 7 • Attach the Stationary Handle (#11) to the Front Vertical Post (#12). Secure it with a M8 x 1 ¼” Allen Bolts (#27) and ∅ 5/8” Washers (#24). Step 8 • 7 Connect the sensor wire from Front Vertical Post (#12) to the sensor wire from Computer (#13). Plug the pulse wire from Front Vertical Post into the hole located on the bottom of the Computer. Slide the Computer onto the slot onto top of the Front Vertical Post (#12).
Step 9 • Place Seat Pad (#10) onto the Seat Support (#5). Secure it with four M6 x 1 ½” Philips Head Screws (#28). • Place the Backrest Pad (#9) onto the Seat Support (#5). Secure them with four M6 x 1 ½” Philips Head Screws (#28). Step 10 • 8 Attach the Left Pedal (#14) and Right Pedal (#15) to the side of each crank on the Front Base Frame (#1). Secure them by threading the pedal into the crank.
9
COMPUTER Press “MODE” on Computer to select each function. Functions: • Scan: Automatically scan through each mode in sequence every 6 seconds. • Speed: Shows the current speed up to 99.9 ML/H. • Distance: Accumulates pedaled distance up to 99.99 ML from zero. • Time: Accumulates total time up to 99:59. • Odometer: Accumulates total distance traveled. • Calories: Accumulates calories consumption during exercise, max value is 9999 cal. • Pulse: Display pulse rate.
FITNESS TIPS Consult your physician Before using this product, please consult your personal physician for a complete physical examination. Your doctor should approve frequent and strenuous exercise. If any discomfort should result from your use of this product, stop exercising and consult your doctor. Proper usage of this product is essential. Please read your manual carefully before exercising. Please keep all children away from the equipment during use and when equipment is unattended.
Exercising in your target zone How fast should your heart beat during aerobic exercise? Fast enough to reach and stay in its “target zone”, a range of beats per minute that is largely determined by our age and physical condition. To determine your target zone, consult the chart we provide. Warming cool down A successful exercise program consists of a warm-up, aerobic exercise, and a cool-down. Do the entire program at least two or preferably three times a week, resting for a day between workouts.
Side stretches Open your arms to the side and continue lifting them until they are over your head. Reach your right arm as far upward toward the ceiling as you can for one count. Feel the stretch up your right side. Repeat this action with your left arm. Quadriceps stretch With one hand against a wall for balance, reach behind you and pull your right foot up. Bring your heels as close to your buttocks as possible. Hold for 15 counts and repeat with left foot up.
Calf/Achilles stretch Lean against a wall with your left leg in front of the right and your arms forward. Keep your right leg straight and the left foot on the floor. Then bend the left leg and lean forward by moving your hips toward the wall. Hold, then repeat on the other side for 15 counts. Aerobic exercise Aerobic exercise is any sustained activity that sends oxygen to your muscles via your heart and lungs—your body’s most important muscle.
PARTS LIST KEY NO.
IMPEX INC. LIMITED WARRANTY IMPEX Inc. ("IMPEX") warrants this product to be free from defects in workmanship and material, under normal use and service conditions, for a period of two years on the Frame from the date of purchase. This warranty extends only to the original purchaser. IMPEX's obligation under this Warranty is limited to replacing or repairing, at IMPEX's option. All returns must be pre-authorized by IMPEX.