P CORDLESS Model: IM200 F18 Part No. 901000 18 Gauge Finish Nailer 18 GAUGE CORDLESS FINISH NAILER IMPORTANT! DO NOT DESTROY OPERATING MANUAL It is the customer's responsibility to have all operators and service personnel read and understand this manual. Printed in U.S.A. © 2001 Illinois Tool Works, Inc. 901070-2 10/01 www.paslode.
Contents Subject Page Introduction and Warranty ............................................... 2 An Overview of TrimMaster18™ Finish Nailer ............... 3 Safety Instructions ........................................................... 4 Battery and Charger ........................................................ 7 Fuel Cell and Metering Valve .......................................... 9 Preparing TrimMaster 18™ Finish Nailer for Use ......... 12 TrimMaster 18™ Finish Nailer Operation .................
Introduction and Warranty TrimMaster 18™ Finish Nailer Operating Manual This manual is intended to acquaint you with the Paslode Cordless 18 Finish Nailer. Unlike other power fastening tools, the Cordless 18 Finish Nailer is powered by an internal combustion linear motor. In simpler terms, your Cordless 18 Finish Nailer is powered by a motor similar to the one that powers an automobile.
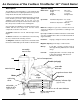
An Overview of the Cordless TrimMaster 18™ Finish Nailer Description Specifications The TrimMaster 18™ Finish nailer is a self-contained, fully portable nailer that uses liquid hydrocarbon fuel to power a unique linear drive internal combustion motor. In order for you to fully understand the information contained in this manual, you need a basic understanding of the TrimMaster 18™ Finish nailer.
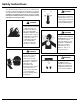
Safety Instructions The following safety instructions have been included in this booklet to provide you with basic information necessary for safe operation of the TrimMaster 18™ Finish Nailer. DO NOT ATTEMPT TO OPERATE THIS TOOL UNTIL YOU HAVE READ AND UNDERSTAND ALL SAFETY PRECAUTIONS AND MANUAL INSTRUCTIONS. DANGER The TrimMaster 18™ Finish Nailer is an internal combustion device. It produces hot exhaust gases that may ignite flammable materials.
Safety Instructions WARNING Always wear EYE and EAR safety gear when working with or in the vicinity of the TrimMaster 18™ Finish Nailer. 7. NEVER OPERATE THE TOOL WITH THE WORK CONTACTING ELEMENT REMOVED OR DISABLED. This device helps reduce the possibility of accidental fastener discharge by preventing the tool from operating until it is completely against the work surface. NEVER operate the tool if the work contacting element is not working properly. 8.
Safety Instructions 12. NEVER DRIVE FASTENERS INTO AREAS WITH CONCEALED HAZARDS. Always check the area behind the work surface for electrical wiring, gas pipes, water pipes, sewer drains or other potential hazards. 13. ALWAYS MAINTAIN SECURE AND UNOBSTRUCTED FOOTING WHEN ON LADDERS, PLATFORMS OR OTHER HIGH LOCATIONS. 15. PROPERLY STORE FUEL CELL. WARNING Always store fuel cells where they will not be exposed to an open flame, sparks or temperatures above 120° F (49° C).
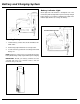
Battery and Charging System Battery and Charging System Charging Instructions The Paslode Cordless tools come with a rechargeable battery and its own charging system. This charging system is the only one that will work with the Pasldoe batteries (either round or oval ). The first step in preparing a new tool for operation is to fully charge the battery. New batteries are shipped discharged and must be charged prior to first use.
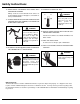
Battery and Charging System Battery Indicator Light On the right side of the handle is a small plastic lens. This is the battery indicator light. When you insert a fully-charged battery into the tool, you will see a blinking green light. If the indicator light blinks red, recharge the battery. P BATTERY INDICATOR LIGHT P Inserting Battery 1. Load the battery, contacts first, into the TrimMaster 18™ Finish nailer. 2. Push battery fully forward into its locked position. 3.
Fuel Cell and Metering Valve Fuel Cell DANGER EXPLOSION/FIRE HAZARD Read ALL safety instructions before using or handling the fuel cell. Failure to follow ALL instructions may result in explosion or fire. This may cause severe personal injuries or property damage. Keep the fuel cell away from heat, sparks and open flame. There is a second container inside the fuel cell. The inner container holds the fuel.
Fuel Cell and Metering Valve Installing Metering Valve to Fuel Cell Prior to Use To install the metering valve to a fuel cell: 1. Press downward on the front side of the valve (stem side) until it seats. 2. Press downward on the rear side of the valve until it seats. 3. The valve is now completely seated onto the fuel can and can be inserted into the tool. 1. 2. 3. NOTE: Impulse fuel cell are marked with expiration date on the bottom of the can. For maximum performance use fuel before expiration date.
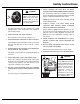
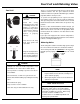
Fuel Cell and Metering Valve Inserting Fuel Cell Inserting the metering valve/fuel cell assembly into the TrimMaster 18™ Finish Nailer is very simple. To begin, press up at the bottom of the actuator cover and pivot outward to open. The cover will swing out of the way. ➔ 2. PULL OUT Yellow Adapter Fuel Cell ➔ P 1. PRESS UP As you slide the metering valve/fuel cell assembly into the TrimMaster 18™ Finish Nailer, you will notice a yellow adapter at the top of the cylinder pocket.
Preparing the TrimMaster 18™ Finish Nailer for Use Fasteners Impulse® and Outdoor Weather The TrimMaster 18™ Finish Nailer drives Paslode ® 18 gauge fasteners designed to be used with the tool. The use of fasteners that do not meet Paslode standards could cause tool damage and will void all warranty claims. Use the TrimMaster 18™ Finish Nailer outdoors, in dry weather, when the nailer, fuel cell, and battery are between 20°F (-7°C) and 120°F (49°C).
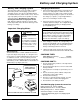
TrimMaster 18™ Finish Nailer Operation Operation: P PRESS WORK – CONTACTING ELEMENT AGAINST THE WORK SURFACE. 120 100 80 Fan motor starts, fuel is injected into combustion chamber and mixed with air by the fan. ➔ 100 80 Depth of Drive Adjustment 120 P SQUEEZE TRIGGER Spark plug ignites the fuel/air mixture driving the piston assembly down on the fastener. Turn adjustment wheel in either direction Remove the battery before adjusting the depth of drive.
Fasteners and Applications Applications The TrimMaster 18™ Finish Nailer is suited for a variety of applications. These include securing door and window casings; attaching baseboards where walls meet floors; attaching moldings where walls meet ceilings; securing paneling; securing chair rails, picture molding and other decorative trim. Fasteners The TrimMaster 18™ Finish Nailer drives Paslode 18 Gauge finish nails. Fasteners are collated into strips of 50 for easy loading.
Servicing Restrict Field Service to the Following CHECKING THE ENERGY LEVEL OF THE BATTERY RECHARGING THE BATTERY CHECKING THE FUEL CELL AND METERING VALVE REPLACING THE FUEL CELL CLEANING/REPLACING THE AIR FILTER CLEARING A JAM Fuel Cell Check If the Impulse® 18 Ga. Brad Nailer's fan operates and the indicator light is green, but the tool will not cycle or does not drive fasteners completely, check the fuel cell.
Servicing Air Filter When you get home: Open the cover by pressing slightly above the adapter and pivoting the cover open. The air filter simply lifts out. 1. Tap the filter GENTLY to remove any dust. Check and clean the air filter every two days. Soap and water restores the filter to a "like new" condition. 2. Wipe yourTrimMaster 18™ Finish Nailer with a clean, soft cloth. Place the battery in its charger if it needs charging as indicated by the red charge light on the handle. 3.
Troubleshooting Preparing Tool for Operation - Battery/Charger Problems SYMPTOM Battery does not appear to accept charge when battery is plugged into the charger. Charger gets hot, makes excessively loud noise, or smokes during charging cycle. Charger cord or wall plug gets hot. POSSIBLE PROBLEMS SERVICE Inoperative indicator lights on charger, or defective charger. Try battery in tool after a full charge cycle. If tools indicator light is red, charger not working properly.
Troubleshooting Normal Stage of Operation SYMPTOM Tool operates properly, but fasteners do not drive fully. POSSIBLE PROBLEMS SERVICE Work-contacting element requires adjustment. Adjust work contacting element. Fuel cell is low. Check fuel cell and replace as required. There may be loss of seal in combustion chamber. Press work contacting element against workpiece for one minute. Pull trigger. If fastener does not drive, there is a leak that requires service.
Model Number PART NO. IM200 F18 901000 PASLODE MODEL NUMBER DESIGNATION The model number of each Paslode tool contains information about the tool and the fasteners that are used with it. The following example illustrates the information contained in this tool model number. IM 200 F18 Finish Nailer (18ga) IMPULSE® Technology Maximum fastener length, in inches, that can be used with tool. (2.0") Copyright © 2001 Illinois Tool Works, Inc.