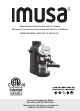
Please Read and Save this Use and Care Manual Por Favor Lea y Guarde este Instructivo Antes de Usar el Producto MODEL/MODELO: GAU-18217 & GAU-18218 Espresso & Cappuccino Maker USE AND CARE INSTRUCTIONS Máquina para Café Expresso y Capuccino ESPRESSO & CAPPUCCINO MAKERDE INSTRUCCIONES MANUAL USE AND CARE INSTRUCTIONS 1
Table of Contents Page Important Safeguards...........................................................................................................................3 Polarized Plug.......................................................................................................................................4 Extension Cord Use .............................................................................................................................4 Electric Power ................................
IMPORTANT SAFEGUARDS When using electrical appliances, basic safety precautions should always be followed, including the following: • Read all instructions before use. • Do not touch hot surfaces. Use handles or knobs. • To protect against electric shock, do not immerse cord, plug, variable temperature control, or the appliance in water or any other liquid. • Close supervision is necessary when any appliance is used near children. • Unplug from outlet when not in use and before cleaning.
POLARIZED PLUG This appliance has a polarized plug (one blade is wider than the other). To reduce the risk of electric shock, this plug will fit into a polarized outlet only one way. If the plug does not fit correctly into the outlet, flip it. If it still does not fit, contact a qualified electrician. Do not attempt to defeat this safety feature by modifying the plug in any way.
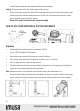
LEARNING ABOUT YOUR ESPRESSO & CAPPUCCINO MAKER Product may vary slightly from what is illustrated. 1. Water Reservoir Lid 2. Function Knob 3. Steam Nozzle/ Frother 4. Removable Drip Tray 5. Measuring Scoop 6. Filter Basket 7. Filter Holder 8. Glass Carafe with Lid 9.
CAUTION: PRESSURE In order to avoid possible burns to body parts and/or other injury from hot steam or water, NEVER open the water reservoir lid while your coffeemaker is turned on or as long as there is pressure in the water reservoir. In order to check if the appliance is under pressure, proceed as follows: 1. Turn the function knob to PULSE and unplug the unit. 2. To release the pressure, hold a carafe with water under the steam nozzle and immerse the frother in the water.
BEFORE FIRST USE • Remove all packing material and stickers from the product and save instruction manual. Caution: Tear up all plastic bags as they can pose a risk to children. • Cut and remove tie wrap located between the electric plug blades. • Before using your new appliance, wipe the body of the appliance with a damp cloth. • Wash all the removable parts with warm sudsy water. Rinse and dry thoroughly. • Place the appliance on a flat stable surface.
and filter basket. Rinse the filter basket and filter holder with water. Caution: The metal parts of the filter holder might still be very hot. • Remove the water reservoir lid. Discard the remaining water through the top opening of the water tank by turning the machine upside down over the sink. Do not immerse the machine in water. Screw the water reservoir lid back in place. Discard the water from the carafe, wash thoroughly.
• Place filter basket inside filter holder and into the brewing head by pushing it upward so that the handle of the filter holder is aligned with the word “INSERT” on the top of the brewing head. • Turn the handle counter-clockwise until aligned with the word “LOCK”. • Place the empty glass carafe with lid on drip tray directly under the brewing head. • Plug into a standard 120 Volt AC outlet. • • Rotate the function knob to the “cup” symbol ( ), which begins the brewing process.
• Pour the water from the carafe into the reservoir. • Close the water reservoir lid by turning clockwise and ensure it is closed properly and tightly so steam does not escape during the brewing process. Note: Always be sure the lid is tightened securely before turning the coffeemaker to on. • Remove the filter basket and holder from the appliance by turning clockwise.
CARE AND CLEANING This product contains no user serviceable parts. • Unplug the cord and wait for the appliance to cool completely before cleaning. • After the pressure has been released, remove the water reservoir lid. Discard the remaining water through the top opening of the water tank by turning the machine upside down over the sink. Do not immerse the machine in water. Screw the water reservoir lid back in place.
Suggested cleaning intervals Type of water Frequency Soft water Every 80 brew cycles Hard water Every 40 brew cycles Mineral deposits left by hard water can clog your appliance. • Make sure the control knob is in the OFF position. • Raise the frothing pitcher filled ¾ of the way with hot water into the frother for 15 seconds. This will clear any milk residue from the steam nozzle and frother. Discard the hot water. • Remove the water reservoir lid by turning it counter-clockwise.
• Discard the water from frothing pitcher. Note: If the frother is not under the water surface, splattering will occur. • Turn the function knob back to the “cup” symbol ( • When brewing stops, turn the function knob to OFF. • Unplug unit and allow the coffeemaker to cool. ), and finish the brewing process. Caution: Do not remove the water reservoir lid until pressure is completely relieved. Follow the “CAUTION: PRESSURE” procedures.
TROUBLESHOOTING GUIDE Problem The coffee is spill out from the gap of the funnel The coffee handle could not be switched to the lock position. The machine works normally when making coffee but couldn’t make the milk foam. Cause anaysis Solution There are sundries inside the seal ring. Clean the sundries inside the seal ring. The coffee powder is too fine. Please replace it with the coffee powder which is relevantly coarse. The coffee powder has been compressed too tightly.
NEED HELP? For service, repairs, or any questions regarding your appliance, call the number on the last page of this manual. Please DO NOT return the product to the place of purchase. Also, please DO NOT mail product back to manufacturer. You may also want to consult the website listed on the last page of this manual.
Índice Página Instrucciones Importantes de Seguridad..............................................................................................19 Enchufe Polarizado..............................................................................................................................20 Uso de un Cable de Extensión..............................................................................................................20 Cable Eléctrico...........................................................
INSTRUCCIONES IMPORTANTES DE SEGURIDAD Cuando se utilizan electrodomésticos, siempre se deben respetar ciertas medidas de seguridad incluyendo las siguientes: • Lea todas las instrucciones antes de utilizar el producto. • No toque las superficies calientes. Utilice las asas o las perillas. • Con el objetivo de disminuir el riesgo de una descarga eléctrica, no sumerja el cable, el enchufe, el control de temperatura variable o la base del aparato en agua ni en ningún otro líquido.
ENCHUFE POLARIZADO Este aparato tiene un enchufe polarizado (un contacto es más ancho que el otro). Para reducir el riesgo de choque eléctrico, este enchufe entra en un contacto polarizado de una sola manera. Si el enchufe no entra correctamente, inviértalo. Si aún así no encaja, busque la ayuda de un electricista calificado. No intente hacerle ninguna modificación al enchufe.
APRENDA ACERCA DE SU MÁQUINA PARA CAFÉ EXPRESO Y CAPUCCINO El producto puede variar ligeramente al ilustrado. 1. 2. 3. 4. 5. 6. 7. 8. 9.
ADVERTENCIA: PRESIÓN Con el fin de evitar posibles quemaduras en las partes del cuerpo y / u otras lesiones debido al vapor y agua caliente, nunca abra la tapa del tanque de agua mientras que la misma está encendida o existe presión en el tanque de agua. Con el fin de comprobar si el aparato se encuentra presurizado, proceda de la siguiente manera: 1. Gire la perilla de función a la posición PAUSE y desconecte la cafetera. 2.
ANTES DE UTILIZAR POR PRIMERA VEZ • Retire todo el material de empaque y las calcomanías adheridas al producto y conserve el manual de instrucciones. Advertencia: Rompa todas las bolsas de plástico ya que pueden representar un riesgo para los niños. • Corte y retire la banda plástica que pasa por los contactos del enchufe. • Antes de usar la máquina, limpie toda la superficie de la misma con un paño húmedo. • Lave todas las partes removibles con agua tibia y jabón. Enjuague y seque.
hasta que la cafetera se haya enfriado. Vea la sección CUIDADO: PRESIÓN. • Después que la cafetera se haya enfriado y toda la presión ha sido liberada, saque el soporte del filtro y el filtro. Enjuague a ambos con agua. Advertencia: Las partes metálicas del soporte del filtro podrían estar muy calientes. Puede enfriar estas partes colocándolas en agua fría. • Retire la tapa del tanque de agua.
COMO USAR SU MÁQUINA PARA HACER CAFÉ EXPRESO Y CAPUCCINO Expreso • Asegúrese que la perilla de función esté en la posición de PAUSE. • Encienda el interruptor ON / OFF en la posición de ON. • Abra la tapa del tanque de agua girando en sentido contrario a las agujas del reloj. Coloque agua fría y fresca dentro de la jarra hasta el nivel 2 o 4 marcado en la jarra. • Coloque el agua que está en la jarra dentro del tanque de agua.
colado. • Enchufe en un tomacorriente de 120 Voltios de CA. • Gire la perilla de función a la posición del símbolo de “taza” ( ), para que comience el proceso de colado. La luz indicadora se prenderá para indicarle que la cafetera está prendida. • Luego de aproximadamente 2 a 3 minutos, el café expreso comenzará a caer en la jarra. Advertencia: No abra la tapa del tanque de agua ni remueva el soporte del filtro durante el proceso de colado. Puede sufrir quemaduras.
(remover) que se encuentra arriba del cabezal de colado. • Gire el asa en sentido contrario a las agujas del reloj hasta que este alineada con la palabra “LOCK”. • Coloque la jarra con su tapa sobre la bandeja para goteo justo debajo de la abertura del cabezal de colado. • Enchufe en un tomacorriente de 120 Voltios de CA. • Gire la perilla de función a la posición del símbolo de “taza” ( ), para que comience el proceso de colado.
CUIDADO Y LIMPIEZA Este producto no contiene piezas reparables por el consumidor. • Desconecte el cable del tomacorriente. Espere que la cafetera se enfríe por completo antes de limpiarla. • Después de que la presión se ha liberado, retire la tapa del tanque de agua. Deseche el agua restante a través de la abertura superior del tanque de agua girando la máquina boca abajo sobre el fregadero. No sumerja la máquina en agua. Coloque otra vez la tapa en su lugar.
Frecuencia de tiempos de limpieza Tipo de Agua Frecuencia Agua suave Cada 80 ciclos de colado Agua dura Cada 40 ciclos de colado Los depósitos de minerales provenientes del agua dura pueden obstruir su cafetera. • Asegúrese de que la perilla de control esté en la posición de PAUSA. • Coloque durante 15 segundos una jarra de acero inoxidable (no incluida) con agua caliente hasta ¾ de su capacidad, debajo de la boquilla de vapor y el vaporizador.
inoxidable hasta ¾ de su capacidad llena de agua fría debajo de la boquilla de vapor. • El vaporizador debe estar justo debajo de la superficie del agua. Gire la perilla de función a la posición del símbolo de “vapor” ( ). Mueva la jarra de acero inoxidable con el agua en forma circular por 5 segundos. Esto sirve para limpiar cualquier resto adicional de leche que pudiera haber quedado en la boquilla de vapor. • Descarte el agua de la jarra de acero inoxidable.
GUÍA SOLUCIÓN DE PROBLEMAS Problema El café se derrama por la abertura del embudo. Causa Hay artículos diversos dentro del anillo de sello. El polvo de café es demasiado fino. El polvo de café ha sido comprimido demasiado fuerte. El anillo de cierre esta desgastado. El mango del café no se pudo cambiar a la posición de bloqueo. La máquina funciona normalmente cuando se hace café, pero no se puede hacer espuma de leche. La cantidad de polvo de café ha superado la escala máxima del embudo.
¿NECESITA AYUDA? Para servicio, reparaciones o preguntas relacionadas al producto, llame al número que se encuentra en la parte de atrás de este manual. Por favor, NO devuelva el producto al fabricante. Adicionalmente, puede consultar la página de internet que se encuentra en la parte de atrás de este manual.
ESPRESSO & CAPPUCCINO MAKER 800W 120 V 60Hz MÁQUINA PARA CAFÉ ESPRESSO Y CAPUCCCINO INSTRUCTION MANUAL MANUAL DE INSTRUCCIONES If you have any questions, please contact us at: Para mayor información puede contactarnos a: IMUSA USA, LLC 6000 NW 97TH AVENUE, UNIT 26 Doral, FL 33178 1-800-850-2501 customerserviceimusa@groupeseb.com www.imusausa.