
User Manual


ESPRESSO & CAPPUCCINO MAKER
USE AND CARE INSTRUCTIONS
7
BEFORE FIRST USE
• Remove all packing material and stickers from the product and save instruction manual.
Caution: Tear up all plastic bags as they can pose a risk to children.
• Cut and remove tie wrap located between the electric plug blades.
• Before using your new appliance, wipe the body of the appliance with a damp cloth.
• Wash all the removable parts with warm sudsy water. Rinse and dry thoroughly.
• Place the appliance on a flat stable surface.
Caution: Because some countertop finishes are more sensitive than others, use care not to place
espresso maker on surfaces where heat may cause damage.
• Make sure the ON/OFF Switch is in the OFF position.
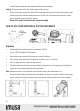
• Remove the water reservoir lid by turning it counter-clockwise.
• Fill the glass carafe with fresh cold water up to the 4 cup mark.
• Pour the water from the carafe into the reservoir.
• Close the water reservoir lid by turning clockwise and ensure it is closed properly and tightly so
steam does not escape during the brewing process.
Note: Always be sure the lid is securely tightened before turning the coffeemaker on.
• Place the filter basket inside the filter holder and into the brewing head.
• Place the empty glass carafe with lid on drip tray directly under the brewing head.
• Plug into a standard 120 Volt AC outlet.
• Rotate the function knob tto the “cup” symbol ( ), which begins the brewing process. The
light indicates that the coffeemaker is on.
• Brew the water through the appliance without adding coffee grounds. This removes any dust or
residue that may remain in the system from the manufacturing process.
• The water will start to be released after a few minutes.
• When brewing stops, turn the function knob to RELEASE PRESSURE.
• Unplug unit and allow the coffeemaker to cool.
Caution: Do not remove the water reservoir lid until pressure is completely released. Follow the
“CAUTION: PRESSURE” procedures.
Caution: Do not remove the filter holder at any time while the coffeemaker is under pressure or until the
coffeemaker has cooled down. Follow the “CAUTION: PRESSURE” procedures.
• After the coffeemaker has cooled down and all the pressure has been release, remove the filter holder
Rotate the function knob tto the “cup” symbol ( ), which begins the brewing process. The