
WeatherBoxForPiCam_UserGuide_v4


In Nature Robotics Ltd. www.innaturerobotics.com
The WeatherBox is a plastic weatherproof housing for the Raspberry Pi version 2 (v2)
camera module. It is intended for use on Autonomous Surface Vessels (ASVs), but
could be used in any application where there is a need to take pictures outdoors with
the Raspberry Pi camera and a need to connect the camera to other electronics such as
a Raspberry Pi computer in a separate enclosure.
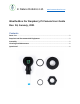
Parts List
1. WeatherBox Camera Enclosure (135 mm x 89 mm x 68 mm) with 35 mm
diameter threaded stem.
2. 89 mm diameter threaded locking collar.
3. Hex locking nut for attachment to threaded stem of camera enclosure.
4. Octagonal 2 mm thick transparent plexiglass plate.
5. 43 mm x 5 mm rubber o-ring for mounting underneath the plexiglass plate.
6. 36 mm x 3.5 mm rubber o-ring for mounting on the flange at the top of the
threaded stem.
7. (WeatherBox-CAM models only) Raspberry Pi v2 Camera Module and ribbon
cable.
Required and Recommended Equipment
1. For the base WeatherBox model (without a camera included) a Raspberry Pi v2
Camera Module with ribbon cable is required.
2. Electronics enclosure with 36 mm diameter hole for housing Raspberry Pi or
similar processor equipment. Desiccant for the enclosure is recommended to
protect against humidity and condensation.
3. Silicone grease (ex: Trident silicone grease) is recommended for application to
the rubber o-rings prior to installation.
4. Power drill with bit(s) for creating a 35 mm diameter hole in the desired
electronics enclosure.
Assembly
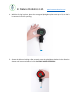
1. With the ribbon cable connected to the Raspberry Pi v2 Camera Module, thread the
ribbon cable through the large, front opening of the Weather Box Camera Enclosure,
so that the ribbon cable emerges from the bottom of the threaded stem.
2. Make sure that the camera lens is facing outward and gently snap the 4 holes of the
Camera Module circuit board over the 4 small (2 mm diameter) mounting posts. Be
careful not to press too hard. The erasure end of a pencil or similar can be useful for
pressing in the circuit board at the corners to get it securely in place.