BPBIO250 User’s Manual
Please note the important information below before reading this manual. Warning Failure to observe these precautions can result in personal injury or equipment damage. Caution Failure to comply with safety precautions can damage the equipment. Note Referring to notes can help improve equipment use. InBody Co., Ltd. [HEAD OFFICE] InBody Bldg., 625, Eonju-ro, Gangnam-gu, Seoul 06106 KOREA TEL: +82-2-501-3939 FAX: +82-2-578-5669 Website: https://www.inbody.com E-mail: info@inbody.com ©2019 InBody Co., Ltd.
Representative & Sponsor Information InBody Europe B.V. Gyroscoopweg 122, 1042 AZ, Amsterdam, The Netherlands TEL: +31 (0)20 238 6080 FAX: +31 (0)6 5734 1858 Website: https://nl.inbody.com E-mail: info.eu@inbody.com Australian Sponsor. [AUSTRALIA] Emergo AUSTRALIA. Level 20, Tower II, Darling Park, 201 Sussex Street, Sydney, NSW 2000, AUSTRALIA TEL: +61-2-9006-1662 FAX: +61-2-9006-1010 Website: https://www.emergogroup.com E-mail: Sponsor@emergogroup.
BPBIO250 User’s Manual Contents I. Product Introduction 4 II. Blood pressure measurement A. Non-Invasive Pressure Measurment B. Precautions Before Measurement 8 9 C. Preparation For Measurement 12 D. Checking Blood Pressure Records 16 E. Check Saved Blood Pressure 32 F. User Settings 34 III. Storage 43 IV. Troubleshooting A. Error Message 44 B. Troubleshooting 45 V. Others A. Optional Equipment 46 B. Safety Information 46 C. Product Classification 47 D.
I. Product Introduction - This product is a professional automatic blood pressure monitor used by medical professionals. 5 measurement modes can be selected according to various medical environments. Rechargeable batteries can be used without replacing batteries. The User can measure blood pressure even in dark environments. - This blood pressure monitor has cuffs of various size.
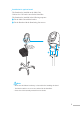
* Main Unit Parts Handle [M] Button [MODE] Button Cuff Rack AC Adapter Connection [START/STOP] Button Cuff Connection [▼] Button [▲] Button Battery Cover 7
* Cuff Parts Checking mark for the available Arm Circumference Range Indicator Artery Indicator When Worn Air Inlet (To Cuff Connector) Cuff Tube * Display Parts Memory Mode Sequence Number Date Time Bluetooth AC Adapter Connection Battery Level Indicator Mute Measurement Mode Blood Pressure Cuff Status Detection Movement Detection Irregular Pulse Detection Pressurization Value 8 Pulse Detection Pulse
* Installation for optional stand ∙ The Stand can be installed on the Main Unit. ∙ Various size Cuff can be stored in the Stand Box. ∙ The Stand can be installed in the following sequence. ❶ Fix the Main Unit with the bracket. ❷ Fix the Bracket with the Stand using four screws. ❶ ❷ Note ∙ Make sure the lithium-ion battery is inserted before installing the Stand. ∙ The Bracket and six set screws are enclosed in the Stand Box. ∙ Please check the assembly manual for more details.
II. Blood Pressure Measurement Method A. Non-Invasive Blood Pressure Measurement Principles Oscillometric method Blood pressure is a measurement of changes in the pressure on the blood vessels. Blood pressure can be measured by direct or indirect measurement. This equipment supports indirect measurement using a cuff.
B. Precautions Before Measurement Warning 1. Do not use blood pressure monitor near Magnetic Resonance Imaging (MRI) equipment. If MRI is to be performed, remove the Cuff from the patient. 2. Do not use the blood pressure monitor near the equipment that generates noise, such as equipments which uses frequencies or electric scalpel. Otherwise, it may cause failure and malfunction. 3. Do not use blood pressure monitor together with the defibrillator. Otherwise, it may cause an electric shock. 4.
20. Do not give strong impact to the main unit. Otherwise, it may cause failure and malfunction. 21. There is a possibility of death due to injury or suffocation if the air tube is wrapped around the neck. Caution 1. Do not use the blood pressure monitor without wrapping the Cuff on the arm. 2. Do not use or store the blood pressure monitor in an environment where the Cuff and the Air Tube are pressed by heavy objects or the Cuff and the Air Tube can be pressed. 3.
15. Repair and inspection can be done only by the authorized staff of InBody Co., Ltd. For repair and inspection, please contact InBody Co., Ltd. 16. Operation of a radio equipment may interfere with the measurement. 17. Please note the following when using the Bluetooth function of BPBIO250. - This product is compatible with Android 4.3(Jellybean) with BLE or newer and iPhone 4S/iOS7 or newer. - Connect only the devices or programs provided by the InBody.
C. Preparation For Measurement (1) Inserting/replacing lithium-ion battery ❶ Remove the battery cover on the bottom of the product. ❷ Insert the lithium-ion battery in the right direction. ❸ Close the battery cover. Note ∙ The lithium-ion battery is provided as the basic component of BPBIO250. AA size battery can also be used if a lithium-ion battery is unavailable. Caution ∙ Do not install batteries with wet hands.
(2) Inserting/replacing the AA batteries ❶ Remove the battery cover on the bottom of the product. ❷ Insert four AA size batteries in the right direction. ❸ Close the battery cover. Note ∙ AA batteries and lithium-ion batteries cannot be used at the same time. Caution ∙ Do not install batteries with wet hands. ∙ Make sure that the polarities (+) and (-) are correct when batteries are installed. ∙ Use 1.5V AA-size alkaline or manganese batteries. ∙ Do not use new and used batteries together.
(3) Using the dedicated AC adapter ❶ Connect the dedicated AC Adapter Connector to the AC Adapter Connection of the Main Unit of the blood pressure monitor. ❷ Connect the dedicated AC adapter to the power outlet. Warning ∙ Do not connect or disconnect the AC Adapter with wet hands. ∙ Do not put heavy objects above the AC Aapter cable. ∙ Do not use the AC Adapter if it is damaged. Caution ∙ Plug the AC Adapter into the wall outlet securely.
(4) Connecting cuff ❶ Insert the Air Inlet of the Cuff into the Cuff Connection on the Main Unit. ❷ Press lightly as shown in A and turn it clock-wist as shown in B to tighten the connection. B A Note ∙ To remove the cuff, press the air inlet of the cuff slightly in the direction of the arrow A and turn it in the opposite direction of the arrow B.
D. Blood Pressure Measurement (1) Wearing the Cuff ❶ Wrap the Cuff around the arm, about 2-3 cm above the elbow. ❷ Make sure that the Index (▲) on the Cuff is within the RANGE bar, and replace the cuff with the proper size if the index deviates from the RANGE. ❸ Place the Cuff so that the ARTERY(▼) is on the arterial position. INDEX(▲) RANGE Cuff RY TE AR 2~3cm ❹ Slightly loosen the Cuff where you can fit one finger.
(3) Turning the Power On/Off - The blood pressure monitor will be turned on by pressing any of the five buttons on the Main Unit. - The blood pressure monitor will be turned off by pressing and holding the [START/STOP] button. - BPBIO250 provides power saving function If there is no operation within 5 minutes, the blood pressure monitor automatically turns off. The power is turned on by pressing and holding the button. The power is turned off by pressing and holding the button.
(5) Charging the Lithium-Ion Batteries - Lithium-Ion Batteries can be charged with Dedicated AC Adapter. - When the Lithium-Ion Batteries are drained, charge it (4 hours for full charge) before using it. ❶ Make sure the Lithium-Ion Batteries are inserted in the Main Unit. ❷ Connect the dedicated AC Adapter Connector to the AC Adapter Connection of the Main Unit. ❸ Plug the Dedicated AC Adapter to the power outlet.
(7) Pressurization Value Setting - The user can set the desired pressure value by pressing the [▼] or [▲] button before measuring blood pressure. - The pressure value can be set from Auto, 220, 250 or 280. Changing the pressure value by pressing the [▼] or [▲] button. : Pressurizing automatically : Pressurizing to 220 mmHg : Pressurizing to 250 mmHg : Pressurizing to 280 mmHg Caution ∙ Do not pressurize more than necessary. ∙ Pressurizing more than necessary may cause pains.
(8) Five measurement modes - Five measurement modes can be selected according to various medical environments in BPBIO250. - The measurement mode can be checked in the upper left corner of the LCD screen. - Each measurement mode can be used in the following situations.
* Changing Measurement Mode - Measurement mode can be changed by pressing the [MODE] button. Changing measurement mode by pressing the [MODE] button - Measurement Mode Changes in Sequence: NORMAL → AUSCULT → CYCLE → CYCLE RANGE → CYCLE HIDE → NORMAL.
* NORMAL Mode - NORMAL Mode is used for normal blood pressure measurement. ❶ Make sure that the Cuff is correctly worn and the measurement posture is correct again. ❷ Press the [START/STOP] button of the blood pressure monitor to start blood pressure measurement. ❸ When pressurization starts and the pressure reaches a certain extent, the measurement begins while air is being exhausted slowly.
* AUSCULT Mode This mode is used when measuring blood pressure with stethoscope. This mode can replace aneroid or mercury blood pressure monitor. The systolic and diastolic blood pressure can be recorded through marking during exhaust. Manual pressurization is possible during exhaust. ❶ Make sure that the Cuff is worn correctly and the posture is correct. ❷ Place the stethoscope in the arm artery. ❸ Set to AUSCULT Mode by pressing the [MODE] button.
Note ∙ Month / Day Hour: Minute is displayed only when date and time are set. ∙ For more information on how to set the date and time, refer to “F. User Settings”. ∙ AUSCULT mode does not automatically measure blood pressure. ∙ AUSCULT mode does not detect heartbeats. ∙ In AUSCULT mode, pulse is not displayed. ∙ In AUSCULT mode, motion and irregular pulse wave are not detected. ∙ If no marking is performed, the measurement is automatically terminated at a certain pressure or less.
* CYCLE Mode In CYCLE mode, the patient can measure blood pressure repeatedly. The number of measurements and standby time can be set. If the measurement count is set to 3 times and the standby time is set to 60 seconds, the operation in the CYCLE mode will be performed shown below.
Start Pressurize Exhaust 1st Measurement Completed Exhaust Last Measurement Completed Setting Mode Start Reducing Standby Time Start and Finish 2nd Measurement Start Pressurize Note ∙ The next measurement can be started immediately by pressing the [START / STOP] button when the standby time is reduced. ∙ All remaining measurements can be canceled during measurement by pressing the [START/STOP] button.
- In the CYCLE Mode, the previous measurement results can be checked. - If all measurements are completed for the set number of times, the previous measurement result can be checked by pressing the [▼] or [▲] button. Measurement Completed Check the Previous Measurements. Note ∙ The previous measurements can only be checked when all the measurements have been completed for the set number of times.
* CYCLE RANGE Mode - In the CYCLE RANGE Mode, the patient can measure his / her blood pressure repeatedly by utilizing the RANGE function. (RANGE function notifies the user when the measured value is out of the average measurement range.) - The previous measurement result can be checked after the measurement is completed. - The RANGE function allows the user to set the expected measurement range of systolic and diastolic blood pressure, respectively.
Note ∙ The RANGE value and the current pressure value will alternately displayed on the screen. ∙ The current number of measurements / the total number of measurements and the standby time are displayed in date and time display field. For more information on how to set the number of measurements, standby time, and RANGE, refer to “F. User Settings”.
* CYCLE HIDE Mode In the CYCLE HIDE mode, the patient can measure his / her blood pressure repeatedly by utilizing the HIDE function. (HIDE function: It does not display measurements on screen.) - The measurement operation is the same as the CYCLE mode. - The measurement result can be checked in the MEMORY Mode after the measurement is completed. ❶ Make sure that the Cuff is correctly worn and the measurement posture is correct again.
(9) Checking Measurement Results ❶ Checking the Blood Pressure Basic Information Measurement Date and Time Measurement Mode Systolic Blood Pressure Diastolic Blood Pressure Pulse Pressurization Value ❷ Checking the Status of the Cuff, Movement, and Irregular Pulse Detection of Cuff Status: The Cuff was loose. Please wear it properly and try again. If the user is wearing thick clothes, please measure after taking them off. Movement Detection: Movement is detected during the measurement.
E. Checking Saved Measurements (MEMORY MODE) (1) Press the [M] button to check the saved measurements. (2) Sequence number and measurement date and time are displayed. (3) Press the [▼] or [▲] button to check the saved results one by one. : Go to Past Measured Results : Go to Recent Measured Results Order Based on the Sequence Date and Time (4) Recorded results in CYCLE RANGE mode are displayed as below. - If the measured value is out of the set range, the measured value will blink.
(5) Press the [M] button again to exit the MEMORY Mode. Note ∙ Up to 99 measurements can be saved. ∙ Press and hold the [▼] or [▲] button to check quickly the past or recent results. ∙ Month / Day Hour: Minute is displayed only when date and time are set. ∙ ‘--’ is displayed if there is no saved blood pressure. ∙ The saved blood pressure measurement value can be deleted. For more information on how to delete the results, refer to “F. User Settings”.
E. User Settings - Press and hold the [MODE] button to set the measurement mode and function. - The settings are displayed - Press the [▼] or [▲] button to change the settings and press the [START/STOP] button to set it. - Press and hold the [MODE] button again to exit the user setup screen. Press the [▼] or [▲] Button to Change the Settings. Press the [START/STOP] Button to Set.
(2) F01: Setting Number of Repeated Counts - The number of repeated measurements can be set in the CYCLE (RANGE, HIDE) mode. ❶ Press and hold the [MODE] button for 3 seconds to enter the User Setting Mode. ❷ Press the [▼] or [▲] button to set . ❸ Press the [START/STOP] button to switch to the repeat count setting. ❹ Press the [▼] or [▲] button to select the number of measurements.
(3) F02: Setting Standby Time - The standby time between the repeated measurements can be set in the CYCLE (RANGE, HIDE) Mode. ❶ Press and hold the [MODE] button for 3 seconds to enter the user settings mode screen. ❷ Press the [▼] or [▲] button to set . ❸ Press the [START/STOP] button to enter the standby time setting. ❹ Press the [▼] or [▲] button to select the standby time.
(4) F03: Setting Systolic Blood Pressure Range - The systolic blood pressure range can be set in the CYCLE RANGE Mode. ❶ Press and hold the [MODE] button for 3 seconds to enter user settings. ❷ Press the [▼] or [▲] button to set . ❸ Press the [START/STOP] button to enter the maximum value (S-H) for systolic blood pressure range settings. ❹ Press the [▼] or [▲] button to select the maximum value for systolic blood pressure range.
(5) F04: Setting Diastolic Blood Pressure Range - The diastolic blood pressure range can be set in the CYCLE RANGE mode. ❶ Press and hold the [MODE] button for 3 seconds to enter user settings mode screen. ❷ Press the [▼] or [▲] button to set . ❸ Press the [START/STOP] button to enter the maximum value (S-H) for diastolic blood pressure range settings. ❹ Press the [▼] or [▲] button to select the maximum value for diastolic blood pressure range.
(6) F05: Setting Mute - If the user doesn't want the sound, it can be muted. ❶ Press and hold the [MODE] button for 3 seconds to enter under settings. ❷ Press the [▼] or [▲] button to set . ❸ Press the [START/STOP] button to enter the sound settings. ❹ Press the [▼] or [▲] button to select the sound ON/OFF. ❺ When the selection is completed, press the [START/STOP] button to complete the setting.
(7) F06: Deleting Memory - The saved blood pressure measurement can be deleted. ❶ Press and hold the [MODE] button for 3 seconds to enter user settings. ❷ Press the [▼] or [▲] button to set . ❸ Press the [START/STOP] button to enter the delete settings. ❹ Press the [▼] or [▲] button to select the No or YES. ❺ When the selection is completed, press the [START/STOP] button to start deleting the memories.
(8) F07: Setting Date and time - The user can set the date and time. ❶ Press and hold the [MODE] button for 3 seconds to enter user settings. ❷ Press the [▼] or [▲] button to set . ❸ Press the [START/STOP] button toenter the Date and Time settings. ❹ Set the clock in the order of year, month, day, hour and minute. (The number being set flashes.
(9) F08 : Setting Fast / Slow Precision measurement - Slow Precision measurement mode ensures the measured results even if there was a disturbance such as the movement of a patient. But, the measurement speed will be slower than a Fast measurement mode. ❶ Press and hold the [MODE] button for 3 seconds to enter user settings. ❷ Press the [▼] or [▲] button to set . ❸ Press the [START/STOP] button to enter the Fast / Slow Precision settings.
III. Storage (1) Keep the blood pressure monitor clean. (2) Wipe the stain off with a smooth and lint free cloth. (3) Keep the cuff on the cuff rack in a flat state. Note ∙ To unfold the cuff, hold the both sides of the cuff and stretch them in the opposite direction of the cuff curl. The BPBIO250 should be transported or stored under the following conditions.
IV. Troubleshooting A. Error Message If a problem is occurred, is displayed in the systolic blood pressure filed and a letter or number appears in the diastolic blood pressure field. Error Reason Fault in pressurization on cuff · Not connected with the cuff · Wearing the cuff, too loosely · Air is leaking from the cuff Measure · Check the cuff connection and how it's worn. · If the air leaks out from the cuff, replace cuff with a new one.
B. Troubleshooting Problem There is no response even the button was pressed. The exhaust is too fast. No sound was heard from the blood pressure monitor. Pressurization is lower or higher than the blood pressure. Cause Measure The lithium-ion batteries or AA batteries are incorrectly inserted Check lithium-ion battery or AA battery polarities and reinstall the batteries to match with ‘+’ and ‘-’ marks.
V. Others A. Optional Equipment - S, L Sized Cuff (S: 17-22 cm only, L: 32-42 cm only) - AA Batteries - Stand B.
Disposal of old Electrical & Electronic Equipment (Application in the European Union and other European countries with separate collection system.) This symbol indicates that this product shall not be treated as household waste. Instead, it shall be handed over to the applicable collection point for the recycling of electrical and electronic equipment.
C. Product Classification - Type of protection against electric shock: Class 2 equipment or Internal power source typed equipment - Level of protection against flooding: General Equipment (No special protection against external water infiltration) - Operation mode: Continuous operation - Level of protection against electric shock: BF-type equipment D.
Operating Environment 10 - 40˚C, 15 - 85% RH, 70 - 106 kPa Storage Environment -10 - 70˚C, 10 - 85% RH, 50 - 106 kPa (No Condensation) Dimension Approx. 122 (W) × 150 (L) × 195 (H) mm Equipment Weight Approx. 958 g Package Weight Approx. 1.5kg Manufacturing Country Republic of Korea (Main unit: Approx. 767 g, Lithium-ion battery: Approx. 47 g, Cuff: Approx. 144 g) Manufacturing Company InBody Co., Ltd. * For purposes of improvement, specifications are subject to change without notice.
E. EMC Declaration This EUT is intended for use in the electromagnetic environment specified below. The customer or the user of the EUT assure that it is used in such an environment.
Conducted disturbances induced by RF fields IEC 61000-4-6 3V 0.15 MHz - 80 MHz 6 V in ISM bands between 0.15 MHz and 80 MHz 80 % AM at 1 kHz 3V 0.15 MHz - 80 MHz 6 V in ISM bands between 0.15 MHz and 80 MHz 80 % AM at 1 kHz Portable and mobile RF communications equipment should be used no closer to any part of the EUT, including cables, than the recommended separation distance calculated from the equation applicable to the frequency of the transmitter. Recommended separation distance: 3.
www.inbody.com ©2019 InBody Co., Ltd. All rights reserved.