Operating Instructions OVEN Contents Installation, 2-3 GB English,1 RS , 11 Positioning Electrical connections Data plate Description of the appliance, 4 Overall view Control panel Start-up and use, 5 Starting the oven How to use the timer Using the cooking timer Clock with Country Style timer The electronic cooking programmer, 6 7OF 627 C RU /HA 7OF 637 C RU /HA 7OF 627 C IX RU /HA 7OF 637 C IX RU /HA 7OFD 610 RU/HA 7OFH 620 RU /HA 7OF 627 C.
Installation ! Before placing your new appliance into operation please read these operating instructions carefully. They contain important information for safe use, for installation and for care of the appliance. ! Please keep these operating instructions for future reference. Pass them on to possible new owners of the appliance. Ventilation To ensure good ventilation, the back panel of the cabinet must be removed.
Electrical connections ! Ovens equipped with a three-pole power supply cable are designed to operate with alternating current at the voltage and frequency indicated on the data plate located on the appliance (see below). Fitting the power supply cable L N 1. Open the terminal board by inserting a screwdriver into the side tabs of the cover. Use the screwdriver as a lever by pushing it down to open the cover (see diagram). 2.
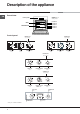
Description of the appliance GB Overall view GUIDES for the sliding racks Control panel position 5 position 4 position 3 position 2 position 1 GRILL DRIPPING PAN Control panel THERMOSTAT indicator light SELECTOR knob TIMER knob * THERMOSTAT indicator light THERMOSTAT knob SELECTOR knob THERMOSTAT indicator light SELECTOR knob COOKING TIMER knob * THERMOSTAT knob THERMOSTAT indicator light SELECTOR knob COUNTRY STYLE TIMER knob * THERMOSTAT knob SELECTOR Knob THERMOSTAT Knob •• •• Indica
Start-up and use ! The first time you use your appliance, heat the empty oven with its door closed at its maximum temperature for at least half an hour. Ensure that the room is well ventilated before switching the oven off and opening the oven door. The appliance may produce a slightly unpleasant odour caused by the burning away of protective substances used during the manufacturing process. Starting the oven 1. Select the desired cooking mode by turning the SELECTOR knob. 2.
The electronic cooking programmer Programming cooking GB ! A cooking mode must be selected before programming can take place. DISPLAY END OF COOKING icon DURATION icon •• •• DECREASE TIME button CLOCK icon TIMER icon INCREASE TIME button SET TIME button Setting the clock ! The clock may be set when the oven is switched off or when it is switched on, provided that a the end time of a cooking cycle has not been programmed previously.
Cooking modes Cooking modes ! A temperature value can be set for all cooking modes between 60°C and Max, except for • BARBECUE (recommended: set only to MAX power level); • GRATIN (recommended: do not exceed 200°C). TRADITIONAL OVEN mode BAKING mode GB The rear heating element and the fan come on, guaranteeing the distribution of heat delicately and uniformly throughout the oven.
GB PIZZA MODE • Use a light aluminium pizza pan. Place it on the rack provided. For a crispy crust, do not use the dripping pan (prevents crust from forming by extending cooking time). • If the pizza has a lot of toppings, we recommend adding the mozzarella cheese on top of the pizza halfway through the cooking process.
Precautions and tips ! The appliance was designed and manufactured in compliance with international safety standards. The following warnings are provided for safety reasons and must be read carefully. General safety • The appliance was designed for domestic use inside the home and is not intended for commercial or industrial use. • The appliance must not be installed outdoors, even in covered areas. It is extremely dangerous to leave the appliance exposed to rain and storms.
Maintenance and care GB Switching the appliance off Replacing the light bulb Disconnect your appliance from the electricity supply before carrying out any work on it. To replace the oven light bulb: 1. Remove the glass cover of the lamp-holder. Cleaning the appliance • The stainless-steel or enamel-coated external parts as well as the rubber seals may be cleaned using a sponge that has been soaked in lukewarm water and neutral soap.
RS
! !
! L N
RS THERMOSTAT indicator light SELECTOR knob •• •• * 14 COOKING TIMER knob * THERMOSTAT knob
!
RS •• •• !
!
RS Программы Традициональный режим Одновременное приготовление ГРИЛЬ Запеканка Пицца Кондитерская выпечка 18 Продукты Вес (кг) Расположение уровней Рекомендуемая температура 3 3 3 3 3 2и4 3 2 2и4 2 2 2и4 2и4 2 2и4 3 4 4 4 3 или 4 4 4 4 4 4 Время нагревания (мин.) 15 15 15 15 15 15 10 10 15 10 10 10 10 10 10 15 5 5 5 5 5 5 5 5 5 200 200 200 180 180 230 180 180 200 180 170 190 180 170 170 200 MAКС. MAКС. MAКС. MAКС. MAКС. MAКС. MAКС. MAКС. MAКС.
!
RS