Operating Instructions OVEN Contents GB English,1 RS 2 wARNINGS, 2 Installation, 3-4 Positioning Electrical connections Data plate Description of the appliance, 5 Overall view Control panel Start-up and use, 6 Starting the oven Assistance Cooking modes,7-8 7OFIM 53 K.A IX 7OFIMS 53K.
Warnings GB • WARNING: The appliance and its accessible parts become hot during use. • Care should be taken to avoid touching heating elements. • Children less than 8 years of age shall be kept away unless continuously supervised.
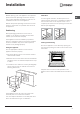
Installation ! Before placing your new appliance into operation please read these operating instructions carefully. They contain important information for safe use, for installation and for care of the appliance. ! Please keep these operating instructions for future reference. Pass them on to possible new owners of the appliance. Ventilation GB To ensure good ventilation, the back panel of the cabinet must be removed.
GB Electrical connections ! Ovens equipped with a three-pole power supply cable are designed to operate with alternating current at the voltage and frequency indicated on the data plate located on the appliance (see below). Fitting the power supply cable L N 1. Open the terminal board by inserting a screwdriver into the side tabs of the cover. Use the screwdriver as a lever by pushing it down to open the cover (see diagram). 2.
Description of the appliance Overall view GB GUIDES for the sliding racks Control panel position 5 position 4 position 3 position 2 position 1 GRILL DRIPPING PAN Control panel SELECTOR knob THERMOSTAT knob THERMOSTAT indicator light ELECTRONIC programmer* * Only on a few models 5
Start-up and use GB ! The first time you use your appliance, heat the empty oven with its door closed at its maximum temperature for at least half an hour. Ensure that the room is well ventilated before switching the oven off and opening the oven door. The appliance may produce a slightly unpleasant odour caused by the burning away of protective substances used during the manufacturing process. Cooling ventilation Starting the oven Oven light 1.
Cooking modes Cooking modes Practical cooking advice ! A temperature value can be set for all cooking modes between 60°C and Max, except for ! Do not place racks in position 1 and 5 during fanassisted cooking. Excessive direct heat can burn temperature sensitive foods. • GRILL (recommended: set only to MAX power level); • GRATIN (recommended: do not exceed 200°C). TRADITIONAL OVEN mode Both the top and bottom heating elements will come on.
GB Cooking advice table Cooking modes Convection Oven Multi-cooking Top oven Grill Gratin 8 Foods Weight (in kg) Rack position Pre-heating time (min) Recommended temperature Duck Roast veal or beef Pork roast Biscuits (short pastry) Tarts Pizza (on 2 racks) Lasagne Lamb Roast chicken + potatoes Mackerel Plum cake Cream puffs (on 2 racks) Biscuits (on 2 racks) Sponge cake (on 1 rack) Sponge cake (on 2 racks) Savoury pies 1 1 1 1 1 1 1 1+1 1 1 0.5 0.5 0.5 1 1.
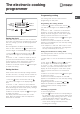
The electronic cooking programmer Programming cooking ! A cooking mode must be selected before programming can take place. DISPLAY END OF COOKING icon DURATION icon •• •• DECREASE TIME button CLOCK icon Programming the cooking duration TIMER icon 1. Press the button several times until the icon and the three digits on the DISPLAY begin to flash. 2.
Precautions and tips GB ! The appliance was designed and manufactured in compliance with international safety standards. The following warnings are provided for safety reasons and must be read carefully. General safety • The appliance was designed for domestic use inside the home and is not intended for commercial or industrial use. • The appliance must not be installed outdoors, even in covered areas. It is extremely dangerous to leave the appliance exposed to rain and storms.
Maintenance and care Switching the appliance off Disconnect your appliance from the electricity supply before carrying out any work on it. Cleaning the appliance • The stainless-steel or enamel-coated external parts as well as the rubber seals may be cleaned using a sponge that has been soaked in lukewarm water and neutral soap. If these stains are difficult to remove, use only specialised products. After cleaning, rinse and dry thoroughly. Do not use abrasive powders or corrosive substances.
Руководство по эксплуатации ДУХОВОИ ШКАФ Содержание GB English, 1 RS Русский, 12 ВНИМАНИЕ,13 Монтаж, 14-15 Расположение Электрическое подключение Паспортная табличка Описание изделия, 16 Общии вид Панель управления Включение и эксплуатация, 17 Включение духового шкафа Программы, 18- 19 Программы приготовления Практические советы по приготовлению Таблица приготовления 7OFIM 53 K.A IX 7OFIMS 53K.
ВНИМАНИЕ RS ВНИМАНИЕ: Данное изделие и его доступные комплектующие сильно нагреваются в процессе эксплуатации. Будьте осторожны и не касайтесь нагревательных элементов. Не разрешайте детям младше 8 лет приближаться к изделию без контроля.
Установка ! Важно сохранить данное руководство для его последующих консультации. В случае продажи, передачи изделия или при переезде на новое место жительства необходимо проверить, чтобы руководство оставалось вместе с изделием, для того чтобы его новыи владелец мог ознакомиться с правилами эксплуатации и с соответствующими предупреждениями. монтажа Вентиляция Для обеспечения надлежащеи вентиляции необходимо снять заднюю панель ниши кухонного элемента.
4. Закройте крышку зажимной коробки. ! Производитель не несет ответственности за последствия несоблюдения перечисленных выше требовании. RS Подсоединение сетевого кабеля изделия к сети электропитания Установите на сетевои кабель нормализованную штепсельную вилку, расчитанную на нагрузку, указанную на паспортнои табличке (см. сбоку).
Описание изделия RS Общии вид Панель управления * Имеется только в некоторых моделях 16
Включение и эксплуатация ! При первом включении духового шкафа рекомендуем прокалить его примерно в течение часа при максимальнои температуре с закрытои дверцеи. Затем выключите духовои шкаф, откроите дверцу и проветрите помещение. Запах, которыи вы можете почувствовать, вызван испарением веществ, использованных для предохранения духового шкафа. Включение духового шкафа 1. Выберите нужную программу приготовления при помощи рукоятки ПРОГРАММЫ. 2. Выберите температуру при помощи регулятора ТЕРМОСТАТ.
Программы RS Программы приготовления ! Для всех программ можно задать температуру от 60°C до МАКС кроме: • ГРИЛЬ (рекомендуется устанавливать только МАКС. температуру); • ПОДРУМЯНИВАНИЕ (рекомендуется не превышать температуру 200°C). Программа ТРАДИЦИОНАЛЬНАЯ ДУХОВКА Включаются два нагревательных элемента: нижнии и верхнии. В режиме традиционального приготовления рекомендуется использовать только один уровень: при использовании нескольких уровнеи распределение температуры будет неоптимальным.
Таблица приготовления Программы Традициональная духовка Одновременное приготовление Forno Sopra (Нагрев сверху) Гриль Gratin (Подрумянивание) RS 200 200 Продолжит-ть приготовления (минуты) 65-75 70-75 15 15 15 15 10 10 15 200 180 180 230 180 180 200 70-80 15-20 30-35 15-20 30-35 40-45 60-70 2 2 2и4 2и4 2 2и4 3 10 10 10 10 10 10 15 180 170 190 180 170 170 200 30-35 40-50 20-25 10-15 15-20 20-25 25-30 - 3/4 15 220 - 1 1 4 4 5 5 Макс. Макс. 8-10 6-8 1 1 1 1 1 1 n.° 4 1.5 1.
Электронный таймер программирования выпечки RS •• •• Программирование часов ! Часы можно настроить как при выключенном духовом шкафу, так и при включенном, при условии что не было задано время окончания выпечки. После подключения к электрической сети или после отключения электроэнергии, начнет мигать икона и четыре цифры на ДИСПЛЕЕ. 1. Нажмите несколько раз кнопку и удерживайте до тех пор, пока на ДИСПЛЕЕ не замигает икона и четыре цифровых значения; 2.
Предосторожности и рекомендации ! Изделие спроектировано и изготовлено в соответствии с международными нормативами по безопасности. Необходимо внимательно прочитать настоящие предупреждения, составленные в целях вашеи безопасности. штепсельную вилку из сетевои розетки. RS • В случае неисправности категорически запрещается открывать внутренние механизмы изделия с целью их самостоятельного ремонта. Обращаитесь в Центр Сервисного обслуживания (см. Техобслуживание).
Техническое обслуживание и уход RS Обесточивание изделия Перед началом какои-либо операции по обслуживанию или чистке отсоедините изделие от сети электропитания. Чистка изделия • Наружные эмалированные элементы или детали из нержавеющеи стали, а также резиновые уплотнения можно протирать губкои, смоченнои в теплои воде или в растворе неитрального моющего средства. Для удаления особо трудных пятен используите специальные чистящие средства, имеющиеся в продаже.
RS Изделие: Торговая марка: Электрический духовой шкаф Торговый знак изготовителя: Модель: Изготовитель: Страна-изготовитель: Габаритные размеры духового шкафа / Объем: Номинальное значение напряжения электропитания или диапазон напряжения Условное обозначение рода электрического тока или номинальная частота переменного тока Класс зашиты от поражения электрическим током Класс энергопотребления 7OFIM 53 K.A IX 7OFIMS 53 K.
05/2012 - 195102620.