Istruzioni per l’uso FORNO Sommario IT Installazione, 2-3 IT Italiano, 1 GB English,20 FR Français, 39 Posizionamento Collegamento elettrico Targhetta caratteristiche Descrizione dell’apparecchio, 4 Vista d’insieme Pannello di controllo Struttura del forno, 5 Avvio e utilizzo, 6-7 OK 89 EN DC.20 /HA OK 89 EN DC.20 X/HA OK 897 EN DC.20 HA OK 897 EN DC.20 X/HA 7OOK 997 ESD C X RU/HA 7OOK 997 ESD C RU/HA OK 89ED.20 X /HA OK 89ED.
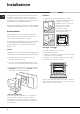
Installazione ! È importante conservare questo libretto per poterlo consultare in ogni momento. In caso di vendita, di cessione o di trasloco, assicurarsi che resti insieme all’apparecchio per informare il nuovo proprietario sul funzionamento e sui relativi avvertimenti. ! Leggere attentamente le istruzioni: ci sono importanti informazioni sull’installazione, sull’uso e sulla sicurezza.
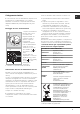
Collegamento elettrico Prima di effettuare l’allacciamento accertarsi che: ! I forni dotati di cavo di alimentazione tripolare sono predisposti per il funzionamento con corrente alternata, con tensione e frequenza indicate nella targhetta caratteristiche posta sull’apparecchio (vedi sotto).
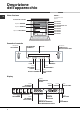
Descrizione dell’apparecchio IT Vista d’insieme GUIDE di scorrimento dei ripiani Pannello di controllo posizione 7 posizione 6 posizione Divider "D" posizione 5 posizione 4 posizione 3 posizione 2 posizione 1 Ripiano DIVIDER Ripiano GRIGLIA Ripiano LECCARDA Pannello di controllo Manopola PROGRAMMI ACCENSIONE PANNELLO Manopola TERMOSTATO/ IMPOSTAZIONE TEMPI DISPLAY Icona LUCE AVVIO/ ARRESTO Icona SELEZIONE CAVITA’ Icona CONTAMINUTI Icona BLOCCO COMANDI Icona IMPOSTAZIONE TEMPI Display Displa
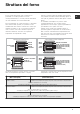
Struttura del forno Il forno OPEN SPACE offre 70lt di capacità e la possibilità di cucinare pietanze su 4 livelli contemporaneamente o cucinare porzioni abbondanti, che non starebbero in un forno tradizionale. Ben 56 programmi di cottura universali e automatici assicurano risultati perfetti per qualsiasi ricetta.
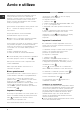
Avvio e utilizzo IT ! Alla prima accensione fare funzionare il forno a vuoto per almeno un’ora con il termostato al massimo e a porta chiusa. Poi spegnere, aprire la porta del forno e aerare il locale. L’odore che si avverte è dovuto all’evaporazione delle sostanze usate per proteggere il forno. ! Per facilitare le impostazioni, tenere premuti i tasti +e- :i numeri sul display scorrono più 1. 2. il 3. Premere il tasto . ruotare la manopola IMPOSTAZIONE TEMPI verso “+” e “-” per regolare l’ora.
Luce del forno La luce si accende aprendo la porta del forno o al momento dell’avvio di un programma di cottura. Il tasto permette di accendere e spegnere la luce in qualsiasi momento. Maniglia a scomparsa Alcuni modelli sono dotati di maniglia a scomparsa integrata nella porta forno. Basta una lieve pressione e l’apertura push/push agevola la presa per aprire e chiudere il forno. Al termine dell’utilizzo, si può richiudere esercitando una lieve pressione.
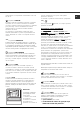
Programmi IT ! Per garantire la perfetta morbidezza e croccantezza dei cibi il forno rilascia sotto forma di vapore acqueo l'umidità che proviene naturalmente dal cibo. In questo modo si possono avere dei risultati di cottura ottimali su tutte le pietanze. ! Ad ogni accensione il forno propone il primo programma di cottura UNIVERSALE. ! Non appoggiare mai oggetti sul fondo del forno perché si rischiano danni allo smalto. ! Porre sempre i recipienti di cottura sulla griglia in dotazione.
temperatura. Le temperature selezionabili sono: 40, 65, 90 °C. Programma GRATIN Si attiva l’elemento riscaldante superiore e durante una parte del ciclo anche l’elemento riscaldante circolare, entrano in funzione la ventola e il girarrosto (ove presente). Unisce all’irradiazione termica unidirezionale la circolazione forzata dell’aria all’interno del forno. Ciò impedisce la bruciatura superficiale degli alimenti aumentando il potere di penetrazione del calore.
IT • la lievitazione del impasto va fatto a temperatura ambiante per 1 ora o 1 ora e mezzo, in funzione della temperatura della stanza, e in pratica, fino al raddoppio del impasto. Ricetta per il PANE : 1 Leccarda di 1000g Max, Ripiano basso 2 Leccarde di 1000g Max, Ripiani basso e medio Ricetta per 1000g d’impasto : 600g Farina, 360g Acqua, 11g Sale, 25g lievito fresco (oppure 2 bustini in polvere) Processo: • Mescolare la farina ed il sale in un grande recipiente.
preriscaldamento, segnalata da una sequenza di segnali acustici. La temperatura viene determinata automaticamente in base al tipo di cottura scelto; tuttavia è possibile modificarla per adattarla alla specifica ricetta da realizzare. È possibile anche impostare una durata di cottura con inizio immediato o ritardato. memorizzata e riproposta al successivo utilizzo del programma.
IT Programmare la durata di cottura 6. Una volta terminata la cottura, sul display compare la scritta “END” e viene emesso un segnale acustico. • Esempio: sono le ore 9:00, viene programmata una durata di 1 ora e 15 minuti e le 12:30 come ora di fine. Il programma inizia automaticamente alle ore 11:15. 1. Premere il tasto Per annullare una programmazione premere il tasto Programmare la cottura ! La programmazione è possibile solo dopo aver selezionato un programma di cottura.
Tabella cottura cavità ExtraLarge Space Funzioni Alimenti Peso (Kg) Universali Multilivello* Crostate Bignè Biscotti Pasticci Crème Caramel (bagno maria) Panettone Plumcake Pan di spagna Arrosto 1,5 -2 Cottura su n. ripiani N.
IT Tabella cottura contemporanea Small Space e Main Space Main Space Funzioni Alimenti Peso (Kg) Cottura su n. ripiani N.
Tabella cottura Main Space Funzioni Alimenti Peso (Kg) Universali Multilivello* Crostate Bignè Biscotti Pasticci Crème Caramel (bagno maria) Pizza* Bassa temperatura* Cottura su n. ripiani N.
Precauzioni e consigli IT ! L’apparecchio è stato progettato e costruito in conformità alle norme internazionali di sicurezza. Queste avvertenze sono fornite per ragioni di sicurezza e devono essere lette attentamente. Sicurezza generale • L’apparecchio è stato concepito per un uso di tipo non professionale all’interno dell’abitazione. • L’apparecchio non va installato all’aperto, nemmeno se lo spazio è riparato, perché è molto pericoloso lasciarlo esposto a pioggia e temporali.
Manutenzione e cura Escludere la corrente elettrica Prima di ogni operazione isolare l’apparecchio dalla rete di alimentazione elettrica. IT F Pulire l’apparecchio • Lievi differenze di colore sul lato anteriore del forno sono dovute a diversi materiali quali vetro, plastica o metallo. • Eventuali ombreggiature sul vetro della porta, simili a striature, sono dovute al riflesso della luce della lampada del forno. • A temperature molto elevate lo smalto viene marcato a fuoco.
Anomalie e rimedi IT Problema Possibile causa Rimedio Il “Tasto Orologio” e le cifre sul display lampeggiano. L’apparecchio è stato appena allacciato alla rete elettrica o c’è stato un black-out. C’è stato un black-out. Impostare l’orologio. L’apparecchio è in modalità standby. La temperatura interna nel forno è superiore a quella proposta per il programma scelto. Le posizioni 1 e 5: sono investite direttamente dall’aria calda che potrebbe provocare bruciature sui cibi delicati.
Assistenza Attenzione: L’apparecchio è dotato di un sistema di diagnostica automatica che consente di rilevare eventuali malfunzionamenti. Questi vengono comunicati dal display tramite messaggi del tipo: “F--” seguito da numeri. In questi casi è necessario l’intervento dell’assistenza tecnica.
Operating Instructions OVEN Contents GB Installation, 21-22 IT Italiano, 1 GB English, 20 FR Français, 39 Positioning Electrical connection Data plate Description of the appliance, 23 Overall view Control panel Oven structure, 24 Start-up and use, 25-26 OK 89 EN DC.20 /HA OK 89 EN DC.20 X/HA OK 897 EN DC.20 HA OK 897 EN DC.20 X/HA 7OOK 997 ESD C X RU/HA 7OOK 997 ESD C RU/HA OK 89ED.20 X /HA OK 89ED.
Installation ! Before placing your new appliance into operation please read these operating instructions carefully. If the appliance is sold, given away or moved, please make sure the booklet is also passed on to the new owners so that they may benefit from the advice contained within it. Ventilation GB To ensure good ventilation, the back panel of the cabinet must be removed.
GB Electrical connection ! Ovens equipped with a three-pole power supply cable are designed to operate with alternating current at the voltage and frequency indicated on the data plate located on the appliance (see below). Fitting the power supply cable 1. Open the terminal board by inserting a screwdriver into the side tabs of the cover. Use the screwdriver as a lever by pushing it down to open the cover (see diagram). 2.
Description of the appliance Overall view GB GUIDE RAILS for the sliding racks Control panel position 7 position 6 Divider "D" position position 5 position 4 position 3 position 2 position 1 DIVIDER shelf RACK shelf DRIPPING PAN shelf Control panel SELECTOR knob CONTROL PANEL POWER BUTTON THERMOSTAT / TIMER knob DISPLAY LIGHT icon START / STOP SELECT CAVITY icon CONTROL PANEL LOCKED icon MINUTE MINDER icon TIMER icon Display CAVITY TEMPERATURE display SMALL CAVITY icon MODE icons MAIN CAVIT
Oven structure GB The OPEN SPACE oven has a capacity of 70 litres and offers users the option of cooking on 4 shelves at the same time or cooking large quantities which would not necessarily be possible in a traditional oven. The 56 universal (Creation) and automatic (Success) cooking modes guarantee perfect results every time, regardless of the dish you are cooking.
Start-up and use ! The first time you use your appliance, heat the empty oven with its door closed at its maximum temperature for at least half and hour. Make sure that the room is well ventilated before switching the oven off and opening the oven door. The appliance may emit a slightly unpleasant odour caused by protective substances used during the manufacturing process burning away.
GB Cooling ventilation In order to cool down the external temperature of the oven, a cooling fan blows a stream of air between the control panel and the oven door, as well as towards the bottom of the oven door.In the FAST COOKING mode, the fan is activated automatically after ten minutes. At the beginning of the FAST CLEAN mode, the cooling fan operates at low speed. ! Once the cooking has been completed, the cooling fan remains on until the oven has cooled down sufficiently.
Modes ! To guarantee perfectly soft or crispy food, the oven releases water contained within the food in the form of steam. This means it is possible to achieve optimal cooking results for all dishes. ! Every time the oven is switched on, it suggests the first CREATION cooking mode. ! Never put objects directly on the bottom of the oven; this will prevent the enamel coating from being damaged. ! Always place cookware on the rack(s) provided. ExtraLarge Space Starting the oven 1.
GB FAN GRILLING mode The top heating element and the rotisserie spit (where present) are activated and the fan begins to operate. During part of the cycle the circular heating element is also activated. This combination of features increases the effectiveness of the unidirectional thermal radiation provided by the heating elements through the forced circulation of the air throughout the oven. This helps prevent food from burning on the surface and allows the heat to penetrate right into the food.
• Follow the recipe. • Do not exceed the maximum weight of the dripping pan. • Remember to pour 100 g (1dl) of cold water into the dripping pan, which should be placed in position 7. • The dough must be left to rise at room temperature for 1 – 1 ½ hours (depending on the room temperature) or until the dough has doubled in size.
GB The oven controls all essential aspects of each of these cooking modes and makes it easier for you to create the perfect dish, from the simplest recipe to the most sophisticated culinary delights: the temperature, heat source, humidity and fan assisted operation are all controlled automatically. This chapter was written with the help of our very own culinary expert. We invite you to follow his advice so you can benefit from his experience and perfect your cooking skills.
Programming cooking ! A cooking mode must be selected before programming can take place. Cooking can also be programmed for the various cavities. Programming the cooking duration 1. Press the button until the icon and the numerical digits on the display begin to flash. 2. Turn the TIMER knob towards “+” and “-” to adjust the time as desired; keep the knob in position to scroll through the numbers more quickly and make the setting process easier. 3. Once you have reached the desired duration, button again.
GB Cooking advice table for ovens with an ExtraLarge Space cavity Function Food Weight (Kg) Cook on shelf no.
Cooking advice table for using the Small Space and Main Space at the same time Main Space Function Food Weight (kg) Preheating Recommended Cooking temperature duration (°C) (minutes) Dripping pan 1 2 2 1 3 D D Yes Yes 200 200 30-40 35-45 1 2 2 1 3 D D Yes Yes 1 2 2 1 3 D D Yes Yes 180 180 200 200 15-25 15-25 30-40 35-45 Crème Caramel (bain-marie) 1 2 D Yes 170 35-45 Cake 1 2 D Yes 160 60-75 Pizza 1 2 2 or 3 1 or 2 D D Yes Yes 220 220 15-25 20-30 Tarts Biscuits S
GB Cooking advice table for the Main Space feature Function Food Weight (Kg) Cook on shelf no.
Precautions and tips ! This appliance has been designed and manufactured in compliance with international safety standards. The following warnings are provided for safety reasons and must be read carefully. General safety • The appliance was designed for domestic use inside the home and is not intended for commercial or industrial use. • The appliance must not be installed outdoors, even in covered areas. It is extremely dangerous to leave the appliance exposed to rain and storms.
Care and maintenance GB Switching the appliance off Disconnect your appliance from the electricity supply before carrying out any work on it. F Cleaning the appliance • Slight differences in colour on the front of the oven are due to the different materials used, i.e. glass, plastic or metal. • Any shady areas resembling grooves on the oven door glass are caused by reflections from the oven light. • The enamel is branded at very high temperatures. This process may cause colour variations.
Troubleshooting Problem Possible cause Solution The “Clock button” and the digits on the display flash. The appliance has just been Set the clock. connected to the electricity mains or there has been a blackou There has been a blackout. Reprogram the cooking mode. GB A programmed cooking mode does not start. Only the high luminosity The appliance is in standby mode Press any button to exit “Clock button” is lit. standby mode.
Assistance GB Warning: The appliance is fitted with an automatic diagnostic system which detects any malfunctions. Malfunctions are signalled through messages of the following type: “F—” followed by numbers. Call for technical assistance in the event of a malfunction. Before calling for Assistance: • Check whether you can fix the problem yourself. • Restart the programme to check whether the malfunction has disappeared. • If it has not, contact the Authorised Technical Assistance Service.
Mode d’emploi FOUR Sommaire FR Installation, 40-41 IT Italiano, 1 GB English,20 FR Français, 39 Positionnement Raccordement électrique Plaque signalétique Description de l’appareil, 42 Vue d’ensemble Tableau de bord Structure du four, 43 Mise en marche et utilisation, 44-45 OK 89 EN DC.20 /HA OK 89 EN DC.20 X/HA OK 897 EN DC.20 HA OK 897 EN DC.20 X/HA 7OOK 997 ESD C X RU/HA 7OOK 997 ESD C RU/HA OK 89ED.20 X /HA OK 89ED.
Installation ! Important : conserver ce mode d’emploi pour pouvoir le consulter à tout moment. En cas de vente, de cession ou de déménagement, veiller à ce qu’il suive l’appareil pour informer le nouveau propriétaire sur son fonctionnement et lui fournir les conseils correspondants. pour ce type d’installation. Aération Pour garantir une bonne aération, la cavité d’encastrement doit être dépourvue de paroi arrière.
Raccordement électrique Avant de procéder au branchement, s’assurer que : ! Les fours munis d’un câble d’alimentation tripolaire sont prévus pour un fonctionnement au courant alternatif à la tension et à la fréquence indiquées sur la plaque signalétique apposée sur l’appareil (voir cidessous).
Description de l’appareil FR Vue d’ensemble GLISSIÈRES de coulissement Tableau de bord niveau 7 niveau 6 niveau Séparateur "D" niveau 5 niveau 4 niveau 3 niveau 2 niveau 1 Support SÉPARATEUR Support GRILLE Support LÈCHEFRITE Tableau de bord Manette PROGRAMMES ALLUMAGE PANNEAU Manette THERMOSTAT/ SÉLECTION TEMPS AFFICHEUR Icône ECLAIRAGE PUESTA EN MARCHA / PARADA Icône MINUTEUR Icône SÉLECTION ENCEINTE Icône VERROUILLAGE COMMANDES Icône SÉLECTION TEMPS Afficheur Afficheur TEMPÉRATURE ENCEINTE
Structure du four Le four OPEN SPACE a une capacité de 70 l et permet de cuisiner simultanément les plats sur 4 niveaux ou de cuire des pièces de grande taille, qui ne rentreraient pas dans un four traditionnel. 56 programmes de cuisson Universels et Automatiques pour réussir n’importe quelle recette à coup sûr.
Mise en marche et utilisation FR ! Lors de son premier allumage, faire fonctionner le four à vide, porte fermée, pendant au moins une heure en réglant le thermostat sur le maximum. Puis éteindre le four, ouvrir la porte et aérer la pièce. L’odeur qui se dégage est due à l’évaporation des produits utilisés pour protéger le four. ! Pour simplifier les sélections, garder les touches + et - enfoncées ; les numéros défilent plus rapidement. ! Toute sélection est automatiquement mémorisée au bout de 10 secondes.
Éclairage du four L’éclairage s’allume à l’ouverture de la porte du four ou au démarrage d’un programme de cuisson. FR La touche permet d’allumer ou éteindre l’éclairage à tout moment. Indicateurs de chaleur résiduelle Cet appareil est équipé d’un indicateur de chaleur résiduelle. Four éteint, l’afficheur signale par allumage du voyant «chaleur résiduelle» la présence de température à l’intérieur de l’enceinte. Le voyant s’éteint quand l’intérieur du four est refroidi.
Programmes FR ! Pour obtenir des aliments parfaitement moelleux et croquants, l’humidité qu’ils dégagent est réutilisée par le four sous forme de vapeur d’eau. Des résultats de cuisson optimaux sont ainsi obtenus pour tous les plats. ! A chaque allumage, le four propose le premier programme de cuisson UNIVERSEL. ! Ne jamais poser d’objets à même la sole du four, l’émail risque de s’abîmer. ! Il faut toujours placer les plats sur la grille fournie avec l’appareil.
Programme GRATIN Mise en marche de la résistance de voûte, de la résistance circulaire (pendant un certain temps) et de la turbine et du tournebroche (si l’appareil en est équipé). L’irradiation thermique unidirectionnelle s’ajoute au brassage de l’air pour une répartition uniforme de la chaleur dans l’enceinte du four. Plus de risque de brûler les aliments en surface et plus grande pénétration de la chaleur. Cuisson porte du four fermée.
FR froide dans la lèchefrite au niveau 7 ; • faire lever la pâte à température ambiante pendant 1 heure ou 1 heure et demie, selon la température de la pièce et jusqu’à ce qu’elle ait pratiquement doublé de volume. Small Space Recette du PAIN : 1 Plaque de 1000g Max., niveau du bas 2 Plaques de 1000g Maxi. niveaux du bas et du milieu s’allume. L’icône 2. Pour les différents réglages et sélections suivre les indications décrites plus haut pour l’enceinte EXTRALARGE.
savoir-faire et obtenir des résultats de cuisson parfaits. Le choix des modes de cuisson, des températures ainsi que les niveaux d’enfournement sont ceux qu’il utilise quotidiennement pour obtenir les meilleurs résultats. Pour chaque fonction des UNIVERSELS, le tableau suivant indique si le plat doit être enfourné à froid ou à chaud. Le respect de ces indications garantit des résultats de cuisson optimaux. Pour enfourner à chaud, attendre la fin du préchauffage signalée par une suite de signaux sonores.
FR Programmation de la cuisson ! La programmation n’est possible qu’après avoir sélectionné un programme de cuisson. Il est possible de programmer la cuisson pour les différentes enceintes aussi. Programmer la durée de cuisson 1. Appuyer sur la touche jusqu’à ce que l’icône et les chiffres de l’afficheur se mettent à clignoter ; 2. tourner le bouton SÉLECTION TEMPS vers « + » et « - » pour régler le temps désiré ; si le bouton est maintenu en place, les chiffres défilent plus rapidement. 3.
Tableau de cuisson enceinte ExtraLarge Space Fonctions Aliments Poids (Kg) Universels Multiniveaux* Tartes 1 2 3 4 Petits choux 2 ou 3 2 1 5 4 1 2 3 1 1 2 2 ou 3 2 1 1 ou 2 1 2 3 1 2 ou 3 2 1 1*** Brochettes Filets de poisson Pommes de terre congelées 1 1 1 1 1 5 Pizza/Fougasse 1 2 3 4 2 ou 3 1 ou 2 1 1 Génoise Rôti Basse température* 1 1 2 3 Panettone Cake Barbecue* 2 ou 3 1 ou 2 1 3 3à5 3 3 Crème caramel (bain-marie) Gratin* Lèchefrite Grille 1 2 ou 3 1à2 1 1 2 ou 3 1à2 1 1
FR Tableau de cuisson simultanée Small Space et Main Space Main Space Fonctions Aliments Poids (Kg) Cuisson sur niveaux N.
Tableau de cuisson Main Space Fonctions Aliments Poids (Kg) Universels Multiniveaux* Tartes Lèchefrite Grille 1 2 1 1 2 1 2 2 1 2 1 1 2 2 1 Crème caramel (bain-marie) 1 Cake Génoise Pizza/Fougasse Biscuits Timbales Basse température* Niveau enfournement 1 2 Petits choux Pizza* Cuisson sur niveaux N.
Précautions et conseils FR ! Cet appareil a été conçu et fabriqué conformément aux normes internationales de sécurité. Ces consignes de sécurité sont très importantes et doivent être lues attentivement. Sécurité générale • Cet appareil a été conçu pour un usage familial, de type non professionnel. • Cet appareil ne doit pas être installé en extérieur, même dans un endroit à l’abri, il est en effet très dangereux de le laisser exposé à la pluie et aux orages.
Nettoyage et entretien Mise hors tension FR Avant toute opération de nettoyage ou d’entretien, couper l’alimentation électrique de l’appareil. F Nettoyage de l’appareil • De légères différences de couleur à l’avant du four sont dues aux différents matériaux utilisés à savoir verre, plastique ou métal. • Des ombres éventuelles sur la vitre du four, semblables à des stries, sont dues au reflet de la lumière de la lampe du four. • L’émail grand feu est traité à des températures très élevées.
Anomalies et remèdes FR Problème Cause possible Remède La « Touche Horloge » et les chiffres de l’afficheur clignotent. L’appareil vient d’être branché au secteur ou il y a eu une panne de courant. Il y a eu une panne de courant. Régler l'horloge. L’appareil est en mode veille (standby). Utiliser une touche quelconque pour quitter le mode standby. Le programme de cuisson n'a pas démarré. Seule la « Touche Horloge » est éclairée en haute luminosité. Reprogrammer.
Assistance Attention : L’appareil dispose d’un système d’autotest qui permet de détecter toute anomalie de fonctionnement. Ces anomalies sont affichées sous la forme : « F— » suivi de chiffres. Contacter alors un service d’assistance technique. FR Avant d’appeler le service de dépannage : • Vérifier s’il est possible de résoudre le problème soi-même ; • Redémarrer le programme pour contrôler si le problème a été résolu ; • Si ce n’est pas le cas, contacter le service d’Assistance technique agréé.
FR 58
FR 59
03/2012 - 195085918.