Mode d’installation et d’emploi LAVE-LINGE Sommaire FR Français,1 GB English,13 FR Installation, 2-3 Déballage et mise à niveau Raccordements eau et électricité Caractéristiques techniques Entretien et soin, 4 Coupure de l’arrivée d’eau et du courant Nettoyage de l’appareil Nettoyage du tiroir à produits lessiviels Entretien du tambour Nettoyage de la pompe Contrôle du tuyau d’arrivée de l’ea Précautions et conseils, 5 Sécurité générale Système d’équilibrage de la charge Mise au rebut Ouverture manuel
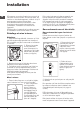
Installation FR ! Conserver ce mode d’emploi pour pouvoir le consulter à tout moment. En cas de vente, de cession ou de déménagement, veiller à ce qu’il accompagne toujours le lave-linge. ! Lire attentivement les instructions : elles fournissent des conseils importants sur l’installation, l’utilisation et la sécurité de l’appareil. ! Cette notice, la garantie et les pièces servant à l’installation sont réunies dans un sachet. Déballage et mise à niveau Déballage 1.
Raccordement du tuyau de vidange 65 - 100 cm Raccorder le tuyau de vidange à un conduit d’évacuation ou à une évacuation murale placés à une distance du sol comprise entre 65 et 100 cm en évitant à tout prix de le plier. Autrement, accrocher le tuyau de vidange à un évier ou à une baignoire, dans ce cas, fixer le support plastique fourni avec l’appareil au robinet (voir figure). L’extrémité libre du tuyau d’évacuation ne doit pas être plongée dans l’eau.
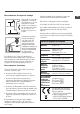
Entretien et soin FR Coupure de l’arrivée d’eau et du courant • Fermer le robinet de l’eau après chaque lavage. Cela réduit l’usure de l’installation hydraulique de l’appareil et évite tout danger de fuites. • Débrancher la fiche de la prise de courant lors de toute opération de nettoyage et de travaux d’entretien. Nettoyage de l’appareil Pour nettoyer l’extérieur et les parties en caoutchouc, utiliser un chiffon imbibé d’eau tiède et de savon. N’utiliser ni solvants ni abrasifs.
Précautions et conseils ! Cet appareil a été conçu et fabriqué conformément aux normes internationales de sécurité. Ces consignes sont fournies pour des raisons de sécurité, il faut les lire attentivement. Sécurité générale • Cet appareil est conçu pour un usage domestique.
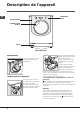
Description de l’appareil FR TABLEAU DE BORD PORTE HUBLOT POIGNEE PORTE HUBLOT SOCLE PIEDS REGLABLES PORTE HUBLOT A Pour ouvrir la porte, se servir de la poignée prévue (voir illustration). 3 1 210 180 150 120 90 60 B 2 1. bac à produit de prélavage : utiliser de la lessive en poudre. ! Avant d’introduire la lessive, s’assurer que le bac supplémentaire 3 n’est pas présent. 2.
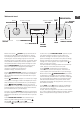
Tableau de bord Bouton PROGRAMMES FR Touche avec voyant Touches et Voyants Touches et Voyants OPTIONS OPTIONS Voyant ECO MARCHE/PAUSE Icônes PHASES DE LAVAGE DISPLAY Bouton avec témoin ON/OFF Touche TEMPÉRATURE Touche ESSORAGE Bouton avec témoin ON/OFF: appuyer brièvement sur la touche pour allumer ou éteindre l’appareil. Le témoin vert indique que l’appareil est sous tension.
Comment faire un cycle de lavage FR REMARQUE: lors de la première mise en service du lavelinge, lancer un cycle de lavage à vide mais avec du produit lessiviel en sélectionnant un programme coton 90° sans prélavage. ! Après pression sur la touche MARCHE/PAUSE, le départ programmé ne peut être modifié que pour être écourté. 2. CHARGER LE LINGE. Ouvrir la porte hublot. Charger le linge en faisant attention à ne pas dépasser la quantité indiquée dans le tableau des programmes de la page suivante.
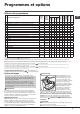
Programmes et options Javel Adoucissant Charge maxi (Kg) Eau totale lt Durée cycle - 8 53 1,04 55 200’ - 8 53 0,98 90 190’ - 5 - - - 5 - - - 800 - - 5 - - - ** ** ** 1000 4,5 45 1,17 65 120’ 1000 600 1000 1200 4,5 2 3,5 8 - - - - 1200 - - 8 - - - - 1200 - - - - 8 - - - ** ** ** ** ** ** - - - - 8 - - - ** 1200 - - 5 - - - Vitesse maxI (tours
Produits lessiviels et linge FR Lessive Le choix et la quantité de lessive dépendent du type de textile (coton, laine, soie...), de la couleur, de la température de lavage, du degré de salissure et de la dureté de l’eau. Bien doser la quantité de produit lessiviel permet d’éviter les gaspillages et protège l’environnement : bien que biodégradables, les produits lessiviels contiennent des éléments qui altèrent l’équilibre de la nature.
Anomalies et remèdes Il peut arriver que l’appareil ne fonctionne pas bien. Avant d’appeler le Service de dépannage (voir “Assistance”), contrôler s’il ne s’agit pas par hasard d’un problème facile à résoudre à l’aide de la liste suivante. Anomalies: Causes / Solutions possibles: L’appareil ne s’allume pas. • La fiche n’est pas branchée dans la prise de courant ou mal branchée. • Il y a une panne de courant. Le cycle de lavage ne démarre pas. • • • • La porte hublot n’est pas bien fermée.
Assistance FR Avant d’appeler le service après-vente: • Vérifier si l’anomalie ne peut pas être résolue par soi-même (voir “Anomalie set Remèdes); • Remettre le programme en marche pour contrôler si l’inconvénient a disparu; • Si ce n’est pas le cas, contacter le service d’Assistance technique agréé. ! En cas de problème d’installation ou d’utilisation inadéquate du lave-linge, l’intervention sera payante. ! Ne jamais faire appel à des techniciens non agréés.
Instructions for installation and use WASHING MACHINE Contents GB English GB Installation, 14-15 Unpacking and levelling Connecting the electricity and water supplies Technical data Care and maintenance, 16 Cutting off the water and electricity supplies Cleaning the machine Cleaning the detergent dispenser drawer Caring for your appliance drum Cleaning the pump Checking the water inlet hose Precautions and tips, 17 General safety Load balancing system Disposal Opening the porthole door manually AQUAL
Installation GB ! This instruction manual should be kept in a safe place for future reference. If the washing machine is sold, given away or moved, please ensure the manual is kept with the machine, so that the new owner may benefit from the advice contained within it. ! Read these instructions carefully: they contain vital information relating to the safe installation and operation of the appliance.
Connecting the drain hose 65 - 100 cm Connect the drain hose to drain duct piping or a wall drain located between 65 and 100 cm above the floor, making sure it is not bent at all. Alternatively, rest the drain hose on the side of a washbasin or bathtub, fastening the duct supplied to the tap (see figure). The free end of the hose should not be underwater.
Care and maintenance GB Cutting off the water and electricity supplies • Turn off the water tap after every wash cycle. This will limit wear on the hydraulic system in the machine and help to prevent leaks. • Unplug the appliance when cleaning it and during all maintenance work. Cleaning the machine The outer parts and rubber components of the appliance can be cleaned using a soft cloth soaked in lukewarm soapy water. Do not use solvents or abrasives.
Precautions and tips ! The machine was designed and constructed in accordance with international safety regulations. The following information is provided for safety reasons and must therefore be read carefully. General safety • This appliance was designed for domestic use only.
Description of the machine GB CONTROL PANEL PORTHOLE DOOR PORTHOLE DOOR HANDLE KICK STRIP ADJUSTABLE FEET PORTHOLE DOOR A Always use the handle to open the porthole door (see figure). 1 210 180 150 120 90 60 B DETERGENT DISPENSER DRAWER The detergent dispenser drawer is located inside the machine and can be accessed by opening the door. For more information on detergent measures, please refer to the chapter entitled “Detergents and laundry”. 18 3 2 1. pre-wash compartment: use powder detergent.
Control panel GB ECO indicator light WASH CYCLE SELECTOR knob OPTION OPTION buttons with indicator lights buttons with indicator lights START/ PAUSE WASH CYCLE PHASE icons button with indicator light DISPLAY Button with ON/OFF indicator light TEMPERATURE DELAYED START button SPIN button Button with ON/OFF indicator light: press this briefly to switch the machine on or off. The green indicator light indicates that the machine is switched on.
Running a wash cycle GB WARNING: before you use the washing machine for the first time, run a wash cycle with detergent and no laundry, using the 90° cottons cycle without pre-wash. 1. SWITCH THE MACHINE ON. Press the button. All the indicator lights will illuminate for 1 second; the indicator light corresponding to the button will then remain lit in a fixed manner and the START/PAUSE indicator light will flash slowly. 2. LOAD THE LAUNDRY. Open the porthole door.
Wash cycles and options Bleach Total water lt Cycle duration Eco Cotton 60°C (1): heavily soiled whites and resistant colours. 60° 1200 - - 8 53 1,04 55 200’ Eco Cotton 40°C (2): lightly soiled whites and delicate colours.
Detergents and laundry GB Detergent The type and quantity of detergent required depend on the type of fabric you are washing (cotton, wool, silk, etc.), as well as its colour, the washing temperature, the level of soiling and the hardness of the water in the area. Measuring out the detergent carefully will avoid wastage and help to protect the environment: although they are biodegradable, detergents still contain ingredients which alter the balance of nature.
Trouble shooting Your washing machine could occasionally fail to work. Before contacting the Technical Assistance Centre (see “Assistance”), make sure that the problem cannot be solved easily using the following list. Problem: Possible causes / Solutions: The washing machine does not switch on. • The appliance is not plugged into the socket fully, or not enough to make contact. • There is no power in the house. The wash cycle does not start. • • • • The door is not closed properly.
Assistance 195133391.00 04/2015 - Xerox Fabriano GB Before calling for Assistance: • Check whether you can solve the problem by yourself (see “Trouble shooting”); • Restart the wash cycle to check whether the problem has been solved; • If it has not, contact the Authorised Technical Assistance Service. ! If the washing machine has been installed or used incorrectly, you will have to pay for the call-out service. ! Always request the assistance of authorised technicians.