Instruction booklet WASHING MACHINE Contents ES GB English,1 Espanol,13 PT Português,25 GB Installation, 2-3 Unpacking and levelling Connecting the cold water and electricity supplies Technical data Description of the machine, 4-5 GR NL ÅËËÇÍÉÊÁ,37 Nederlands,49 Control panel Running a wash cycle, 6 Programmes and options, 7 Table of Programmes Wash options Detergents and laundry, 8 AQUALTIS AQGF 129 Detergent Preparing the laundry Washing advice Load-balancing system Precautions and tips, 9
Installation GB Keep this instruction manual in a safe place for If positioned on a fitted carpet or a rug, adjust the Please read this instruction manual carefully it Connecting the cold water and electricity supplies future reference. If the appliance is sold, given away or moved, please ensure the manual remains with the machine so that the new owner may benefit from the advice contained within it.
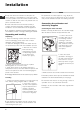
Do not use extension cables or multiple sockets. Drainage Connection 65 - 100 cm Connect the outlet hose to a draining duct or a stand pipe at a height between 65 and 100 cm from the floor. Do not bend it under any circumstances. GB The cable should not be bent or compressed. The cable should be replaced only by authorised technicians. Warning! The company shall not be held responsible for any incidents that occur if these regulations are not observed.
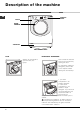
Description of the machine GB CONTROL PANEL DOOR DOOR HANDLE TOE-KICK ADJUSTABLE FEET DOOR DETERGENT DISPENSER: Always use the handle to open the door (see figure). 20 This is inside the machine and may be accessed by opening the door. For information relating to detergents, please refer to the chapter entitled Detergents and laundry. 1. pre-wash compartment: use powder detergent. 1 2. main wash compartment: use 2 powder or liquid detergent.
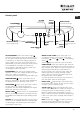
Control panel GB OPTION PROGRAMME knob ON-OFF/CANCEL button with indicator light WASH CYCLE PHASE buttons and indicator lights START/PAUSE button with indicator light icons TEMPERATURE DELAY TIMER button SPIN SPEED button ON-OFF/CANCEL button with indicator light : press the button briefly to switch the machine on or off. The green indicator light shows that the machine is switched on.
Running a wash cycle GB NOTE: the first time you use the washing machine, add detergent and run an empty 90°C cotton wash cycle without the pre-wash phase. 1. SWITCH ON THE MACHINE. Press the button. All the indicator lights will illuminate for 1 second, after which the light corresponding to the button will remain lit constantly, while the START/PAUSE indicator light will flash slowly. 2. LOAD THE LAUNDRY. Open the porthole door.
Programmes and options Table of Programmes Icon Maximum load (kg) Washing Fabric softener Normal Using Mini load 60° (Max 90°) 1200 l l 8 4 40° 1200 l l 8 4 40° 1200 l l 8 4 40° 800 l l 4 2 30° 800 l l 3.5 1.5 90° 1200 l l 8 4 60° 800 l l 4 2 SHIRTS 40° 600 l l 2 1 SILK: Washes silk and garments and lingerie. 30° 0 l l 2 1 WOOL: Washes wool, cashmere, etc. 40° 600 l l 2 1 DUVETS: Washes garments filled with goose down.
Detergents and laundry GB Detergent The type and quantity of detergent used depends on the type of fabric (cotton, wool, silk...), its colour, the temperature of the wash, the level of soiling and the hardness of the water in the area. Measuring out the detergent carefully will avoid accidental spills and help to protect the environment: although they may be biodegradable, detergents contain elements that alter the balance of nature.
Precautions and tips This machine was designed and manufactured in compliance with cuurent international safety standards. The following advice is provided for safety reasons and should be read carefully. Opening the door manually If it is not possible to open the porthole door due to a powercut and you wish to hang out the laundry, proceed as follows: General safety This appliance was designed for domestic use inside the home and is not intended for commercial or industrial use.
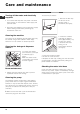
Care and maintenance GB Turning off the water and electricity supplies Turn off the water tap after every wash. This limits wear and tear on the machines water supply and prevents leaks. To access the pre-chamber: 1. Remove the kick strip on the front of the machine using a screwdriver (see figure); Disconnect the appliance from the electricity supply before cleaning it and before performing any maintenance work on it.
Troubleshooting From time to time your machine may not operate as it should. Before calling for Assistance (see Assistance), make sure that the problem cannot be resolved easily using the following list. GB Malfunction: Possible causes / Solutions: The washing machine will not switch on. The plug has not been inserted into the electrical socket, or it has not been inserted far enough to make contact. There is no power in the house. The wash cycle does not begin.
Assistance GB Before contacting Assistance: Check whether you can resolve the problem on your own (see Troubleshooting); Restart the programme to check whether the problem has been overcome; If this is not the case, contact the Authorised Technical Assistance Centre. If the machine has been installed or used incorrectly, you may be charged for the maintenance callout service. Never use the services of an unauthorised technician.
Manual de instrucciones LAVADORA Sumario ES Español ES Instalación, 14-15 Desembalaje y nivelación Conexiones hidráulicas y eléctricas Datos técnicos Descripción de la máquina, 16-17 Panel de control Cómo efectuar un ciclo de lavado, 18 Programas y opciones, 19 Tabla de Programas Opciones de lavado Detergentes y ropa, 20 AQUALTIS AQGF 129 Detergente Preparar la ropa Consejos sobre el lavado Sistema de equilibrado de la carga Precauciones y consejos, 21 Seguridad general Eliminaciones Apertura manua
Instalación ES Es importante conservar este manual para poder Cuando se instala sobre moquetas o alfombras, regule las patas para que, debajo de la lavadora, quede un espacio suficiente para la ventilación. Lea atentamente las instrucciones: contienen Conexiones hidráulicas y eléctricas consultarlo en cualquier momento. En el caso de venta, cesión o traslado, compruebe que permanezca junto con la lavadora. importante información sobre la instalación, el uso y la seguridad.
Conexión del tubo de descarga 65 - 100 cm Conecte el tubo de descarga a una tubería de descarga o a una descarga de pared ubicadas a una distancia del piso comprendida entre 65 y 100 cm. evitando siempre plegarlo. No utilice prolongaciones ni conexiones múltiples. ES El cable no debe estar plegado ni sufrir compresiones. El cable de alimentación y el enchufe deben ser sustituidos sólo por técnicos autorizados.
Descripción de la máquina ES PANEL DE CONTROL PUERTA TIRADOR DE LA PUERTA ZÓCALO PATAS REGULABLES PUERTA CONTENEDOR DE DETERGENTES Para abrir la puerta utilice siempre el tirador correspondiente (ver la figura). Se encuentra en el interior de la máquina y se accede a él abriendo la puerta. Para la dosificación de detergente, ver el capítulo Detergentes y ropa. 20 1 2 1. cubeta para el prelavado: utilice detergente en polvo. 2. cubeta para el lavado: utilice detergente en polvo o líquido.
Panel de control ES Botones y Pilotos de Mando de OPCIONES PROGRAMAS Botón con piloto ENCENDIDO/APAGADO y ANULACIÓN Botón de TEMPERATURA Botón de CENTRIFUGADO Botón con piloto ENCENDIDO/APAGADO y ANULACIÓN: presione brevemente el botón para encender o apagar la máquina. El piloto verde indica que la máquina está encendida. Para apagar la lavadora durante el lavado, es necesario mantener presionado el botón durante más tiempo, aproximadamente 2 seg.
Cómo realizar un ciclo de lavado ES NOTA: la primera vez que se utiliza la lavadora, realice un ciclo de lavado sin ropa pero con detergente, seleccionando el programa algodón 90º sin prelavado. 1. ENCENCER LA MÁQUINA. Presione el botón . Todos los pilotos se encenderán durante 1 segundo y luego permanecerá encendido de forma fija el piloto del botón , el piloto START/PAUSE centelleará lentamente. 2. CARGAR LA ROPA. Abra la puerta.
Programas y opciones Tabla de programas Icono Descripción del Programa ES Temp. máx. (°C) Detergentes Carga máx. (Kg) Velocidad máx. Con (r.p.m.) Lavado Suavizante Normal Mini carga Duración del ciclo Programas para todos los días BLANCOS ALGODÓN 1200 l l 8 4 40° 1200 l l 8 4 40° 1200 l l 8 4 40° 800 l l 4 2 30° 800 l l 3,5 1, 5 90° 1200 l l 8 4 60° 800 l l 4 2 CAMISAS 40° 600 l l 2 1 SEDA: Para prendas de seda, viscosa, lencería.
Detergentes y ropa ES Detergente El tipo y la cantidad de detergente dependen del tipo de tejido (algodón, lana, seda...), del color, de la temperatura de lavado, del grado de suciedad y de la dureza del agua. Dosificar bien el detergente evita derroches y protege el medio ambiente: aún siendo biodegradables, los detergentes contienen elementos que alteran el equilibrio de la naturaleza. Se aconseja: usar detergente en polvo para prendas de algodón blancas y para el prelavado.
Precauciones y consejos La máquina fue proyectada y fabricada en conformidad con las normas internacionales de seguridad. Estas advertencias se suministran por razones de seguridad y deben ser leídas atentamente. Apertura manual de la puerta Si desea sacar la ropa de la lavadora y no es posible abrir la puerta debido a un corte de energía eléctrica, proceda del siguiente modo: Seguridad general Este aparato ha sido fabricado para un uso de tipo doméstico exclusivamente.
Mantenimiento y cuidados ES Interrumpir el agua y la corriente eléctrica Cierre el grifo de agua después de cada lavado. De este modo se limita el desgaste de la instalación hidráulica de la máquina y se elimina el peligro de pérdidas. Para acceder a la precámara: 1. quite el panel de cobertura delantero de la máquina con la ayuda de un destornillador (ver la figura); Desenchufe la máquina cuando la debe limpiar y durante los trabajos de mantenimiento.
Anomalías y soluciones Puede suceder que la máquina no funcione. Antes de llamar al Servicio de Asistencia Técnica (ver Asistencia), compruebe que no se trate de un problema de fácil solución utilizando la siguiente lista. ES Anomalías: Posibles causas / Solución: La máquina no se enciende. El enchufe no está introducido (o no lo está suficientemente) en la toma de El ciclo de lavado no comienza. La puerta no está bien cerrada. El botón START/PAUSE no fue presionado.
Asistencia ES Antes de llamar al Servicio de Asistencia Técnica: Verifique si la anomalía la puede resolver Ud. solo (ver Anomalías y Soluciones); Vuelva a poner en marcha el programa para comprobar si el problema fue resuelto; Si no es así, llame al Servicio de Asistencia Técnica Autorizado. En el caso de una mala instalación o de un uso incorrecto, se le podrá solicitar el pago de la intervención. No recurra nunca a técnicos no autorizados.
Instruções para utilização MÁQUINA DE LAVAR ROUPA Sumário PT Português PT Instalação, 26-27 Desembalar e nivelar Ligações hidráulicas e eléctricas Dados técnicos Descrição da máquina, 28-29 Painel de comandos Como efectuar um ciclo de lavagem, 30 Programas e opções, 31 Tabela dos Programas Opções de Lavagem Detergentes e roupa, 32 AQUALTIS AQGF 129 Detergente Preparar a roupa Conselhos de lavagem Sistema de equelíbrio da carga Precauções e conselhos, 33 Segurança geral Eliminação Abertura manual da
Instalação PT É importante guardar este livro para poder consultá-lo a qualquer momento. Se a máquina for vendida, cedida ou transferida, certifique-se que este livro permaneça com a máquina. Se a máquina for posicionada sobre um tapete ou alcatifa, regule os pés de modo a que por baixo da máquina de lavar roupa haja espaço suficiente para a ventilação. Leia com atenção estas instruções: há importantes informações acerca da instalação, da utilização e da segurança.
Ligação do tubo de descarga 65 - 100 cm Ligue o tubo de descarga, sem dobrá-lo, a uma conduta de descarga ou a uma descarga na parede situada entre 65 e 100 cm. de altura do chão. Não empregue extensões nem fichas múltiplas. PT O cabo não deve ser dobrado nem apertado. O cabo de alimentação e a ficha devem ser substituídos somente por técnicos autorizados. Atenção! O fabricante declina toda a responsabilidade se estas regras não forem respeitadas.
Descrição da máquina PT PAINEL DE COMANDOS PORTA DE VIDRO PEGA DA PORTA DE VIDRO BASE PÉS REGULÁVEIS PORTA DE VIDRO GAVETA DOS DETERGENTES Para abrir a porta de vidro use sempre a sua pega (ver figura). Encontra-se no interior da máquina e para se ter acesso deve-se abrir a porta. Para a dosagem dos detergentes consulte o capítulo Detergentes e roupa. 20 1 2 1. recipiente para a prélavagem: use detergente em pó. 2. recipiente para a lavagem: use detergente em pó ou líquido.
Painel de comandos Selector de PROGRAMAS Botão com indicador luminoso LIGA DESLIGA e ANULAÇÃO PT Botões e Indicadores luminosos OPÇÕES Ícone FASES DE Botão com indicador luminoso START/ LAVAGEM PAUSE Botão Botão TEMPERATURA Botão CENTRIFUGAÇÃO Botão com indicador luminoso LIGA DESLIGA e ANULAÇÃO: carregue brevemente no botão para ligar ou desligar a máquina. O indicador luminoso verde indica que a máquina está ligada.
Como efectuar um ciclo de lavagem PT OBSERVAÇÃO: a primeira vez que utilizar a máquina de lavar roupa, efectue um ciclo de lavagem sem roupa mas com detergente, usando o programa algodão 90º sem pré-lavagem. 1. LIGAR A MÁQUINA. Carregar no botão . Todos os indicadores se acenderão por 1 segundo e logo em seguida permanecerá aceso o indicador do botão , o indicador luminoso START/PAUSE começará a piscar lentamente. 2. COLOCAR A ROUPA. Abrir a porta de vidro.
Programas e opções Tabela dos Programas Ícone Descrição do Programa Velocità Carga max. Detergentes Temp. max. (Kg) max. (rotações Com Duração ciclo Lava- Amacia(°C) por Normal Mini dor minuto) gem Carga Programas para todos os dias 1200 l l 8 4 40° 1200 l l 8 4 40° 1200 l l 8 4 40° 800 l l 4 2 30° 800 l l 3,5 1, 5 90° 1200 l l 8 4 60° 800 l l 4 2 CAMISAS 40° 600 l l 2 1 SEDA: Para roupas de seda, viscosa, lingerie.
Detergentes e roupa PT Detergente A escolha e a quantidade de detergente dependem do tipo de tecido (algodão, lã, seda...), da cor, da temperatura de lavagem, do grau de sujidade e da dureza da água. Uma correcta dosagem de detergente evita desperdícios e protege o meio ambiente: mesmo os detergentes biodegradáveis contêm componentes que alteram o equilíbrio da natureza. Aconselha-se: usar detergente em pó para as peças de algodão brancas e para a pré-lavagem.
Precauções e conselhos Esta máquina de lavar roupa foi projectada e fabricada em conformidade com os regulamentos internacionais de segurança. Estas advertências são fornecidas por razões de segurança e devem ser lidas com atenção. Abertura manual da porta de vidro Caso não seja possível abrir a porta de vidro por falta de energia eléctrica e queira pendurar a roupa lavada, proceda da seguinte maneira: Segurança geral Este aparelho foi projectado exclusivamente para um uso doméstico.
Manutenção e cuidados PT Interromper a alimentação de água e de corrente eléctrica Feche a torneira da água depois de cada lavagem. Desta maneira diminuiu-se o desgaste do sistema hidráulico da máquina de lavar roupa e elimina-se o risco de vazamento. Para obter acesso à pré-câmara: 1.
Anomalias e soluções Pode acontecer que a máquina não funcione. Antes de telefonar para a Assistência Técnica (veja Assistência), verifique se não se trata de um problema fácil de resolver com ajuda da seguinte lista. PT Anomalias: Possíveis causas / Solução: A máquina não liga. A ficha não está colocada na tomada eléctrica, ou não o suficiente para haver contacto. Em casa não há corrente. O ciclo de lavagem não inicia. A porta de vidro não está bem fechada.
Assistência PT Antes de contactar a Assistência Técnica: Verifique se consegue resolver a anomalia sozinho (veja Anomalias e soluções); Reinicie o programa para verificar se o inconveniente foi resolvido; Em caso negativo, contacte a Assistência Técnica autorizada. No caso de uma errada instalação ou de um uso não correcto, o pagamento do técnico poderia ficar por conta do cliente. Nunca recorra a técnicos não autorizados. Comunique: o tipo de anomalia; o modelo da máquina (Mod.
Ïäçãßåò ÷ñÞóçò ÐËÕÍÔÇÑÉÏ ÑÏÕ×ÙÍ Ðåñéå÷üìåíá GR ÅëëçíéêÜ GR ÅãêáôÜóôáóç, 38-39 Áðïóõóêåõáóßá êáé ïñéæïíôßùóç ÕäñáõëéêÝò êáé çëåêôñéêÝò óõíäÝóåéò Ôå÷íéêÜ óôïé÷åßá ÐåñéãñáöÞ ôçò ðëõíôÞñéï, 40-41 Ðßíáêáò åëÝã÷ïõ Ðùò äéåíåñãåßôáé Ýíáò êýêëïò ðëõóßìáôïò, 42 ÐñïãñÜììáôá êáé äõíáôüôçôåò, 43 Ðßíáêáò ÐñïãñáììÜôùí Äõíáôüôçôåò ðëõóßìáôïò ÁðïññõðáíôéêÜ êáé ìðïõãÜäá, 44 AQUALTIS AQGF 129 Áðïññõðáíôéêü Ðñïåôïéìáóßá ôçò ìðïõãÜäáò ÓõìâïõëÝò ðëõóßìáôïò Óýóôçìá éóïóôÜèìéóçò ôïõ öïñôßïõ ÐñïöõëÜîåéò êáé óõìâïõëÝò, 45 Ã
ÅãêáôÜóôáóç GR Åßíáé óçìáíôéêü íá äéáôçñÞóåôå ôï åã÷åéñßäéï áõôü ãéá Óå ðåñßðôùóç ìïêÝôáò Þ ôÜðçôá, ñõèìßóôå ôá ðïäáñÜêéá Ýôóé þóôå íá õößóôáôáé êÜôù áðü ôï ðëõíôÞñéï áñêåôüò ÷þñïò ãéá ôïí áåñéóìü. ÄéáâÜóôå ðñïóåêôéêÜ ôéò ïäçãßåò: õðÜñ÷ïõí ÕäñáõëéêÝò êáé çëåêôñéêÝò óõíäÝóåéò íá ìðïñåßôå íá ôï óõìâïõëåýåóôå ïðïéáäÞðïôå óôéãìÞ. Óå ðåñßðôùóç ðþëçóçò, ðáñá÷þñçóçò Þ ìåôáêüìéóçò, âåâáéùèåßôå üôé ðáñáìÝíåé ìáæß ìå ôï ðëõíôÞñéï. óçìáíôéêÝò ðëçñïöïñßåò ãéá ôçí åãêáôÜóôáóç, ôç ÷ñÞóç êáé ôçí áóöÜëåéá.
Óýíäåóç ôïõ óùëÞíá áäåéÜóìáôïò 65 - 100 cm ÓõíäÝóôå ôï óùëÞíá áäåéÜóìáôïò óå ìéá óùëÞíùóç áäåéÜóìáôïò Þ óå ìéá åðéôïß÷éá ðáñï÷Ýôåõóç óå ýøïò áðü ôï Ýäáöïò ìåôáîý 65 êáé 100 cm êáé áðïöåýãïíôáò ñçôÜ íá ôïí äéðëþóåôå. Ìç ÷ñçóéìïðïéåßôå ðñïåêôÜóåéò êáé ðïëýðñéæá. GR Ôï êáëþäéï äåí ðñÝðåé íá öÝñåé ðôõ÷Ýò Þ íá åßíáé óõìðéåóìÝíï. Ôï êáëþäéï ôñïöïäïóßáò êáé ôï âýóìá ðñÝðåé íá áíôéêáèßóôáíôáé ìüíï áðü åîïõóéïäïôçìÝíïõò ôå÷íéêïýò.
ÐåñéãñáöÞ ôçò ðëõíôÞñéï GR ÐÉÍÁÊÁÓ ÅËÅÃ×ÏÕ ÐÏÑÔÁ ËÁÂÇ ÐÏÑÔÁÓ ÐÅËÌÁ ÑÕÈÌÉÆÏÌÅÍÁ ÐÏÄÁÑÁÊÉÁ ÐÏÑÔÁ ÈÇÊÇ ÁÐÏÑÑÕÐÁÍÔÉÊÙÍ Ãéá íá áíïßîåôå ôçí ðüñôá ÷ñçóéìïðïéåßôå ðÜíôá ôç ó÷åôéêÞ ëáâÞ (âëÝðå åéêüíá). 20 Âñßóêåôáé óôï åóùôåñéêü ôçò ðëõíôÞñéï êáé Ý÷åôå ðñüóâáóç áíïßãïíôáò ôçí ðüñôá. Ãéá ôç äïóïëïãßá ôùí áðïññõðáíôéêþí âëÝðå ôï êåöÜëáéï ÁðïññõðáíôéêÜ êáé ìðïõãÜäá. 1. ëåêáíßôóá ãéá ôçí ðñüðëõóç: ÷ñçóéìïðïéåßôå áðïññõðáíôéêü óå óêüíç. 1 2.
Ðßíáêáò åëÝã÷ïõ ÅðéëïãÝáò ÐÑÏÃÑÁÌÌÁÔÙÍ Êïõìðß ìå åíäåéêôéêü öùôÜêé ÁÍÁÌÌÁ/ ÓÂÇÓÉÌÏ êáé ÁÊÕÑÙÓÇ ÊïõìðéÜ êáé ÅíäåéêôéêÝò Ëõ÷íßåò ÄÕÍÁÔÏÔÇÔÅÓ ÐëÞêôñï ÈÅÑÌÏÊÑÁÓÉÁ Êïõìðß ÓÔÕØÉÌÁÔÏÓ Êïõìðß ìå åíäåéêôéêü öùôÜêé ÁÍÁÌÌÁ ÓÂÇÓÉÌÏ êáé ÁÊÕÑÙÓÇ: ðéÝóôå óôéãìéáßá ôï êïõìðß ãéá íá áíÜøåé Þ íá óâÞóåé ç ðëõíôÞñéï. Ôï ðñÜóéíï åíäåéêôéêü öùôÜêé äåß÷íåé üôé ç ðëõíôÞñéï åßíáé áíáììÝíç. Ãéá íá óâÞóåôå ôï ðëõíôÞñéï êáôÜ ôï ðëýóéìï ðñÝðåé íá êñáôÜôåðáôçìÝíï ôï êïõìðß ðéï ðïëý, ðåñßðïõ 2 sec.
Ðùò äéåíåñãåßôáé Ýíáò êýêëïò ðëõóßìáôïò GR ÐÁÑÁÔÇÑÇÓÇ: ôçí ðñþôç öïñÜ ðïõ ÷ñçóéìïðïéåßôå ôï ðëõíôÞñéï, äéåíåñãÞóôå Ýíá êýêëï ðëõóßìáôïò ÷ùñßò ñïý÷á áëëÜ ìå áðïññõðáíôéêü, èÝôïíôáò ôï ðñüãñáììá âáìâáêåñþí 90° ÷ùñßò ðñüðëõóç. 1. ÁÍÁØÔÅ ÔÇ ÐËÕÍÔÇÑÉÏ. ÐáôÞóôå ôï êïõìðß . ¼ëá ôá åíäåéêôéêÜ öùôÜêéá èá áíÜøïõí ãéá 1 äåõôåñüëåðôï ìåôÜ ôï ïðïßï èá ðáñáìåßíåé áíáììÝíï óõíå÷þò ìüíï ôï åíäåéêôéêü öùôÜêé ôïõ êïõìðéïý , ôï åíäåéêôéêü öùôÜêé START/PAUSE èá áíáâïóâÞíåé áñãÜ.
ÐñïãñÜììáôá êáé äõíáôüôçôåò Ðßíáêáò ðñïãñáììÜôùí Åéê ï- Ð å ñ éãñ áöÞ ôïõ Ð ñ ïãñ Üììáôïò í ßäéï Ð ñïãñ Üììáôá ãéá üëå ò ôéò ìÝñ å ò  Á Ì Á KÅÑÁ Ë ÅÕ KÁ 60° (M ax 90°) 1200 l l 8 4 40° 1200 l l 8 4 40° 1200 l l 8 4 40° 800 l l 4 2 30° 800 l l 3,5 1, 5 90° 1200 l l 8 4 60° 800 l l 4 2 1 ÓÕ Í È ÅÔÉKÁ ÅÕ Á ÉÓÈ Ç ÔÁ M IX 30': Ãéá ôï ãñ Þãïñ ï ö ñ å óêÜ ñ éóìá ñ ïý÷ùí å ëá ö ñ Ü ëå ñ ùìÝíùí (äåí åí äå ßêíõôá é ãéá ìÜ ëëéíá , ìåôá îùôÜ êá é ñ ïý÷á ðïõ ðëÝíïíôá é óôï ÷
ÁðïññõðáíôéêÜ êáé ìðïõãÜäá GR Áðïññõðáíôéêü Ç åðéëïãÞ êáé ç ðïóüôçôá ôïõ áðïññõðáíôéêïý åîáñôþíôáé áðü ôïí ôýðï õöÜóìáôïò (âáìâáêåñÜ, ìÜëëéíá, ìåôáîùôÜ...), áðü ôï ÷ñþìá, áðü ôç èåñìïêñáóßá ðëõóßìáôïò, áðü ôï âáèìü âñùìéÜò êáé áðü ôçí óêëçñüôçôá ôïõ íåñïý. Ç êáëÞ äïóïëïãßá ôïõ áðïññõðáíôéêïý áðïóïâåß óðáôÜëåò êáé ðñïóôáôåýåé ôï ðåñéâÜëëïí: áí êáé âéïäéáóðþìåíá, ôá áðïññõðáíôéêÜ ðåñéÝ÷ïõí óôïé÷åßá ðïõ áëëïéþíïõí ôçí éóïññïðßá óôç öýóç.
ÐñïöõëÜîåéò êáé óõìâïõëÝò Ôï ðëõíôÞñéï ó÷åäéÜóôçêå êáé êáôáóêåõÜóôçêå óýìöùíá ìå ôïõò äéåèíåßò êáíüíåò áóöáëåßáò. ÁõôÝò ïé ðñïåéäïðïéÞóåéò ðáñÝ÷ïíôáé ãéá ëüãïõò áóöáëåßáò êáé ðñÝðåé íá äéáâÜæïíôáé ðñïóåêôéêÜ. ÃåíéêÞ áóöÜëåéá Ç óõóêåõÞ áõôÞ ó÷åäéÜóôçêå áðïêëåéóôéêÜ ãéá ïéêéáêÞ ÷ñÞóç. Ôï ðëõíôÞñéï ðñÝðåé íá ÷ñçóéìïðïéåßôáé ìüíï áðü åíÞëéêá Üôïìá êáé óýìöùíá ìå ôéò ïäçãßåò ðïõ áíáöÝñïíôáé óôï ðáñüí åã÷åéñßäéï. Ìçí áããßæåôå ôï ìç÷Üíçìá ìå ãõìíÜ ðüäéá Þ ìå ôá ÷Ýñéá Þ ôá ðüäéá âñåãìÝíá.
ÓõíôÞñçóç êáé öñïíôßäá GR Áðïêëåéóìüò íåñïý êáé çëåêôñéêïý ñåýìáôïò Êëåßóôå ôïí êñïõíü ôïõ íåñïý ìåôÜ áðü êÜèå ðëýóéìï. ¸ôóé ðåñéïñßæåôáé ç öèïñÜ ôçò õäñáõëéêÞò åãêáôÜóôáóçò ôïõ ðëõíôçñßïõ êáé áðïóïâåßôáé ï êßíäõíïò áðùëåéþí. ÂãÜëôå ôï âýóìá áðü ôï ñåýìá üôáí êáèáñßæåôå ôï ðëõíôÞñéï êáé êáôÜ ôéò åñãáóßåò óõíôÞñçóçò. Ãéá íá Ý÷åôå ðñüóâáóç óôïí ðñïèÜëáìï: 1.
Áíùìáëßåò êáé ëýóåéò Ìðïñåß íá óõìâåß ôï ðëõíôÞñéï íá ìç ëåéôïõñãåß. Ðñéí ôçëåöùíÞóåôå óôçí ÕðïóôÞñéîç (âëÝðå ÕðïóôÞñéîç), åëÝãîôå áí äåí ðñüêåéôáé ãéá ðñüâëçìá ðïõ åðéëýåôáé åýêïëá ìå ôç âïÞèåéá ôïõ áêüëïõèïõ êáôáëüãïõ. Áíùìáëßåò: ÄõíáôÜ áßôéá / Ëýóç: Ç ðëõíôÞñéï äåí áíÜâåé. Ôï âýóìá äåí Ý÷åé åéóá÷èåß óôçí çëåêôñéêÞ ðñßæá, Þ ôïõëÜ÷éóôïí ü÷é áñêåôÜ ãéá íá êÜíåé åðáöÞ. Óôï óðßôé äåí õðÜñ÷åé ñåýìá. Ï êýêëïò ðëõóßìáôïò äåí áñ÷ßæåé. Ç ðüñôá äåí åßíáé êáëÜ êëåéóìÝíç.
ÕðïóôÞñéîç GR Ðñéí åðéêïéíùíÞóåôå ìå ôçí ÕðïóôÞñéîç: ÅëÝãîôå áí ç áíùìáëßá ìðïñåß íá áíôéìåôùðéóôåß áõôüíïìá (âëÝðå «Áíùìáëßåò êáé Ëýóåéò»); ÅðáíåêêéíÞóôå ôï ðñüãñáììá ãéá íá åëÝãîåôå áí ôï ðñüâëçìá áíôéìåôùðßóôçêå; Óå áñíçôéêÞ ðåñßðôùóç, åðéêïéíùíÞóôå ìå ôçí ÅîïõóéïäïôçìÝíç Õðçñåóßá Ôå÷íéêÞò ÕðïóôÞñéîçò. Óå ðåñßðôùóç åóöáëìÝíçò åãêáôÜóôáóçò Þ ìç óùóôÞò ÷ñÞóçò ìðïñåß íá êëçèåßôå íá ðëçñþóåôå ôçí åðÝìâáóç. Ìçí êáôáöåýãåôå ðïôÝ óå ìç åîïõóéïäïôçìÝíïõò ôå÷íéêïýò.
Gebruiksaanwijzingen WASAUTOMAAT Inhoud NL Nederlands NL Installatie, 50-51 Uitpakken en waterpas zetten Hydraulische en elektrische aansluitingen Technische gegevens Beschrijving van de wasautomaat, 52-53 Bedieningspaneel Het uitvoeren van een wascyclus, 54 Programmas en opties, 55 Programmatabel Wasopties Wasmiddel en wasgoed, 56 AQUALTIS AQGF 129 Wasmiddel Voorbereiden van het wasgoed Wastips Balanceersysteem van de lading Voorzorgsmaatregelen en advies, 57 Algemene veiligheid Afvalverwijdering
Installatie NL Het is belangrijk dit boekje te bewaren, zodat u het op ieder gewenst moment kunt raadplegen. In het geval u de wasautomaat verkoopt of u verhuist, moet u de handleiding bij het apparaat bewaren. Lees de instructies aandachtig door: u vindt er belangrijke informatie betreffende installatie, gebruik en veiligheid. In de envelop vindt u samen met deze gebruiksaanwijzing, de garantie en instructies die nodig zijn voor de installatie.
Aansluiting van de afvoerbuis 65 - 100 cm Verbindt de afvoerbuis, zonder hem te buigen, aan een afvoerleiding of aan een afvoer in de muur tussen de 65 en 100 cm van de grond af. Gebruik geen verlengsnoeren of dubbelstekkers. NL Het snoer mag niet gebogen of samengedrukt worden. De voedingskabel en de stekker mogen alleen door een bevoegde installateur worden vervangen. Belangrijk! De fabrikant kan niet aansprakelijk worden gesteld wanneer deze normen niet worden nageleefd.
Beschrijving van de wasautomaat NL BEDIENINGSPANEEL DEUR WASAUTOMAAT HANDVAT DEUR WASAUTOMAAT PLINT STELVOETJES DEUR GEBLOKKEERD WASMIDDELBAKJE Om de deur van de wasautomaat te openen dient u altijd het speciale handvat te gebruiken (zie afbeelding). Bevindt zich aan de binnenkant van de automaat en verschijnt als u de deur opent. Voor de dosering van wasmiddelen zie het hoofdstuk Wasmiddelen en wasgoed. 20 1 2 1. bakje wasmiddel voorwas: voor waspoeder. 2.
Bedieningspaneel NL Toetsen en Controlelampjes OPTIES Knop WASPROGRAMMAS Toets met controlelampje AAN/UIT en ANNULEREN Toets Toets Symbolen WASFASES UITGESTELDE START TEMPERATUUR Toets CENTRIFUGE Toets met controlelampje AAN-/UIT en ANNULEREN: druk even op de toets om de wasautomaat aan of uit te zetten. Het groene controlelampje geeft aan dat de wasautomaat aanstaat. Om de wasautomaat tijdens de wascyclus uit te zetten moet u de toets langer, circa 2 sec.
Het uitvoeren van een wascyclus NL N.B.: voordat u de wasautomaat gaat gebruiken moet u hem met wasmiddel maar zonder wasgoed een wascyclus laten uitvoeren. Kies het programma van 90° zonder voorwas. De eigenschappen van de wascyclus wijzigen. 1. DE WASAUTOMAAT AANZETTEN. Druk op de toets . Alle controlelampjes gaan 1 seconde lang aan, waarna het controlelampje van de toets aanblijft; het controlelampje START/PAUSE zal langzaam gaan knipperen.
Programmas en opties Programmatabel Symbool Beschrijving van het Programma Maximale Wasmiddel Maximale snelheid Tijdsduur (toeren Wasverzac(°C) per Wassen hter minuut) Maximale lading (Kg) Normaal Programma's voor iedere dag Met mini lading 1200 l l 8 4 1200 l l 8 4 BONT KATOEN 40° 1200 l l 8 4 FIJN SYNTHETISCH MIX 30': Voor het snel opfrissen van niet zo vuil wasgoed (niet geschikt voor wol, zijde en handwas).
Wasmiddel en wasgoed NL Wasmiddel De keuze en de hoeveelheid wasmiddel hangen af van het type stof (katoen, wol, zijde ), van de kleur van het wasgoed, de wastemperatuur, de vuilgraad en de hardheid van het water. Een juiste dosering van het wasmiddel voorkomt verspillingen en beschermt het milieu: ook al zijn wasmiddelen biologisch afbreekbaar, toch bevatten ze elementen die het evenwicht in de natuur verstoren. We raden u aan: waspoeder te gebruiken voor de witte katoenen was en voor de voorwas.
Voorzorgsmaatregelen en advies Deze wasautomaat is ontworpen en uitgevoerd volgens de internationale veiligheidsnormen. Deze aanwijzingen zijn om veiligheidsredenen geschreven en moeten aandachtig worden doorgenomen. Handmatige opening van het deurtje Mocht er in het huis geen stroom aanwezig zijn en u wilt het deurtje openen om de was op te hangen, dan dient u het volgende te doen: Algemene veiligheid Dit apparaat is uitsluitend ontworpen voor huishoudelijk niet-professioneel gebruik.
Onderhoud en verzorging NL Afsluiten van water en stroom Sluit na iedere wasbeurt de kraan af. Hiermee beperkt u slijtage van de waterinstallatie van de wasautomaat alsmede lekkagegevaar. Sluit altijd eerst de stroom af voordat u de wasautomaat schoonmaakt en gedurende onderhoudswerkzaamheden. Toegang tot het voorvakje: 1.
Storingen en oplossingen Het kan gebeuren dat het apparaat niet werkt. Voor u contact opneemt met de Servicedienst (zie Service) moet u controleren of het niet een storing betreft die uzelf makkelijk kunt verhelpen met behulp van de volgende lijst. Storingen: Mogelijke oorzaken / Oplossing: De wasautomaat gaat niet aan. De stekker zit niet in het stopcontact of niet diep genoeg om contact te maken. Er is in het hele huis geen stroom. De wascyclus start niet. De deur is niet goed dicht.
Service 195070247.00 03/2008 - Xerox Business Services NL Voordat u Servicedienst inschakelt: Controleer eerst of u het probleem zelf kunt oplossen (zie Storingen en oplossingen); Start het programma opnieuw om te controleren of de storing is verholpen; Als dit niet het geval is, kunt u contact opnemen met de erkende Servicedienst. In het geval de automaat verkeerd is geïnstalleerd of u hem niet correct heeft gebruikt zal u gevraagd worden de reparatiekosten te betalen.